
目录导航
axiom介绍
Axiom 是一个动态基础架构框架,可有效处理多云环境,构建和部署专注于进攻和防御安全的可重复基础架构。
Axiom 的工作原理是将您选择的工具预安装到“基本映像”上,然后使用该映像部署新实例。从那里,您可以连接并立即访问许多对赏金猎人和渗透测试人员有关的工具。借助不可变基础设施的强大功能,其中大部分都是为您完成的,您只需启动 15 个盒子,执行分布式 nmap/ffuf/屏幕截图扫描,然后将它们关闭。
因为您可以非常轻松地创建许多一次性实例,允许您分发许多不同工具的扫描,包括 amass aquatone arjun Assetfinder dalfox dnsgen dnsx feroxbuster fff ffuf findomain gau gobuster gospider gowitness hakrawler httprobe httpx jaeles kiterunnter masscan massbudns pramtnu s3scanner shuffledns 和 subfinder。安装和设置后,您可以在几分钟内在 10 到 15 个实例中分发大量目标的扫描并极快地获得结果。这称为axiom-scan。
Axiom 支持多个云提供商,最终,axiom 应该完全与云无关,允许轻松统一控制各种不同的云环境。目前,DigitalOcean、IBM Cloud、Linode 和 Azure 是官方支持的提供商。Google Compute 已部分实施,AWS 在路线图上。如果您想对功能或提供程序实现进行优先级排序,请在 Twitter 上联系我 @pry0cc,我们可以讨论:)
支持的操作系统
| 操作系统 | 支持的 | 是否易于安装 | 已测试 |
|---|---|---|---|
| Ubuntu | 是的 | 是的 | Ubuntu 20.04 |
| kali | 是的 | 是的 | kali 2020.4 |
| Debian | 是的 | 是的 | Debian 10 |
| windows | 是的 | 是的 | WSL 与 Ubuntu |
| MacOS | 是的 | 是的 | macOS 11.4 |
| Arch Linux | 是的 | 不 | 是的 |
目前为止包含的安装包
 amass
 anew
 anti-burl
 aquatone
 assetfinder
 dalfox
 dirb
 dnsprobe
 dnsvalidator
 docker
 fbrobe
 feroxbuster
 ffuf
 gau
 getjs
 gf
 gobuster
 Golang (setup, path configured, latest version)
 gowitness
 hakrawler
 httprobe
 jq
 kxss
 masscan
 massdns
 metasploit
 mosh
 nmap
 oh-my-zsh
 openvpn
 Paramspider
 projectdiscovery chaos
 projectdiscovery chaos-client
 projectdiscovery httpx
 projectdiscovery naabu
 projectdiscovery nuclei
 projectdiscovery shuffledns
 proxychains w/ Tor setup
 SecLists
 sn0int
 SQLMap
 subfinder
 subgen
 subjack
 tmux
 urlprobe
 waybackurls
 zdns
 zmap
axiom安装方法
Docker安装
docker exec -it $(docker run -d -it ubuntu) sh -c "apt update && apt install git -y && git clone https://github.com/pry0cc/axiom ~/.axiom/ && cd && .axiom/interact/axiom-configure"详细安装介绍
要安装 axiom,您所要做的就是确保您拥有所有正确的依赖项,然后运行配置脚本。
依赖关系
- Digital Ocean API Key – (Personal Access Token) – https://cloud.digitalocean.com/account/api/tokens
- SSH Keypair (我建议使用没有密码短语的密钥以提高速度,即使仅用于 Axiom)
- git
- curl
- ruby
- jq – 1.6
- packer – v1.5.6测试通过
- doctl
- Interlace – https://github.com/codingo/Interlace
- rsync
- lsb_release – 1.4 测试通过(但任何版本都可以)
- fzf (如果你想要菜单)
安装完所有这些后,运行以下命令并输入您的 DigitalOcean API 密钥
linux安装
以标准用户而非 root 用户身份运行此命令
bash <(curl -s https://raw.githubusercontent.com/pry0cc/axiom/master/interact/axiom-configure)
手动安装
在大多数情况下,简单安装应该可以工作,但是,如果您确实想手动安装,本指南是您的朋友!
确保 ~/.axiom/ 不存在
rm -rf ~/.axiom/克隆 axiom 存储库
git clone https://github.com/pry0cc/axiom ~/.axiom/运行配置脚本
$HOME/.axiom/interact/axiom-configure故障排除
如果最近发生错误,请在报告问题之前成功运行 axiom-update。
如果即使完成了所有这些步骤,它仍然无法正常工作,请使用此清单:
- ~/.axiom/axiom.json 是否存在?是空的吗?
- 是否配置了 docl?运行
doctl compute instances list以进行测试,您可能需要运行doctl auth. - axiom在你的路径上吗?运行
echo $PATH,你$PATH应该包含~/.axiom/interact/,这是所有脚本的目录 - 你正确使用axiom吗?查看快速入门指南!
- git 是否抱怨更新时无法合并的文件?删除它抱怨的那些,然后再次运行更新。
- 你有错误
functions.sh吗?运行axiom-account-setup
更新后报错
.axiom/interact/axiom-ls: line 5: /home/pry/.axiom/interact/includes/functions.sh: No such file or directory
修复措施
运行 axiom-account 以查看您拥有哪些帐户配置文件
axiom-account然后运行 axiom-account <profile>
axiom-account personal更新时出错
$ axiom-update
remote: Enumerating objects: 10, done.
remote: Counting objects: 100% (10/10), done.
remote: Compressing objects: 100% (2/2), done.
Unpacking objects: 100% (6/6), 1012 bytes | 253.00 KiB/s, done.
remote: Total 6 (delta 3), reused 5 (delta 3), pack-reused 0
From github.com:pry0cc/axiom
   4c8e258..a2992f1  master     -> origin/master
Updating 4c8e258..a2992f1
error: Your local changes to the following files would be overwritten by merge:
	interact/includes/functions.sh
Please commit your changes or stash them before you merge.
Aborting
修复方法
rm ~/.axiom/interact/includes/functions.sh
axiom-account <profile>
常问问题
我无法登录我的 Droplets,我的权限被拒绝/密码错误?
您可能会发现 SSH 密钥配置不正确,请确保您~/.ssh/id_rsa在~/.ssh/id_rsa.pub. 您还需要~/.axiom/configs/authorized_keys包含您的 SSH 公钥。
## Press enter, do not set a password unless you want to be prompted for every connection.
ssh-keygen

## Copy your SSH pubkey into the authorized_keys file
cat ~/.ssh/id_rsa.pub > ~/.axiom/configs/authorized_keys

## Build a new axiom image (this will bake in your keys)
axiom-build
演示
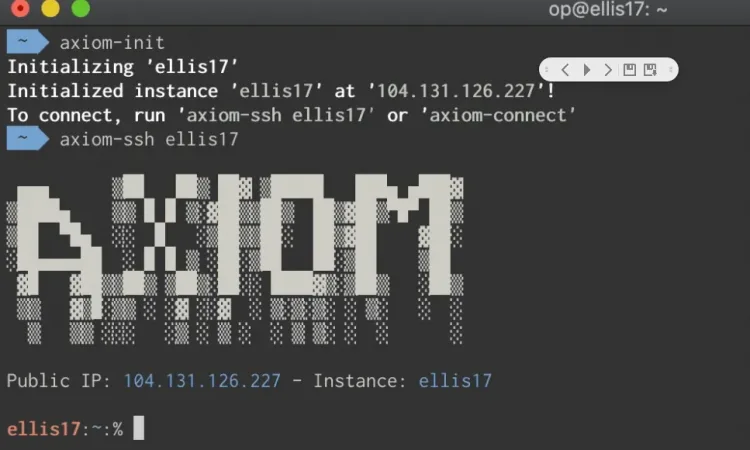
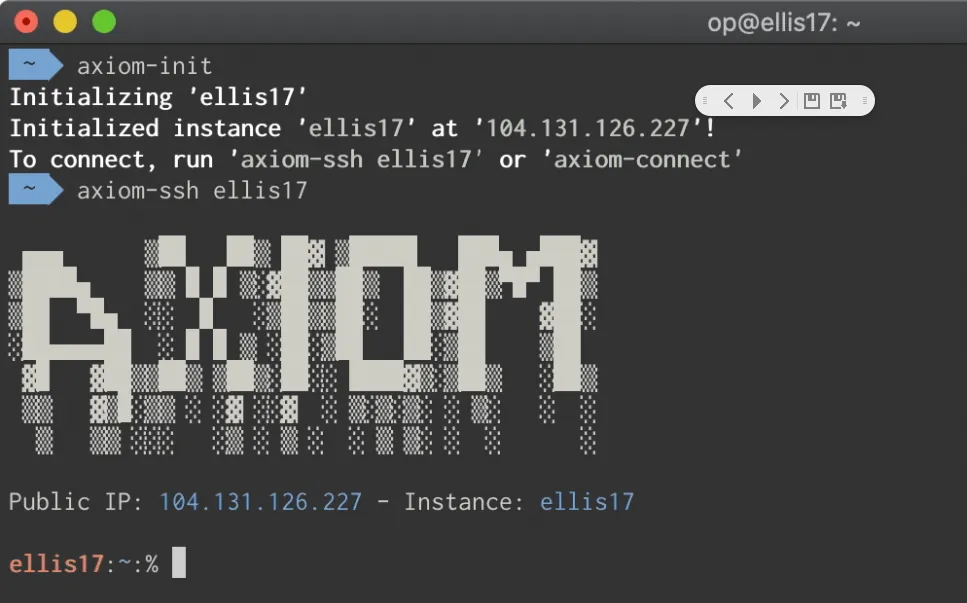
在这个演示中(为了尊重您的时间而加快速度;)),我们展示了初始化和 ssh 到一个新实例是多么容易。
axiom-scan – 执行分布式扫描的一些例子
注意:
对于最近发布的 axiom-scan v2,唯一的语法变化将是相应的输出模式 -oX 和 -oG,以及移除变量赋值的“=”。
v2 的新语法命令如下所示:
axiom-scan roots.txt -m subfinder -o subs.txt --threads 3
axiom-scan subs.txt -m dnsx -resp -o dns.txt

cat dns.txt | awk '{ print $2 }' | anew ips.txt

cat ips.txt | cf-check > ips.txt

axiom-scan ips.txt -m masscan -oX masscan.xml -rate=100000
axiom-scan ips.txt -m nmap -oG nmap.txt -T4 -p- -sV
axiom-scan ips.txt -m nmap -oX nmap.xml -T4 -p- -sV

ports.py nmap.xml | anew hosts.txt

axiom-scan hosts.txt -m httpx -o http.txt

axiom-scan http.txt -m gowitness -o screenshots
axiom-scan http.txt -m ffuf -o content.csv --threads 2
截至目前,以下模块如下:
amass.json   dnsgen.json  ffuf.json      gau.json     gowitness.json  masscan.json  meg.json    nmapx.json   shuffledns.json  subfinder.json
dalfox.json  dnsx.json    gospider.json  httpx.json   massdns.json    nmap.json     nuclei.json soxy.json    tlscout.json
要对 IP 地址列表执行简单的质量扫描,请运行:
axiom-scan ips.txt -p80,443你也可以设置一个输出文件:
axiom-scan ips.txt -m masscan -p80,443 -o masscan.txt提供给 axiom-scan 的任何参数都将自动传递给底层命令,例如:
axiom-scan ips.txt -m masscan -p80,443,8080 --rate=100000 --banners -o masscan-banners-fast.txt一旦您启动了一个舰队并选择了它(遵循舰队指南),您就可以使用 axiom-scan。axiom-scan是一种工具,可让您跨车队执行类似扫描的操作。它总是至少需要一个参数,这个参数应该是一个可以在本地目录中访问的输入文件,其中包含一个目标列表。
输入文件中的内容取决于您要运行的扫描类型。您可以使用不同的 axiom-scan 模块来修改扫描的行为,这些模块位于~/.axiom/modules/简单的 JSON 文件中,详细说明了您的扫描行为。
使用 Axiom 进行大规模扫描 – Stök
模块
您可以使用该-m module标志使用 axiom-scan 模块。让我们演示针对域列表运行 subfinder。
axiom-scan domains.txt -m subfinder -o subf.txt --threads 1假设您的域列表大于队列中的实例数,它将拆分域,无论您在一个队列中有多少个实例,如果您有 3 个实例,它将以 3 种方式拆分您的 infile 并将它们全部上传。
上传后,它将运行您的模块代码,下载输出,然后对输出进行排序并将其合并到单个输出文件中。整洁吧?
axiom-scan subsf.txt -m httpx -o http.txt使用上面的命令,我们可以对我们的子域运行 httpx,并获得 URL 列表,很好!
给定一些工作,上面的命令可以即时使用,也可以在更大的自动化脚本中使用,让您的大脑疯狂!
Axiom-scan 模块示例
示例可以在 ~/.axiom/modules/ 中读取
Nmap
[
	{
		"command":"nmap -T4 -iL input -oG output",
		"ext":"txt"
	},
	{
		"command":"nmap -T4 -iL input -oX output",
		"ext":"xml"
	}
]
分布式 Gowitness(输出是一个目录,因此是空扩展名)。
[{
	"command":"gowitness file -f input -P output",
	"ext":""
}]
Httpx
[{
	"command":"cat input | /home/op/go/bin/httpx -silent > output",
	"ext":"txt"
}]
带有 HTML 输出的 Nmap
axiom-scan 工具的一个有点酷的功能是输出设置为“-oX”的 nmap 模块(请参阅上面的示例),给定 IP 地址和范围列表,这将在您的队列中分发 nmap 并将结果输出到一个以引导程序为主题的 html 输出文件!这可以是一种非常漂亮且非常直观的方式来读取您的扫描结果,尤其是在许多主机上。
axiom-scan 100.txt -m nmap -T5 -sV -p80 -oX scan.xml这将对端口 80 执行分布式 nmap 服务扫描,并给我一个 HTML 输出来读取我的结果!
分布式ffuf
axiom-scan http.txt -m ffuf -o results.csv -threads 1

# -w specifies a custom wordlist to the absolute path on the axiom instance!
axiom-scan http.txt -m ffuf -w ~/lists/jhaddix-all.txt -o results.csv -threads 1
自定义密码字典
要指定当前位于 axiom 实例上的自定义词表,请使用-w带有 axiom-scan的标志。
axiom-scan http.txt -m ffuf -w /path/on/instance -o ffuf.csv
这需要是文件的绝对路径,并且该文件必须存在于实例中。
要在扫描开始时上传自定义本地文件,请使用该-wL标志。
axiom-scan domains.txt -m shuffledns -wL ~/path/to/local/wordlist.txt -o shuffle.txt
axiom-scan http.txt -m ffuf -wL ~/path/to/local/wordlist.txt -o ffuf.csv
axiom-scan http.txt -m nuclei -wL ~/path/to/local/template.yml -o nuclei.txt