
目录导航
BBOT简介
BBOT是一个用 Python 编写的递归模块化OSINT 框架。
它能够在单个命令中执行整个 OSINT 进程,包括子域枚举、端口扫描、网页截图(及其gowitness模块)、漏洞扫描(带有nuclei)等等。
BBOT 目前有超过50 个模块并且还在增加。
安装
pipx install bbot
先决条件:
- 必须安装 Python 3.9 或更新版本
pipx推荐作为替代方案,因为pip它在自己的 Python 环境中安装了 BBOT。
故障排除:
Fatal error from pip prevented installation.ERROR: No matching distribution found for bbotbash: /home/user/.local/bin/bbot: /home/user/.local/pipx/venvs/bbot/bin/python: bad interpreter
如果您遇到与上述任何类似的错误,您需要执行以下操作:
# 安装更新版本的python
sudo apt install python3.9 python3.9-venv
# 安装pipx
python3.9 -m pip install --user pipx
# 为pipx添加路径
python3.9 -m pipx ensurepath
# 重启
reboot
# 安装bbot
python3.9 -m pipx install bbot
# 运行bbot
bbot --help
# 如果这行不通,你可能要回家重新考虑你的生活了。
使用 BBOT 扫描

例子
#列出模块
bbot -l

#子域名枚举
bbot --flags subdomain-enum --targets evilcorp.com

#只进行被动扫描
bbot --flags passive --targets evilcorp.com

#使用gowitness进行网页截图
bbot --modules naabu httpx gowitness --name my_scan --output-dir . --targets evilcorp.com 1.2.3.4/28 4.3.2.1 targets.txt

#Web spider(搜索电子邮件等)
bbot -m httpx -c web_spider_distance=2 -t www.evilcorp.com
提示
运行 BBOT 扫描就像指定目标和模块列表一样简单。
但是,有一个模块特别重要,那就是httpx. BBOT 的httpx模块是其 Web 能力的核心,并被其他模块大量使用。httpx负责访问网页并验证 URLS 的有效性。因此,如果您想运行任何与 Web 相关的模块,例如wappalyzer、gowitness、nuclei等,您也需要启用httpx。
httpx特别强大,因为它使其他 BBOT 模块(如excavate)能够被动地解析网页以获取明文密码、电子邮件、子域等好东西。
使用 BBOT 作为 Python 库
from bbot.scanner import Scanner

#这将在第一次运行时提示输入sudo密码
# 如果愿意,也可以导出BBOT_SUDO_PASS
scan = Scanner("evilcorp.com", "1.2.3.0/24", modules=["naabu"], output_modules=["http"])

len(scan.target) # --> 257
"1.2.3.4" in scan.target # --> True
"4.3.2.1" in scan.target # --> False
"www.evilcorp.com" in scan.target # --> True

scan.start()
输出
BBOT 默认输出到 STDOUT,但可以同时输出多种格式(带--output-module)。
# tee to a file
bbot -f subdomain-enum -t evilcorp.com | tee evilcorp.txt

#输出为JSON
bbot --output-module json -f subdomain-enum -t evilcorp.com | jq

# 在当前的目录中输出为CSV, TXT和JSON
bbot -o . --output-module human csv json -f subdomain-enum -t evilcorp.com
对于每一次扫描,BBOT 都会生成一个独特而有趣的名称,例如fuzzy_gandalf. 该扫描的输出,包括词云和任何 gowitness 屏幕截图等,都保存到~/.bbot/scans. 保留最近的 20 次扫描,并删除较旧的扫描。您可以使用 更改 BBOT 输出的位置,--output也可以使用 选择自定义扫描名称--name。
如果您重复使用扫描名称,它将附加到其原始输出文件并利用之前的词云。
Neo4j
Neo4j 是查看 BBOT 数据并与之交互的最有趣(也是最漂亮)的方式。
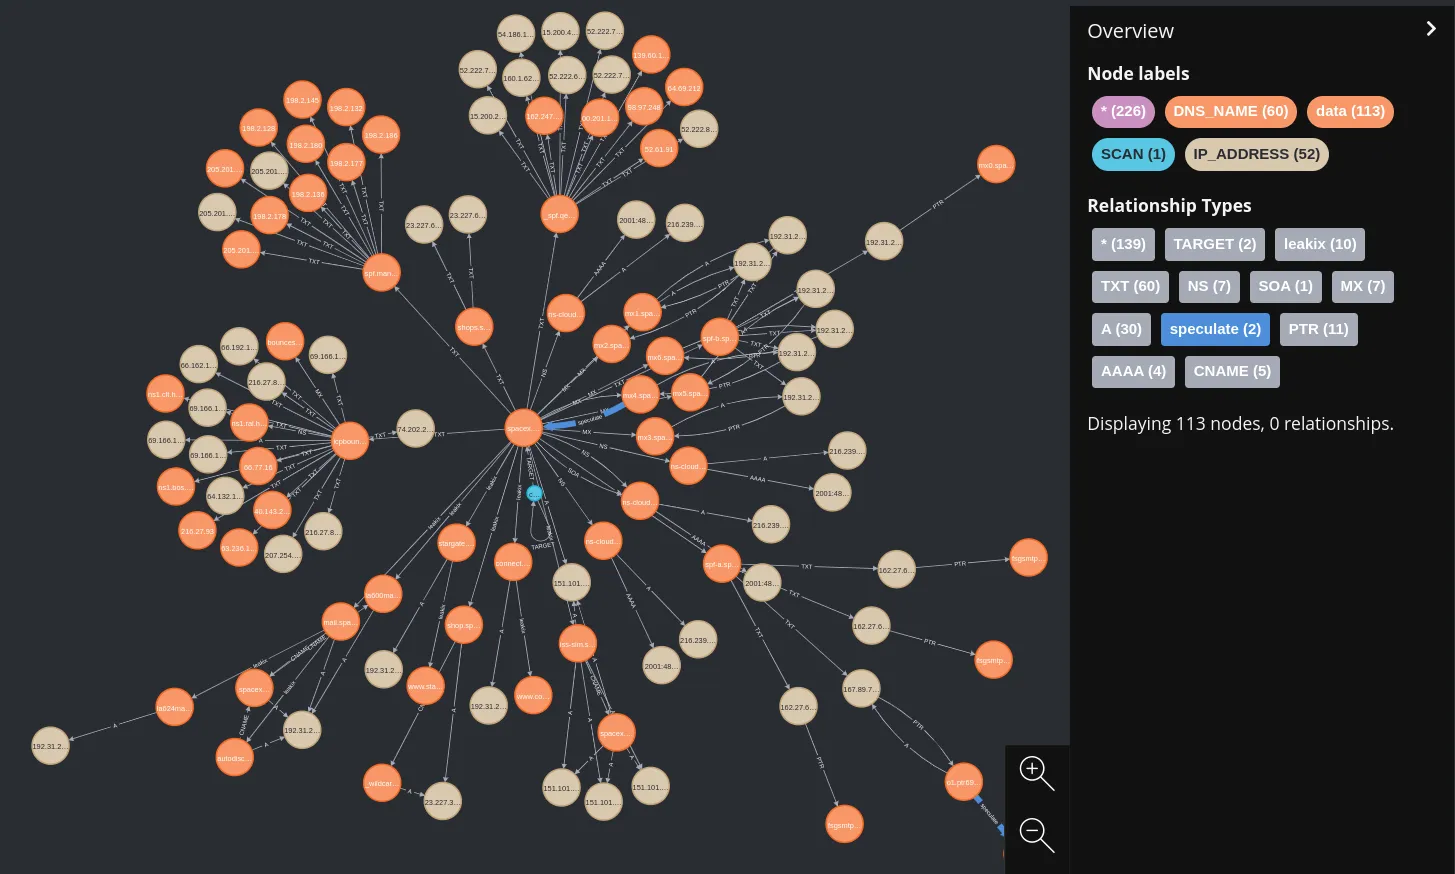
- 您可以使用单个 docker 命令启动并运行 Neo4j:
docker run -p 7687:7687 -p 7474:7474 --env NEO4J_AUTH=neo4j/bbotislife neo4j
- 之后,运行 bbot
--output-modules neo4j
bbot -f subdomain-enum -t evilcorp.com --output-modules human neo4j
模块
| 模块 | 需要 API 密钥 | 描述 | Flags | 产生的事件 |
| aspnet_viewstate | | 解析网页的视图状态并对照 blacklist3r 检查它们 | active,safe,web | VULNERABILITY |
| bypass403 | | 检查 403 页面的常见绕过 | active,aggressive,web | FINDING |
| cookie_brute | | 检查常见的 HTTP cookie 参数 | active,aggressive,brute-force,slow,web | FINDING |
| dnszonetransfer | | 尝试 DNS 区域传输 | active,safe,subdomain-enum | DNS_NAME |
| ffuf | | 用 Go 编写的快速网络模糊器 | active,aggressive,brute-force,deadly,web | URL |
| ffuf_shortnames | | 在组合 IIS 短名称中使用 ffuf | active,aggressive,brute-force,web | URL |
| generic_ssrf | | 检查通用 SSRF | active,aggressive,web | VULNERABILITY |
| getparam_brute | | 检查常见的 HTTP GET 参数 | active,aggressive,brute-force,slow,web | FINDING |
| gowitness | | 截取网页截图 | active,safe,web | SCREENSHOT |
| header_brute | | 检查常见的 HTTP 标头参数 | active,aggressive,brute-force,slow,web | FINDING |
| host_header | | 尝试常见的 HTTP 主机头欺骗技术 | active,aggressive,web | FINDING |
| httpx | | 访问网页。许多其他模块依赖于httpx | active,safe,web | HTTP_RESPONSE,URL |
| hunt | | 注意通常可利用的 HTTP 参数 | active,safe,web | FINDING |
| iis_shortnames | | 检查 IIS 短名称漏洞 | active,safe | URL_HINT |
| naabu | | 使用 naabu 执行端口扫描 | active,aggressive,portscan | OPEN_TCP_PORT |
| ntlm | | 注意支持 NTLM 身份验证的 HTTP 端点 | active,safe,web | DNS_NAME,FINDING |
| nuclei | | 快速且可定制的漏洞扫描程序 | active,aggressive,deadly,web | VULNERABILITY |
| smuggler | | 检查 HTTP 走私 | active,aggressive,brute-force,slow,web | FINDING |
| sslcert | | 访问开放端口并检索 SSL 证书 | active,email-enum,safe,subdomain-enum | DNS_NAME,EMAIL_ADDRESS |
| telerik | | 扫描关键 Telerik 漏洞 | active,aggressive,web | FINDING,VULNERABILITY |
| vhost | | 虚拟主机的模糊测试 | active,aggressive,brute-force,deadly,slow,web | DNS_NAME,VHOST |
| wappalyzer | | 从网络响应中提取技术 | active,safe,web | TECHNOLOGY |
| affiliates | | 在扫描结束时总结附属域 | passive,report,safe | |
| asn | | 在 bgpview.io 中查询 ASN | passive,report,safe,subdomain-enum | ASN |
| azure_tenant | | 在 Azure 中查询租户姐妹域 | passive,safe,subdomain-enum | DNS_NAME |
| binaryedge | X | 查询 BinaryEdge API | passive,safe,subdomain-enum | DNS_NAME,EMAIL_ADDRESS,IP_ADDRESS,OPEN_PORT,PROTOCOL |
| c99 | X | 查询子域的 C99 API | passive,safe,subdomain-enum | DNS_NAME |
| censys | X | 查询 Censys API | email-enum,passive,safe,subdomain-enum | DNS_NAME,EMAIL_ADDRESS,IP_ADDRESS,OPEN_PORT,PROTOCOL |
| certspotter | | 查询 Certspotter 的子域 API | passive,safe,subdomain-enum | DNS_NAME |
| crobat | | 查询子域的 Project Crobat | passive,safe,subdomain-enum | DNS_NAME |
| crt | | 查询子域的 crt.sh(证书透明度) | passive,safe,subdomain-enum | DNS_NAME |
| dnscommonsrv | | 检查常见的 SRV 记录 | passive,safe,subdomain-enum | DNS_NAME |
| dnsdumpster | | 查询子域的 dnsdumpster | passive,safe,subdomain-enum | DNS_NAME |
| emailformat | | 在 email-format.com 中查询电子邮件地址 | email-enum,passive,safe | EMAIL_ADDRESS |
| github | X | 查询 Github 的 API 获取相关仓库 | passive,safe,subdomain-enum | URL_UNVERIFIED |
| hackertarget | | 查询hackertarget.com API 的子域 | passive,safe,subdomain-enum | DNS_NAME |
| hunterio | X | 在hunter.io 中查询电子邮件 | email-enum,passive,safe,subdomain-enum | DNS_NAME,EMAIL_ADDRESS,URL_UNVERIFIED |
| ipneighbor | | 查看周围子网中的 IP | aggressive,passive,subdomain-enum | IP_ADDRESS |
| leakix | | 在leakix.net 中查询子域 | passive,safe,subdomain-enum | DNS_NAME |
| massdns | | 使用 massdns 的子域爆破(高效) | aggressive,brute-force,passive,slow,subdomain-enum | DNS_NAME |
| passivetotal | X | 查询子域的 PassiveTotal API | passive,safe,subdomain-enum | DNS_NAME |
| pgp | | 查询常用 PGP 服务器的电子邮件地址 | email-enum,passive,safe | EMAIL_ADDRESS |
| securitytrails | X | 查询子域的 SecurityTrails API | passive,safe,subdomain-enum | DNS_NAME |
| shodan_dns | X | 查询 Shodan 的子域 | passive,safe,subdomain-enum | DNS_NAME |
| skymem | | 在 skymem.info 中查询电子邮件地址 | email-enum,passive,safe | EMAIL_ADDRESS |
| sublist3r | | 查询 sublist3r 的子域 API | passive,safe,subdomain-enum | DNS_NAME |
| threatminer | | 查询threatminer的子域API | passive,safe,subdomain-enum | DNS_NAME |
| urlscan | | 查询 urlscan.io 的子域 | passive,safe,subdomain-enum | DNS_NAME,URL_UNVERIFIED |
| viewdns | | 查询viewdns.info的相关域名的反向whois | passive,safe,subdomain-enum | DNS_NAME |
| wayback | | 查询archive.org 的子域API | passive,safe,subdomain-enum | DNS_NAME,URL_UNVERIFIED |
| zoomeye | X | 查询 ZoomEye 的子域 API | passive,safe,subdomain-enum | DNS_NAME |
用法
$ bbot --help
用法: bbot [-h] [-t TARGET [目标 ...]] [-w WHITELIST [白名单 ...]] [-b BLACKLIST [黑名单 ...]] [-s] [-n 扫描的名字] [-m MODULE [模块 ...]] [-l] [-em MODULE [MODULE ...]] [-f FLAG [FLAG ...]]
            [-rf FLAG [FLAG ...]] [-ef FLAG [FLAG ...]] [-om MODULE [MODULE ...]] [-o DIR] [-c [CONFIG ...]] [--allow-deadly] [-v] [-d] [--force] [-y] [--dry-run] [--current-config] [--save-wordcloud FILE]
            [--load-wordcloud FILE] [--no-deps | --force-deps | --retry-deps | --ignore-failed-deps] [-a]

大型BLS OSINT工具

选项:
  -h, --help           显示帮助信息并退出
  -n SCAN_NAME, --name SCAN_NAME
                        扫描名称(默认:random)
  -m MODULE [MODULE ...], --modules MODULE [MODULE ...]
                        要启用的模块. 可选: affiliates,asn,aspnet_viewstate,azure_tenant,binaryedge,blind_ssrf,bypass403,c99,censys,certspotter,cookie_brute,crobat,crt,dnscommonsrv,dnsdumpster,dnszonetransfer,emailformat,ffuf,ffuf_shortnames,generic_ssrf,getparam_brute,github,gowitness,hackertarget,header_brute,host_header,httpx,hunt,hunterio,iis_shortnames,ipneighbor,leakix,massdns,naabu,ntlm,nuclei,passivetotal,pgp,securitytrails,shodan_dns,skymem,smuggler,sslcert,sublist3r,telerik,threatminer,urlscan,viewdns,wappalyzer,wayback,zoomeye
  -l, --list-modules    列出可用的模块列表
  -em MODULE [MODULE ...], --exclude-modules MODULE [MODULE ...]
                        排除这些模块。
  -f FLAG [FLAG ...], --flags FLAG [FLAG ...]
                        通过falg启用模块。 可选: active,aggressive,brute-force,deadly,passive,portscan,report,safe,slow,subdomain-enum,web
  -rf FLAG [FLAG ...], --require-flags FLAG [FLAG ...]
                        禁用没有这些标志的模块(例如--require-flags passive)
  -ef FLAG [FLAG ...], --exclude-flags FLAG [FLAG ...]
                        禁用带有这些标志的模块。(例如:--exclude-flags brute-force)
  -om MODULE [MODULE ...], --output-modules MODULE [MODULE ...]
                        输出模块(s)。选择: csv,http,human,json,neo4j,websocket
  -o DIR, --output-dir DIR
  -c [CONFIG ...], --config [CONFIG ...]
                        自定义配置文件,或key=value格式的配置选项: 'modules.shodan.api_key=1234'
  --allow-deadly        启用标记为的运行模块 "deadly"
  -v, --verbose         更详细的
  -d, --debug           调试模式
  --force               即使模块设置失败,也要运行scan
  -y, --yes             跳过扫描确认提示
  --dry-run             执行扫描前终止
  --current-config      以YAML格式显示当前配置

Target:
  -t TARGET [TARGET ...], --targets TARGET [TARGET ...]
                        以种子扫描为目标
  -w WHITELIST [WHITELIST ...], --whitelist WHITELIST [WHITELIST ...]
                        什么被认为是范围内的(默认情况下与--targets相同)
  -b BLACKLIST [BLACKLIST ...], --blacklist BLACKLIST [BLACKLIST ...]
                        不要碰这些东西
  -s, --strict-scope    不要认为目标/白名单的子域名在范围内

Word cloud:
  保存/加载扫描期间收集的常用单词列表

  --save-wordcloud FILE
                        扫描完成后输出wordcloud到自定义文件
  --load-wordcloud FILE
                        从自定义文件加载wordcloud

模块依赖关系:
  控制模块如何安装它们的依赖项

  --no-deps             不要安装模块依赖项
  --force-deps          强制安装所有模块依赖项
  --retry-deps          请再次尝试安装失败的模块依赖项
  --ignore-failed-deps  运行模块,即使它们有失败的依赖项

代理:
  向中心服务器发回报告

  -a, --agent-mode      以代理模式启动
BBOT 配置
BBOT 按以下顺序从这些位置加载其配置:
~/.config/bbot/defaults.yml~/.config/bbot/bbot.yml<– 将这个用于其他所有内容~/.config/bbot/secrets.yml<– 将此用于 API 密钥和东西- 命令行(通过
--config)
命令行参数优先于所有其他参数。你可以给 BBOT 一个自定义配置文件--config myconf.yml,或者像这样的单个参数:--config http_proxy=http://127.0.0.1:8080 modules.shodan_dns.api_key=1234. 要显示完整和当前的 BBOT 配置,包括任何命令行参数,请使用bbot --current-config.
###基本选项###

# BBOT工作目录
home: ~/.bbot
# 离主搜索范围还有多远
scope_search_distance: 1
# 不要输出距离主作用域更远的事件
scope_report_distance: 1
#解析DNS名称/ ip的主要作用域距离
scope_dns_search_distance: 2
#限制BBOT线程的数量
max_threads: 20
#限制DNS线程数
max_dns_threads: 100
#限制一次可以运行的暴力模块的数量
max_brute_forcers: 2


###高级选项###

#从其他事件中推断某些事件,例如从IP范围中推断IP地址,从url中推断DNS_NAMEs,等等。
speculate: True
#被动地搜索url、主机名、电子邮件等事件数据。
excavate: True
#在扫描结束时总结活动
aggregate: True
#HTTP代理
http_proxy:
#HTTP超时(用于Python请求;API调用,等等)。
http_timeout: 30
#HTTP超时(针对httpx)
httpx_timeout: 5
#启用/禁用web请求/响应的调试消息
http_debug: false
#设置一行中可以跟随的HTTP链接的最大数量(0 ==不允许爬行)
web_spider_distance: 0
#设置web爬虫的最大目录深度
web_spider_depth: 1
#通过DNS解析生成新的DNS_NAME和IP_ADDRESS事件
dns_resolution: true
#DNS查询超时时间
dns_timeout: 10
#禁用BBOT对选定域的智能DNS通配符处理
dns_wildcard_ignore: []
#在验证通配符DNS时要进行多少完整性检查
#如果BBOT的通配符检测不起作用,请增加此值
dns_wildcard_tests: 5
#在遇到这么多DNS请求后,跳过对某个域和rdtype的DNS请求
timeouts or SERVFAILs
#这样可以避免出现故障的DNS服务器挂起扫描
dns_abort_threshold: 10
#开启/关闭对包含IP地址的PTR记录的过滤
dns_filter_ptrs: true
#打开/关闭dns查询的调试消息
dns_debug: false
#是否校验SSL证书
ssl_verify: false
#在清除旧的扫描结果之前要保留多少扫描结果
keep_scans: 20
#Web user-agent
user_agent: Mozilla/5.0 (Windows NT 10.0; Win64; x64) AppleWebKit/537.36 (KHTML, like Gecko) Chrome/103.0.0.0 Safari/537.36
#完全忽略带有这些扩展的url
url_extension_blacklist:
    # images
    - png
    - jpg
    - bmp
    - ico
    - jpeg
    - gif
    - svg
    # web/fonts
    - css
    - woff
    - woff2
    - ttf
    # audio
    - mp3
    - m4a
    - wav
    - flac
    # video
    - mp4
    - mkv
    - avi
    - wmv
    - mov
    - flv
    - webm
#只将带有这些扩展的url分发给httpx(输出中省略了这些扩展)
url_extension_httpx_only:
    - js
#不要输出这些类型的事件(它们仍然分发给模块)
omit_event_types:
    - HTTP_RESPONSE
    - URL_UNVERIFIED
#BBOT服务器URL
agent_url: ''
#Agent承载认证令牌
agent_token: ''

#自定义交互服务器设置
interactsh_server: null
interactsh_token: null
interactsh_disable: false
在 BBOT 上开发
安装
克隆 BBOT 并使用 Poetry 搭建开发环境:
git clone git@github.com:blacklanternsecurity/bbot.git && cd bbot

pip install poetry
poetry shell
poetry install

bbot --help
编写模块
编写模块很容易,只需要对 Python 有基本的了解。它由几个步骤组成:
- 在中创建一个新
.py文件bbot/modules - 在文件顶部,导入
BaseModule - 声明一个继承自的类
BaseModule- 该类必须与您的文件同名(不区分大小写)
- 定义(通过
watched_events和produced_events)你的模块使用什么类型的事件 - 定义(通过)您的
flags模块是activepassive - 覆盖
.handle_event()- 这是您放置自定义代码的地方
下面是一个工作模块 ( bbot/modules/mymodule.py) 的简单示例:
from bbot.modules.base import BaseModule

class MyModule(BaseModule):
    """
    Reverse-resolve DNS_NAMEs
    """
    watched_events = ["DNS_NAME"]
    produced_events = ["IP_ADDRESS"]
    flags = ["passive"]

    def handle_event(self, event):
        for ip in self.helpers.resolve(event.data):
            self.emit_event(ip, "IP_ADDRESS", source=event)
功能:依赖处理
BBOT 使用Ansible自动化模块依赖。如果您的模块有外部依赖项(包括 pip 依赖项),您可以在deps_*模块的属性中指定它们。
class MyModule(BaseModule):
    ...
    deps_pip = ["beautifulsoup4"]
    deps_apt = ["chromium-browser"]
    deps_ansible = [
        {
            "name": "Download massdns source code",
            "git": {
                "repo": "https://github.com/blechschmidt/massdns.git",
                "dest": "{BBOT_TEMP}/massdns",
                "single_branch": True,
                "version": "master",
            },
        },
        {
            "name": "Build massdns",
            "command": {"chdir": "{BBOT_TEMP}/massdns", "cmd": "make", "creates": "{BBOT_TEMP}/massdns/bin/massdns"},
        },
        {
            "name": "Install massdns",
            "copy": {"src": "{BBOT_TEMP}/massdns/bin/massdns", "dest": "{BBOT_TOOLS}/", "mode": "u+x,g+x,o+x"},
        },
    ]
模块助手
模块可以轻松访问扫描信息(通过self.scan)和辅助功能(通过self.helpers):
# Access scan target:
if event in self.scan.target:
    self.info(f"{event} is part of target!")

# Use a helper function
if not self.helpers.is_domain(event.data):
    self.warning(f"{event} is not a domain.")

# Access module config
if not self.config.api_key:
    self.error(f"No API key specified for module {self.name}!")

# Make a DNS query
mx_records = self.helpers.resolve("evilcorp.com", type="mx")

# Make a web request
response = self.helpers.request("https://evilcorp.com")

# Download a file
filename = self.helpers.download("https://example.com/test.pdf", cache_hrs=720)

# Download a wordlist
filename = self.helpers.wordlist("https://example.com/wordlist.txt", lines=1000)
filename = self.helpers.wordlist("/tmp/wordlist.txt", lines=1000)

# Reverse resolve IP
ptrs = self.helpers.resolve("8.8.8.8")

# Execute a shell command
process = self.helpers.run(["ls", "-lah"])
log.info(process.stdout)

# Use the shared thread pool
# limit threads by setting self.config.max_threads
futures = {}
for url in urls:
    future = self.submit_task(self.helpers.request, url)
    futures[future] = url

for future in self.helpers.as_completed(futures):
    url = futures[future]
    response = future.result()
    if getattr(response, "status_code", 0) == 200:
        log.success(f"Found URL: {url}")

# Access the global word cloud
# The word cloud contains commonly-encountered words from the scan
# These words come from dns names, etc., and you can use them for
# smart brute-forcing of subdomains, vhosts, storage buckets, etc.
self.helpers.word_cloud
# {"www": 1, black": 3, "lantern": 1, "security": 1, ...}
self.helpers.word_cloud.modifiers()
# {"1", "2", "3", "dev", "api", "test", "qa", ...}
self.helpers.word_cloud.mutations("www")
"""
[
    ("www", "dev"),
    ("dev", "www"),
    ("www", "api"),
    ("api", "www"),
    ("www", "1"),
    ("1", "www")
]
"""
运行测试
# run tests
bbot/test/run_tests.sh

# re-run a specific test
pytest --disable-warnings --log-cli-level=ERROR -k test_modules

# format with black
black .
添加依赖项
1. poetry add <package>BBOT源码下载地址:
yunzhongzhuan.com/#sharefile=v2hm8UvZ_75401
解压密码:www.ddosi.org
项目地址:
github:
https://github.com/blacklanternsecurity/bbot
转载请注明出处及链接