
目录导航
Osmedeus 简介
Osmedeus是用于进攻性安全的工作流引擎。它旨在建立具有能力和灵活性的基础,使您能够对大量目标自动执行侦察。
特征
?显著加快侦察过程
✅易于组织和优化结果
✅易于自定义工作流程
✅易于与新工具集成
✅易于扩展大量目标
✅易于在多个地方同步结果
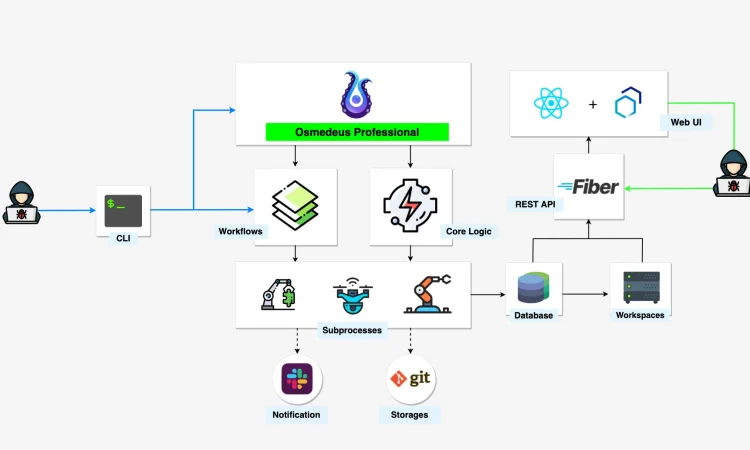
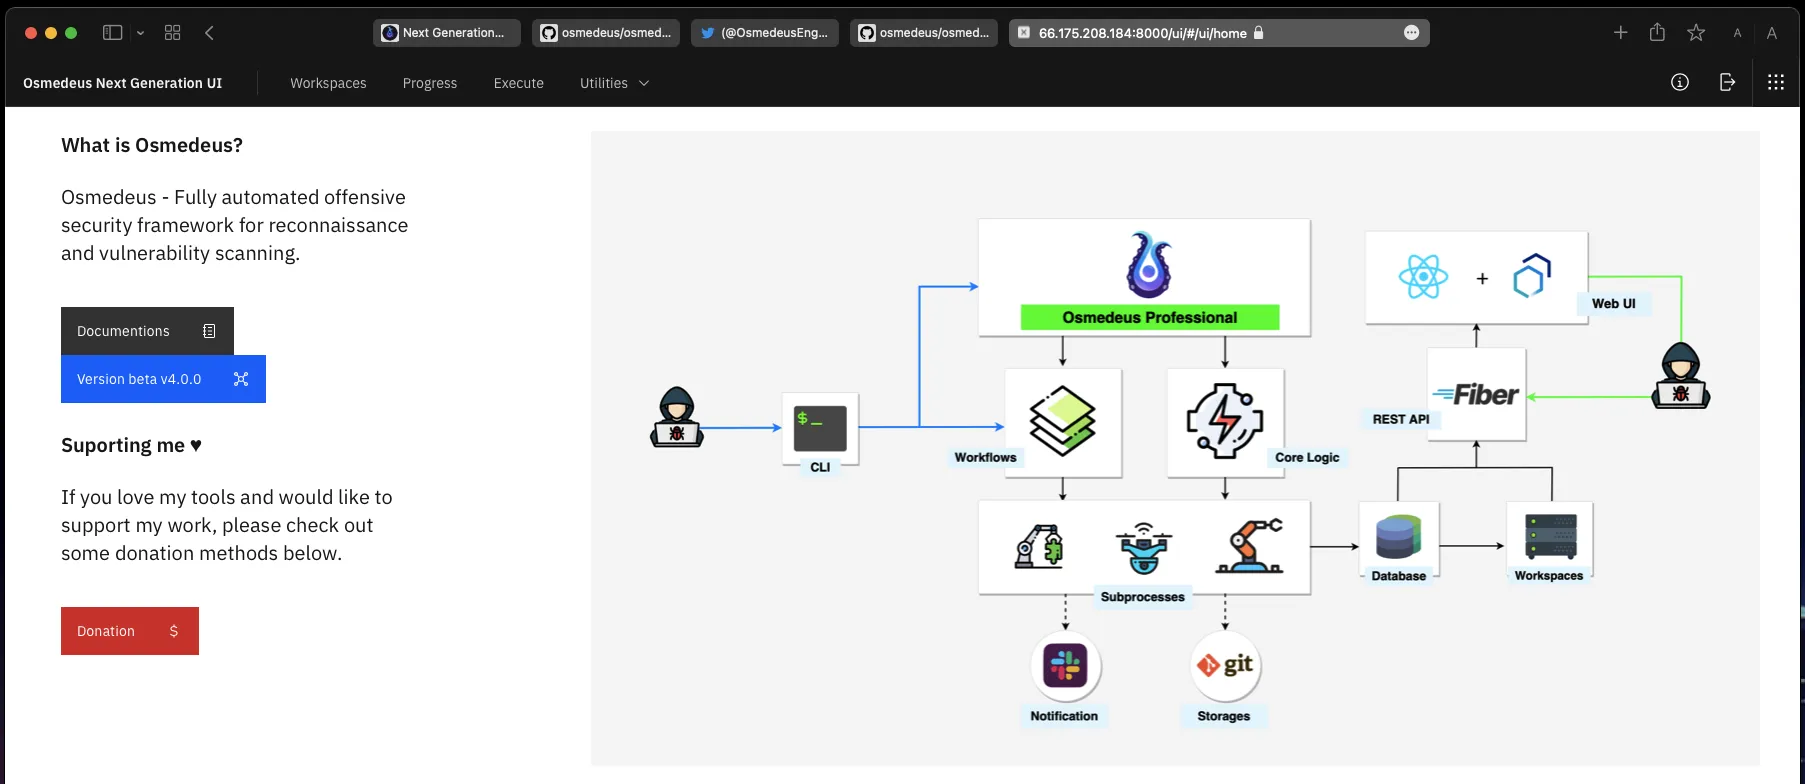
Osmedeus 构造原理
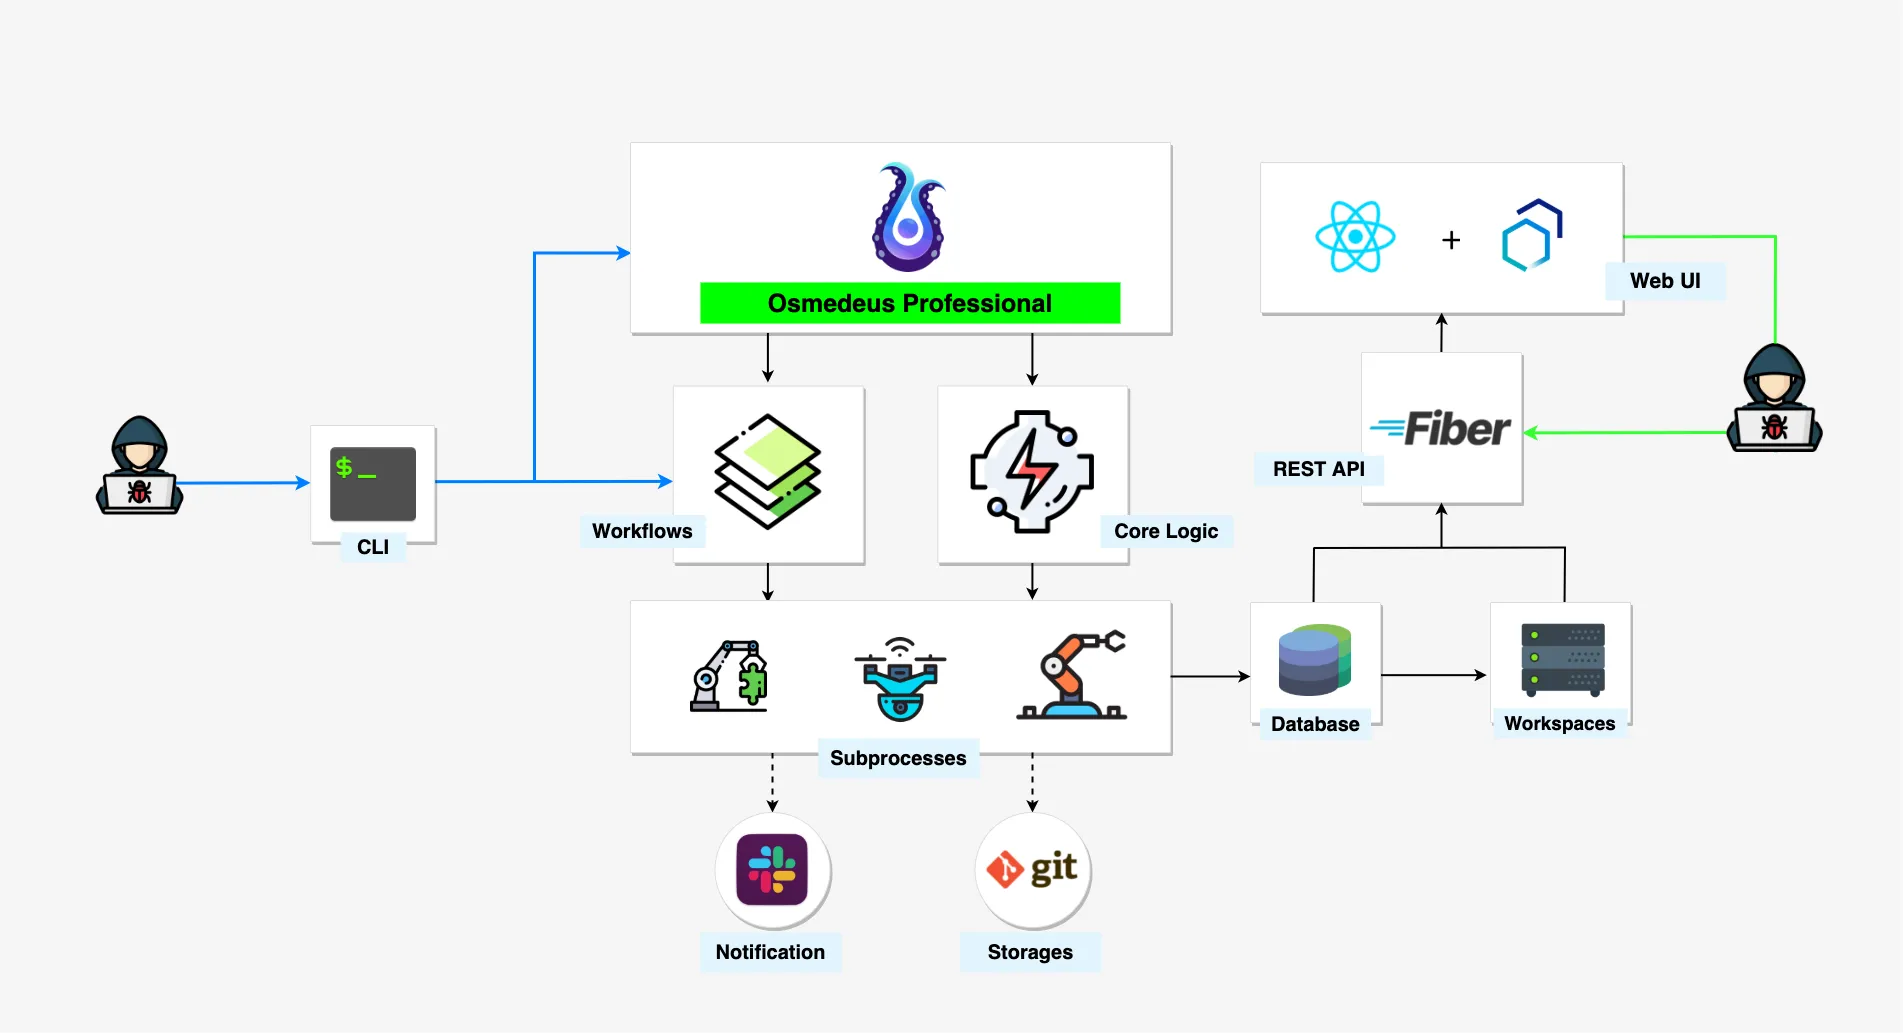
结构如下:

该工具有两个主要组件:
用 Golang 编写的核心引擎,负责处理所有逻辑和工作流程,它是描述您的方法的 YAML 文件的集合
目标可以是域、url、IP、CIDR 或任何适合您工作流程的内容。
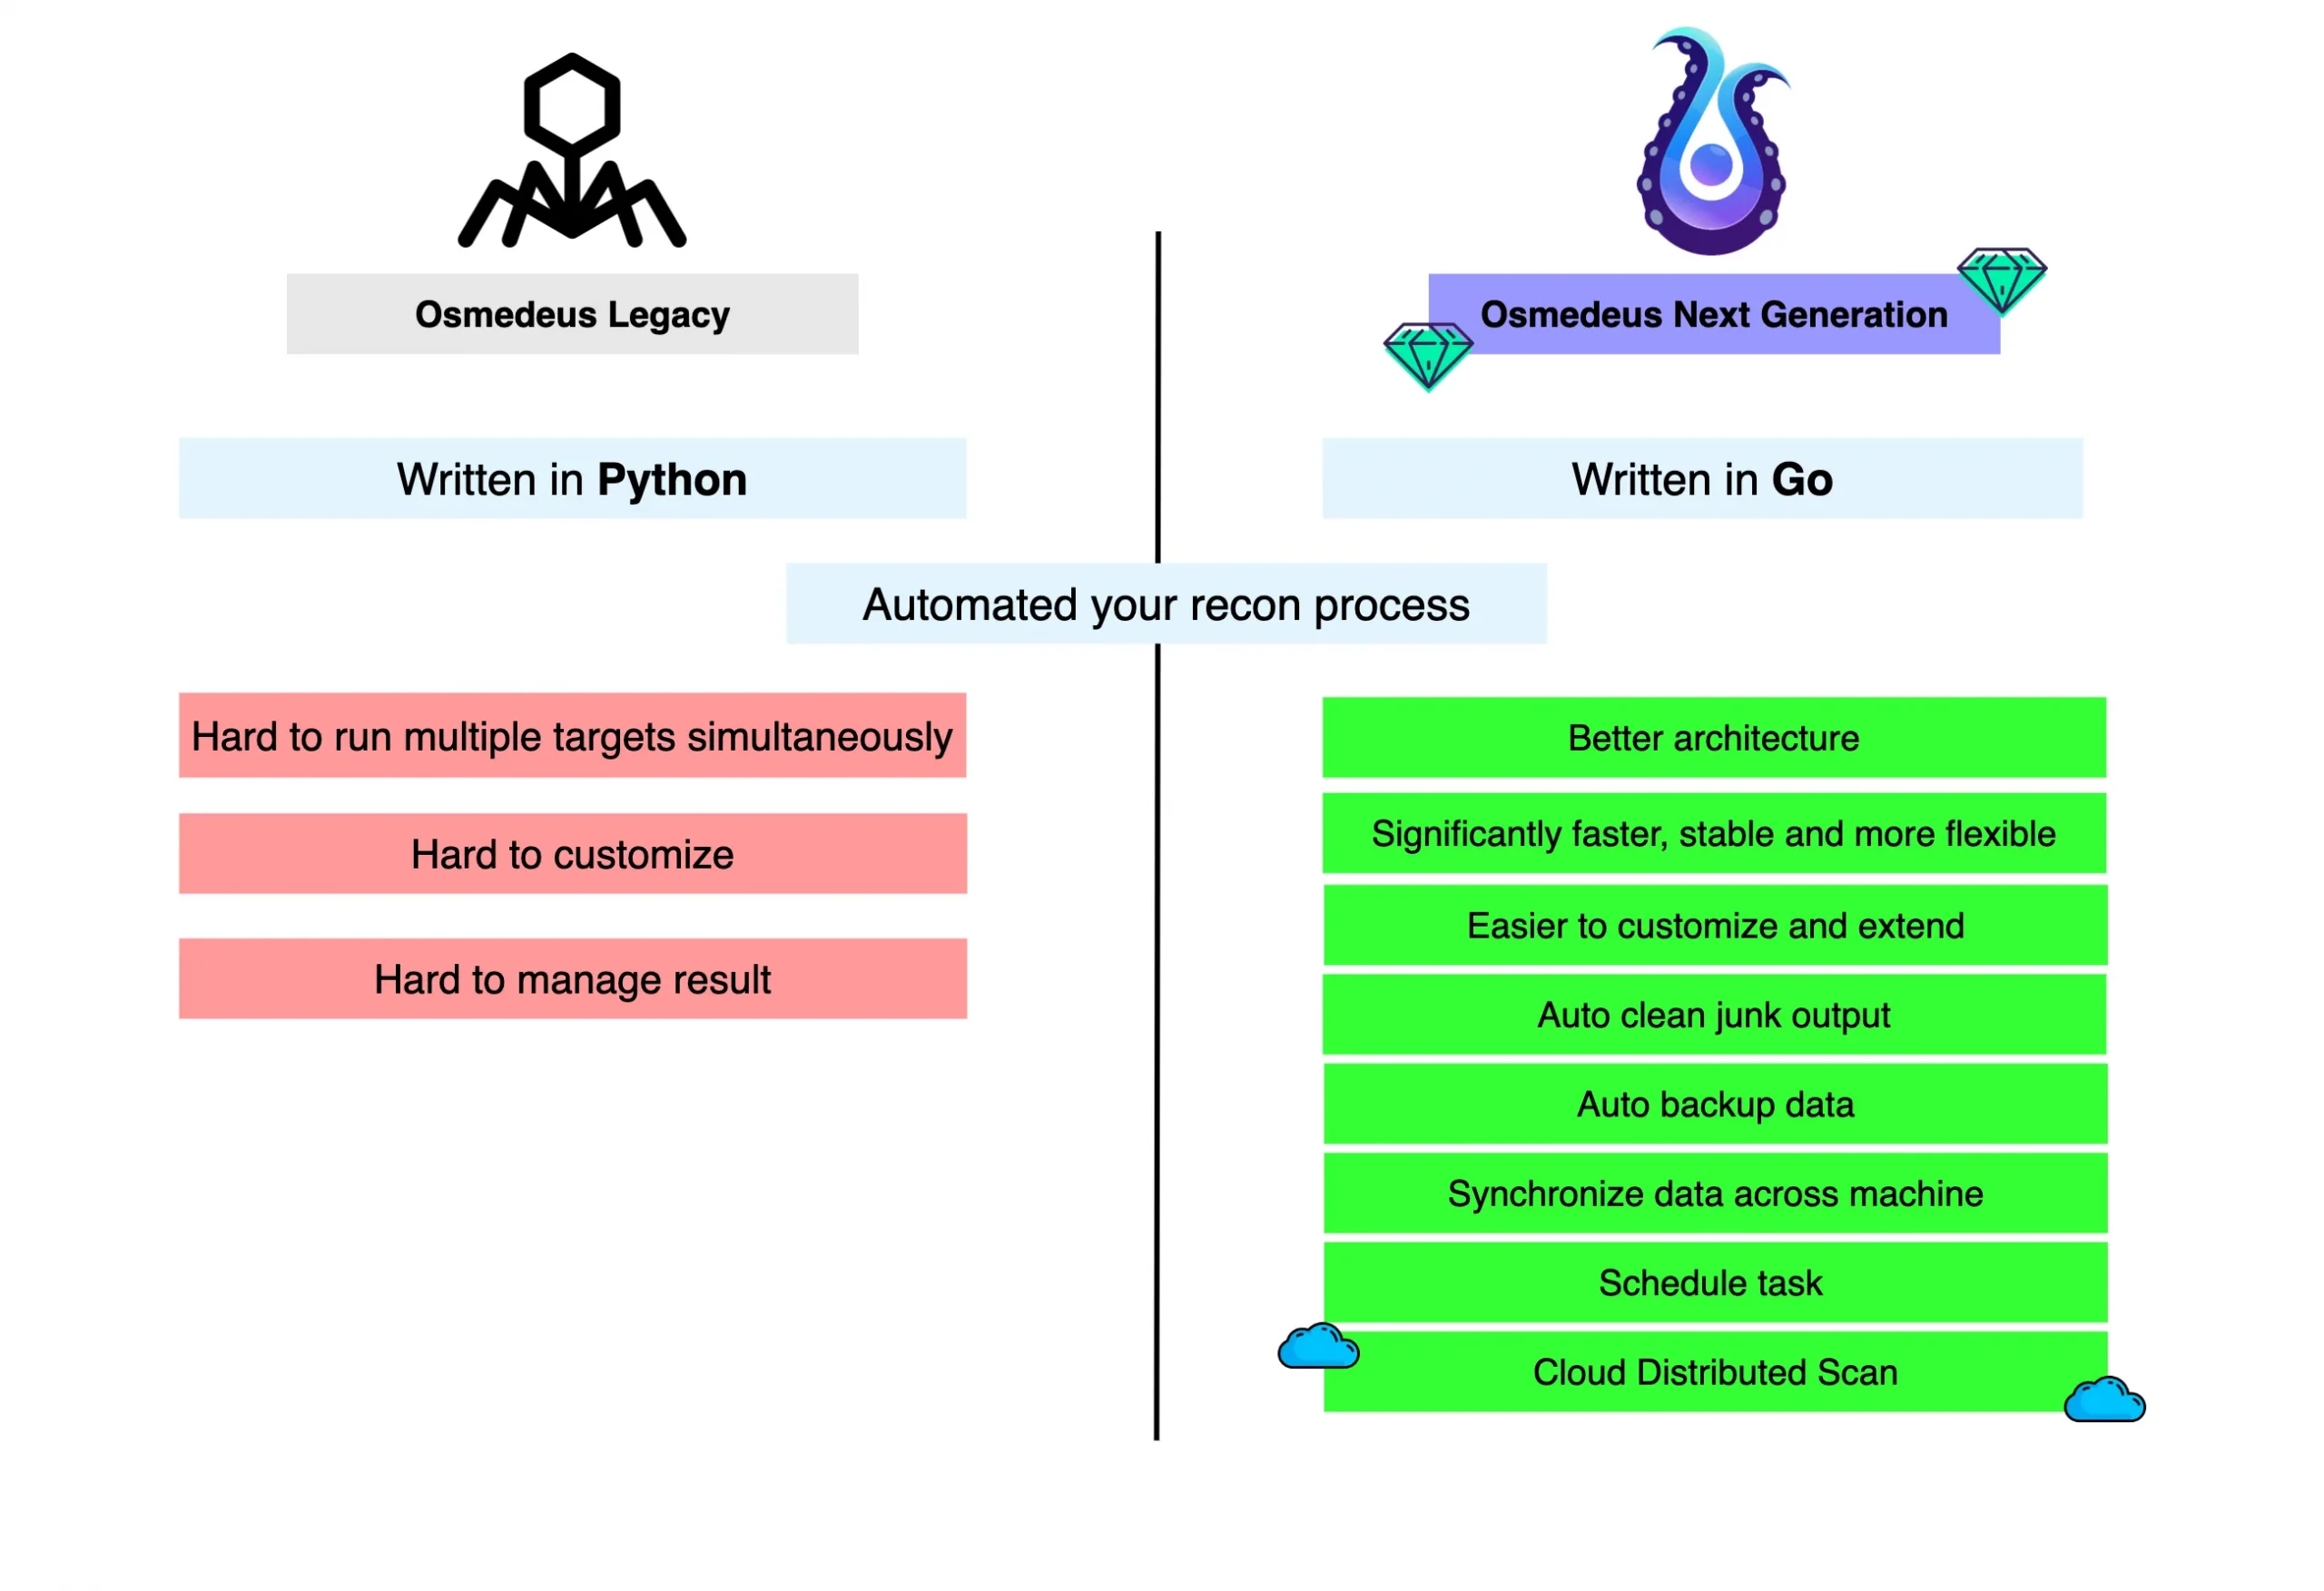
新旧版本比较
Osmedeus下载地址
①GitHub
https://github.com/osmedeus.zip
②云中转网盘:
https://yzzpan.com/#sharefile=dXfDoveH_26639
解压密码:www.ddosi.org
Osmedeus安装方法
从基础存储库安装
请注意,您需要一些基本工具,例如curl, wget, git, zip, tmux并以root身份登录才能启动
bash -c "$(curl -fsSL https://raw.githubusercontent.com/osmedeus/osmedeus-base/master/install.sh)"从构建版本安装
请确保您登录为root,否则运行sudo su第一然后把build-osm.zip任何文件夹(如:/opt/)
unzip -q build-osm.zip && cd build-osm
./build.sh

# 使用运行状况命令验证安装
osmedeus health
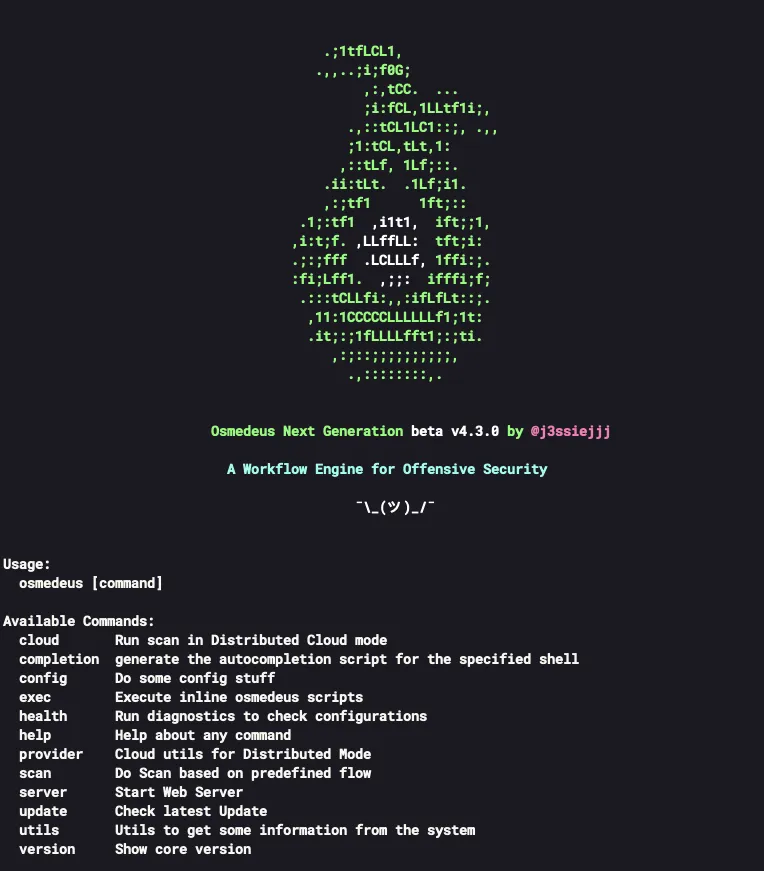
验证安装过程
只需运行命令osmedeus health。如果您看到如下图所示的内容,则表示安装过程已成功。

如果您看到此消息,安装过程仍然成功。这只是众多高级功能之一
[-] Cloud config setup incorrectly. If you install osmedeus on a single machine then it's okay to ignore the cloud setup
Osmedeus使用方法
示例命令的实际用法
# 实际使用情况:
osmedeus scan -f [flowName] -t [target]
osmedeus scan -f [flowName] -T [targetsFile]
osmedeus scan -f /path/to/flow.yaml -t [target]
osmedeus scan -m /path/to/module.yaml -t [target] --params 'port=9200'
osmedeus scan -m /path/to/module.yaml -t [target] -l /tmp/log.log
cat targets | osmedeus scan -f sample
# 云的使用:
osmedeus provider build
osmedeus cloud -f [flowName] -t [target]
osmedeus cloud -c 10 -f [flowName] -T [targetsFile]
osmedeus cloud --chunk -c 10 -f [flowName] -t [targetsFile]
# 示例命令:
osmedeus scan -t target.com
osmedeus scan -T list_of_targets.txt -W custom_workspaces
osmedeus scan -t target.com -w workspace_name --debug
osmedeus scan -f single -t www.sample.com
osmedeus scan -f ovuln-T list_of_target.txt
osmedeus scan -m ~/osmedeus-base/workflow/direct-module/dirbscan.yaml -t http-file.txt
ls ~/.osmedeus/storages/summary/ | osmedeus scan -m ~/osmedeus-base/workflow/test/dirbscan.yaml
ls ~/.osmedeus/storages/summary/ | osmedeus scan -m ~/osmedeus-base/workflow/test/busting.yaml -D
# 私人文档可以在这里找到: https://frosty-minsky-779bed.netlify.app/introduction/
# 启动Web UI https://localhost:8000/ui/
osmedeus server
# 登陆凭证位置 `~/.osmedeus/config.yaml`
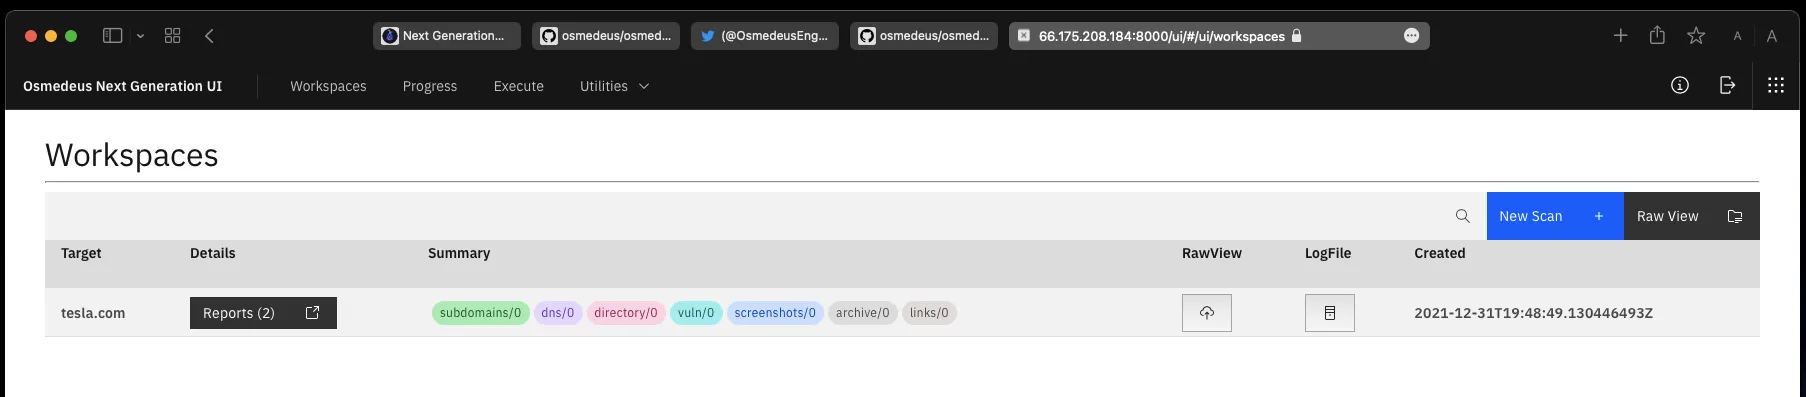
# 删除工作空间
osmedeus config delete -w workspace_name
help – 关于任何命令的帮助
osmedeus help
osmedeus scan help
scan – 根据预定义的工作流程实际开始扫描
# 实际扫描用法:

## 使用默认的“常规”流程启动简单扫描 (general)
osmedeus scan -t sample.com

## 直接用输入为http域列表的模块启动扫描 https://sub.example.com
osmedeus scan -m ~/osmedeus-base/workflow/direct-module/dirbscan.yaml -t http-file.txt

## 启动常规扫描,但排除一些模块
osmedeus scan -t sample.com -x screenshot -x spider

## 用其他流启动简单扫描
osmedeus scan -f vuln -t sample.com

## 扫描CIDR的文件包含CIDR的格式 '1.2.3.4/24'
osmedeus scan -f cidr -t list-of-cidrs.txt
osmedeus scan -f cidr -t '1.2.3.4/24' # this will auto convert the single input to the file and run

## 直接在域列表上运行漏洞扫描和目录扫描
osmedeus scan -f vuln-and-dirb -t list-of-domains.txt

## 直接运行一般扫描,但没有子域枚举扫描的域列表
osmedeus scan -f domains -t list-of-domains.txt

## 使用自定义字典表
osmedeus scan -t sample.com -p 'wordlists={{.Data}}/wordlists/content/big.txt' -p 'fthreads=40'

## 扫描目标列表
osmedeus scan -T list_of_targets.txt

## 从标准输入中获取目标,并以2并发启动扫描
cat list_of_targets.txt | osmedeus scan -c 2
server – 启动 Web UI 服务器
osmedeus server --port 9000utils – 从系统获取一些信息的实用程序
osmedeus utils tmux ls
osmedeus utils tmux logs -A -l 10
osmedeus utils ps
osmedeus utils ps --proc 'jaeles'
osmedeus utils cron --cmd 'osmdeus scan -t example.com' --sch 60
osmedeus utils cron --for --cmd 'osmedeus scan -t example.com'
健康 – 运行诊断以检查配置
osmedeus health
osmedeus health cloud --debug
osmedeus health git --debug
cloud – 在分布式云模式下运行扫描
# 云用法
  osmedeus cloud -f [flowName] -t [target]
  osmedeus cloud -m [modulePath] -t [target]
  osmedeus cloud -c 10 -f [flowName] -T [targetsFile]
  osmedeus cloud --token xxx -G -c 10 -f [flowName] -T [targetsFile]
  osmedeus cloud --chunk -c 10 -f [flowName] -t [targetsFile]
provider – 分布式模式的云工具
# 供应商用法
osmedeus provider build
osmedeus provider build --token xxx --rebuild --ic
osmedeus provider create --name 'sample'
osmedeus provider health --debug
网页界面(实验性)
启动一个网络服务器
打开一个新的终端或 tmux 并运行
osmedeus server服务器将在此处的HTTPS URL处可用:https://your-vps-ip:8000/ui/
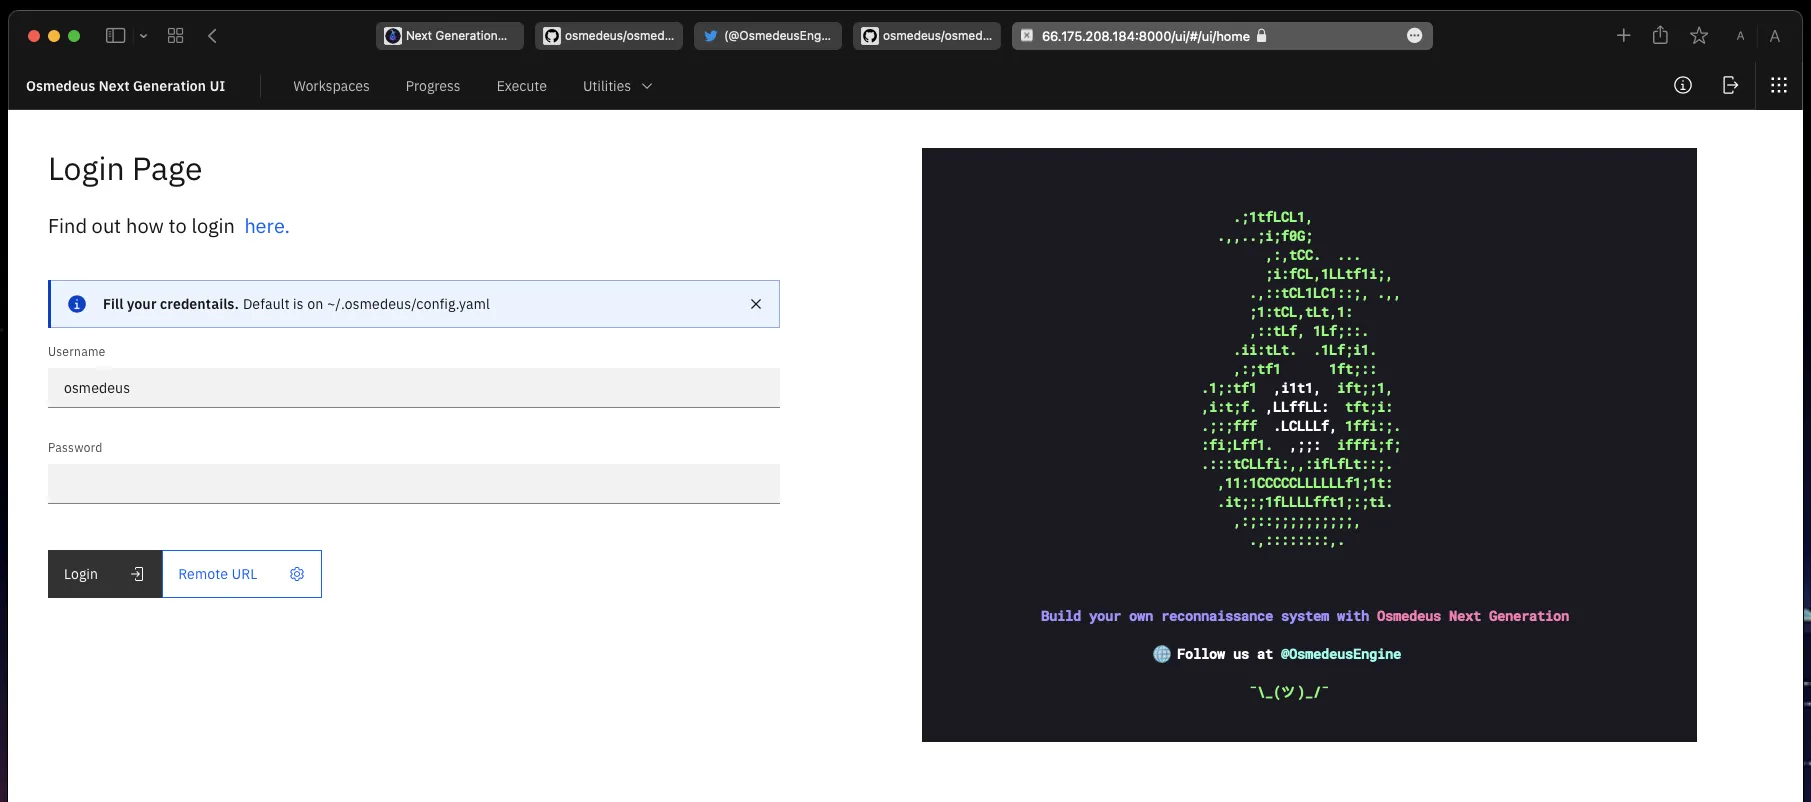
然后从此文件中获取凭据。
cat ~/.osmedeus/config.yaml

...
client:
  password: xxxx
  username: osmedeus
...
设置令牌和 API 密钥
请注意,此设置是可选的。没有它,您仍然可以完美地使用该工具!
下面的 Osmedeus 中有一些地方会存放token
主令牌文件
默认情况下,所有主要令牌都将存储在 ~/osmedeus-base/token/osm-default.rc
令牌文件中有一些基本令牌。- github 搜索需要 Github 令牌。- 所有的TELEGRAM_都是为了通知。
# Set github token for run github scan
export GITHUB_TOKEN=xxx,xxxx

# for telegram
export TELEGRAM_API_TOKEN=1111114500:AAGx
## use this command to get channel ID
## curl 'https://api.telegram.org/bot$TELEGRAM_API_TOKEN/sendMessage?chat_id=@osmpReports&text=hello'
export TELEGRAM_CHANNEL=-100XXXXX
export TELEGRAM_STATUS_CHANNEL=-100XXXXX
export TELEGRAM_REPORT_CHANNEL=-100XXXXX
export TELEGRAM_SENSITIVE_CHANNEL=-100XXXXX
export TELEGRAM_DIRB_CHANNEL=-100XXXXX
export TELEGRAM_MICS_CHANNEL=-100XXXXX
修改令牌后,运行以下命令将令牌重新加载到 osmedeus config.yaml
# or edit file osm-default.rc
# add osmedeus-base/token/osm-default.rc to your ~/.bashrc file
echo 'source $HOME/osmedeus-base/token/osm-default.rc' >> ~/.bashrc && source ~/.bashrc

# reload config to osmedeus
osmedeus config reload
积累配置
默认情况下,Amass 配置将存储在 ~/osmedeus-base/data/configs/amass.ini
通知
请注意,此设置是可选的。没有它,您仍然可以完美地使用该工具!
电报通知


您可以在设置令牌和 API 密钥中设置电报令牌
设置存储
请注意,此设置是可选的。没有它,您仍然可以完美地使用该工具!
请关注此视频以获取更多详细信息。
您所有的存储设置都将存储在 ~/osmedeus-base/token/storages-alias.rc
修改 Storages Config 文件内容
创建您的 SSH 密钥并添加到可以访问以下所有存储库的用户。将该密钥另存为~/.osmedeus/secret_key.private
# for storages
export SECRET_KEY=~/.osmedeus/secret_key.private
# core one
export [email protected]:not-j3ssie/your-osmd-summary
export [email protected]:not-j3ssie/your-osmd-vuln
export [email protected]:not-j3ssie/your-osmd-paths
export [email protected]:not-j3ssie/your-osmd-http

# mics one
export [email protected]:not-j3ssie/your-osmd-assets
export [email protected]:not-j3ssie/your-osmd-ports
export [email protected]:not-j3ssie/your-osmd-subdomain
请更改您的用户名和存储库名称
请注意,这not-j3ssie是您的 gitlab 用户名,your-osmd-summary也是您的 Gitlab 存储库名称。
如果您之前不使用 git,请在下面运行这些命令
git config --global user.name "your_gitlab_user"
git config --global user.email "[email protected]"
将存储变量加载到 Osmedeus 配置
# or edit file storages-alias.rc
# add osmedeus-base/storages-alias.rc to your ~/.bashrc file
echo 'source $HOME/osmedeus-base/token/storages-alias.rc' >> ~/.bashrc && source ~/.bashrc

# reload config to osmedeus
osmedeus config reload

# finally you can check the content of ~/.osmedeus/config.yaml file
# to see if config actually change or not like below
cat ~/.osmedeus/config.yaml

# The content should be showed like this
# ...
# storages:
# ...
#   summary_repo: [email protected]:j3ssie/dosm-summary
#   summary_storage: ~/.osmedeus/storages/summary
# ...

# now run the health check again it will clone the
osmedeus health


# then check out your storages folder at `~/.osmedeus/storages`
ls ~/.osmedeus/storages/summary/
docker运行用法
docker run -it j3ssie/osmedeus:latest scan -t example.com官网地址
项目地址
https://github.com/osmedeus/osmedeus-base
转载请注明出处及链接