
目录导航
transfer.sh介绍
transfer.sh是一个从命令行窗口快速上传文件的系统,相当于一个linux网盘系统,只需要输入命令即可快速上传文件到transfer.sh 分享给别人.
Transfer.sh 目前支持 s3 (Amazon S3)、gdrive (Google Drive)、storj (Storj) 供应商和本地文件系统 (local).
Transfer.sh特色:
- 使用shell上传文件
- 使用url共享文件
- 可无限上传文件
- 文件存储时间为 336h0m0s (28天)
- 免费使用
- 文件传输可加密
- 最大化下载
使用方法
①上传命令
比如我们要上传 www.ddosi.org.txt 这个文件,使用如下命令即可
curl --upload-file ./www.ddosi.org.txt https://transfer.sh/www.ddosi.org.txt
上传成功的话下面会显示出上传的文件url,浏览器直接访问这个url即可下载文件:
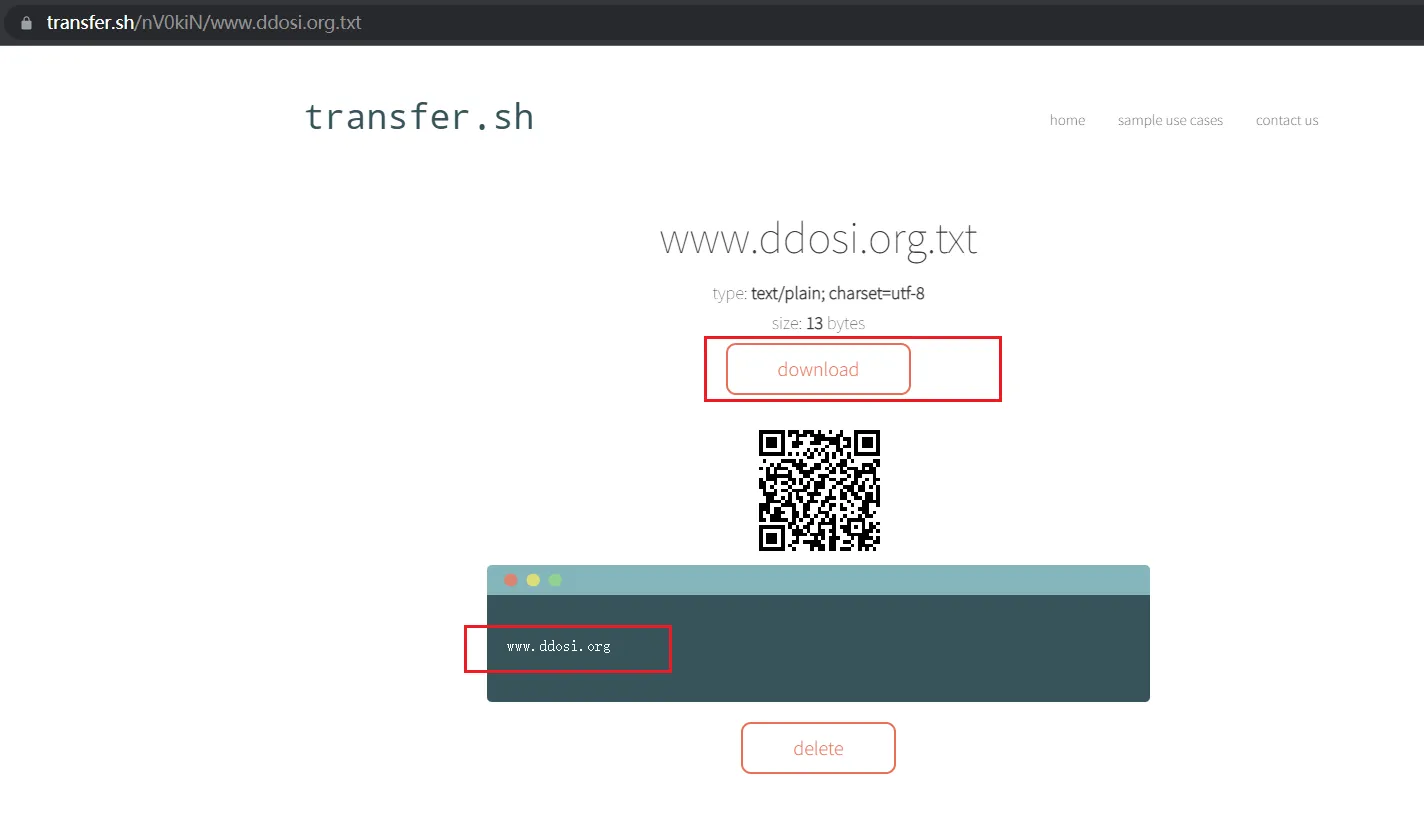
②下载命令:
不使用浏览器,直接使用shell命令下载文件并保存到root目录下:
curl https://transfer.sh/nV0kiN/www.ddosi.org.txt > /root/ddosi.org.txt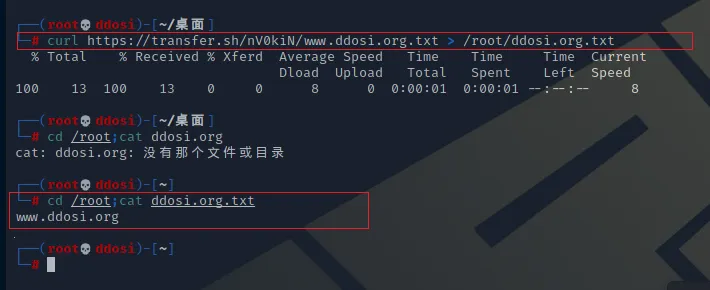
其他更多使用示例:
使用 wget 上传
wget --method PUT --body-file=/tmp/file.tar https://transfer.sh/file.tar -O - -nv
使用 PowerShell 上传
PS H:\> invoke-webrequest -method put -infile .\file.txt https://transfer.sh/file.txt
使用 HTTPie 上传
http https://transfer.sh/ -vv < /tmp/test.log
上传过滤的文本文件
grep 'pound' /var/log/syslog | curl --upload-file - https://transfer.sh/pound.log
使用 curl 下载
curl https://transfer.sh/1lDau/test.txt -o test.txt
使用 wget 下载
wget https://transfer.sh/1lDau/test.txt
限制下载次数
$ curl --upload-file ./hello.txt https://transfer.sh/hello.txt -H "Max-Downloads: 1" #限制下载次数,下载次数为1设置文件过期时间
$ curl --upload-file ./hello.txt https://transfer.sh/hello.txt -H "Max-Days: 1" # 设置删除前的天数,1天.存档和备份
备份、加密和传输 MySQL 转储
mysqldump --all-databases | gzip | gpg -ac -o- | curl -X PUT --upload-file "-" https://transfer.sh/test.txt
存档和上传目录
tar -czf - /var/log/journal | curl --upload-file - https://transfer.sh/journal.tar.gz
一次上传多个文件
curl -i -F filedata=@/tmp/hello.txt -F filedata=@/tmp/hello2.txt https://transfer.sh/
将下载合并为 zip 或 tar.gz 存档
curl https://transfer.sh/(15HKz/hello.txt,15HKz/hello.txt).tar.gz
curl https://transfer.sh/(15HKz/hello.txt,15HKz/hello.txt).zip
传输和发送带有链接的电子邮件(使用别名)
transfer /tmp/hello.txt | mail -s "Hello World" [email protected]
使用Windows脚本上传文件/目录
把如下代码保存为.cmd文件,运行即可
@echo off
setlocal EnableDelayedExpansion EnableExtensions
goto main
:usage
echo No arguments specified. >&2
echo Usage: >&2
echo transfer ^<file^|directory^> >&2
echo ... ^| transfer ^<file_name^> >&2
exit /b 1
:main
if "%~1" == "" goto usage
timeout.exe /t 0 >nul 2>nul || goto not_tty
set "file=%~1"
for %%A in ("%file%") do set "file_name=%%~nxA"
if exist "%file_name%" goto file_exists
echo %file%: No such file or directory >&2
exit /b 1
:file_exists
if not exist "%file%\" goto not_a_directory
set "file_name=%file_name%.zip"
pushd "%file%" || exit /b 1
set "full_name=%temp%\%file_name%"
powershell.exe -Command "Get-ChildItem -Path . -Recurse | Compress-Archive -DestinationPath ""%full_name%"""
curl.exe --progress-bar --upload-file "%full_name%" "https://transfer.sh/%file_name%"
popd
goto :eof
:not_a_directory
curl.exe --progress-bar --upload-file "%file%" "https://transfer.sh/%file_name%"
goto :eof
:not_tty
set "file_name=%~1"
curl.exe --progress-bar --upload-file - "https://transfer.sh/%file_name%"
goto :eof
加密和解密
使用 gpg密码加密文件
cat /tmp/hello.txt | gpg -ac -o- | curl -X PUT --upload-file "-" https://transfer.sh/test.txt
下载和解密
curl https://transfer.sh/1lDau/test.txt | gpg -o- > /tmp/hello.txt
从密钥库导入密钥
keybase track [them] # 加密的收件人(s)
cat somebackupfile.tar.gz | keybase encrypt [them] | curl --upload-file '-' https://transfer.sh/test.txt # 解密
curl https://transfer.sh/sqUFi/test.md | keybase decrypt
病毒扫描
使用 Clamav 扫描恶意软件或病毒
wget http://www.eicar.org/download/eicar.com
curl -X PUT --upload-file ./eicar.com https://transfer.sh/eicar.com/scan
将恶意软件上传到 VirusTotal,获得永久链接
curl -X PUT --upload-file nhgbhhj https://transfer.sh/test.txt/virustotal
上传和复制下载命令
使用 transfer.sh 上传文件后,下载命令可以自动复制到剪贴板。
它是为 Linux 或 macOS 设计的。
1、安装xclip或者xsel for Linux,macOS跳过这一步
稍后安装,将 pbcopy 和 pbpaste 添加到 .bashrc 或 .zshrc 或其等效项。
- 如果使用 xclip,请粘贴以下行:
alias pbcopy='xclip -selection clipboard'
alias pbpaste='xclip -selection clipboard -o'
- 如果使用 xsel,请粘贴以下行:
alias pbcopy='xsel --clipboard --input'
alias pbpaste='xsel --clipboard --output'
2.增加上传和复制下载命令shell功能
- 打开 .bashrc 或 .zshrc 或其等效项。
- 添加以下 shell 脚本:
transfer() {
  curl --progress-bar --upload-file "$1" https://transfer.sh/$(basename "$1") | pbcopy;
  echo "1) Download link:"
  echo "$(pbpaste)"

  echo "\n2) Linux or macOS download command:"
  linux_macos_download_command="wget $(pbpaste)"
  echo $linux_macos_download_command

  echo "\n3) Windows download command:"
  windows_download_command="Invoke-WebRequest -Uri "$(pbpaste)" -OutFile $(basename $1)"
  echo $windows_download_command

  case $2 in
    l|m)  echo $linux_macos_download_command | pbcopy
    ;;
    w)  echo $windows_download_command | pbcopy
    ;;
  esac
}
3. 测试
传输命令有两个参数:
- 第一个参数是上传文件的路径。
- 第二个参数表示复制哪个系统的下载命令。可选的:
- 该参数为空复制下载链接。
l或m复制下载文件的 Linux 或 macOS 命令。w复制下载文件的 Windows 命令。
例如,在 Windows 上下载文件的命令将被复制:
$ transfer ~/temp/a.log w
######################################################################## 100.0%
1) 下载链接:
https://transfer.sh/y0qr2c/a.log

2) Linux 或 macOS下载命令:
wget https://transfer.sh/y0qr2c/a.log

3) Windows下载命令:
Invoke-WebRequest -Uri https://transfer.sh/y0qr2c/a.log -OutFile a.log
参数
| 范围 | 描述 | 值 | 环境 |
|---|---|---|---|
| listener | 用于 http (:80) 的端口 | LISTENER | |
| profile-listener | 用于分析器的端口(:6060) | PROFILE_LISTENER | |
| force-https | 重定向到 https | false | FORCE_HTTPS |
| tls-listener | 用于 https 的端口 (:443) | TLS_LISTENER | |
| tls-listener-only | 仅启用 tls 侦听器的标志 | TLS_LISTENER_ONLY | |
| tls-cert-file | tls证书的路径 | TLS_CERT_FILE | |
| tls-private-key | tls 私钥的路径 | TLS_PRIVATE_KEY | |
| http-auth-user | 上传时进行基本 http 身份验证的用户 | HTTP_AUTH_USER | |
| http-auth-pass | 上传时通过基本 http 身份验证 | HTTP_AUTH_PASS | |
| ip-whitelist | 允许连接到服务的 ip 的逗号分隔列表 | IP_WHITELIST | |
| ip-blacklist | 逗号分隔的 ips 列表不允许连接到服务 | IP_BLACKLIST | |
| temp-path | 临时文件夹的路径 | system temp | TEMP_PATH |
| web-path | 静态 Web 文件的路径(用于开发或自定义前端) | WEB_PATH | |
| proxy-path | 服务在代理后面运行时的路径前缀 | PROXY_PATH | |
| proxy-port | 当服务在代理后面运行时代理的端口 | PROXY_PORT | |
| email-contact | 前端的电子邮件联系方式 | EMAIL_CONTACT | |
| ga-key | 前端的谷歌分析密钥 | GA_KEY | |
| provider | 使用哪个存储提供程序 | (s3, storj, gdrive 或 local) | |
| uservoice-key | 前端用户语音键 | USERVOICE_KEY | |
| aws-access-key | aws 访问密钥 | AWS_ACCESS_KEY | |
| aws-secret-key | aws 访问密钥 | AWS_SECRET_KEY | |
| bucket | aws 存储桶 | BUCKET | |
| s3-endpoint | 自定义 S3 端点。 | S3_ENDPOINT | |
| s3-region | s3 存储桶的区域 | eu-west-1 | S3_REGION |
| s3-no-multipart | 禁用 s3 分段上传 | false | S3_NO_MULTIPART |
| s3-path-style | 强制路径样式 URL,Minio 需要。 | false | S3_PATH_STYLE |
| storj-access | 项目访问 | STORJ_ACCESS | |
| storj-bucket | 在项目中使用的桶 | STORJ_BUCKET | |
| basedir | 本地/gdrive 提供程序的路径存储 | BASEDIR | |
| gdrive-client-json-filepath | gdrive 提供程序的 oauth 客户端 json 配置的路径 | GDRIVE_CLIENT_JSON_FILEPATH | |
| gdrive-local-config-path | 为 gdrive 提供程序存储本地 transfer.sh 配置缓存的路径 | GDRIVE_LOCAL_CONFIG_PATH | |
| gdrive-chunk-size | gdrive 上传的块大小(以 MB 为单位),必须小于可用内存 (8 MB) | GDRIVE_CHUNK_SIZE | |
| lets-encrypt-hosts | 用于加密证书的主机(逗号分隔) | HOSTS | |
| log | 日志文件的路径 | LOG | |
| cors-domains | 逗号分隔的 CORS 域列表,将其设置为启用 CORS | CORS_DOMAINS | |
| clamav-host | clamav 功能的主机 | CLAMAV_HOST | |
| perform-clamav-prescan | 通过 clamav 功能预扫描每次上传(clamav-host 必须是本地 clamd unix 套接字) | PERFORM_CLAMAV_PRESCAN | |
| rate-limit | 每分钟请求 | RATE_LIMIT | |
| max-upload-size | 最大上传大小(以千字节为单位) | MAX_UPLOAD_SIZE | |
| purge-days | 自动清除上传后的天数 | PURGE_DAYS | |
| purge-interval | 运行自动清除的时间间隔(不适用于 S3 和 Storj) | PURGE_INTERVAL | |
| random-token-length | 上传路径的随机令牌长度(删除路径大小的两倍) | 6 | RANDOM_TOKEN_LENGTH |
如果您想使用 TLS 加密证书,请将lets-encrypt-hosts设置为您的域,将tls-listener设置为:443并启用force-https。
如果您想通过自己的证书使用 TLS,请将 tls-listener 设置为 :443、force-https、tls-cert-file 和 tls-private-key。
安装方法
配置环境
切换到GO111MODULE
go run main.go --provider=local --listener :8080 --temp-path=/tmp/ --basedir=/tmp/
构建
git clone [email protected]:dutchcoders/transfer.sh.git
cd transfer.sh
go build -o transfersh main.go
Docker安装方法
docker run --publish 8080:8080 dutchcoders/transfer.sh:latest --provider local --basedir /tmp/S3 使用方法
对于使用 AWS S3 存储桶,您只需指定以下选项:
- provider
- aws-access-key
- aws-secret-key
- bucket
- s3-region
如果您指定 s3 区域,则无需设置端点 URL,因为将自动使用正确的端点。
自定义 S3 提供程序
要使用自定义的非 AWS S3 提供商,您需要指定您的云提供商定义的终端节点。
Storj 网络提供商
要将 Storj 网络用作存储提供程序,您需要指定以下标志:
- 提供者
--provider storj - storj-access (通过标志或环境变量 STORJ_ACCESS)
- storj-bucket (通过标志或环境变量 STORJ_BUCKET)
创建存储桶和范围
您需要创建一个访问授权(或从上行链路配置中复制它)和一个存储桶以进行准备。
要开始使用,请登录您的帐户并转到访问授权菜单并启动右上角的向导。
输入您选择的访问授权名称,点击下一步并根据需要/首选限制它。然后在 CLI 或浏览器中继续。接下来,您将被要求提供用作加密密钥的密码。 确保将其保存在安全的地方。没有它,您将失去解密文件的能力!
之后,您可以复制访问权限,然后启动 transfer.sh 端点。建议同时提供访问授权和存储桶名称作为 ENV 变量以增强安全性。
例子:
export STORJ_BUCKET=<BUCKET NAME>
export STORJ_ACCESS=<ACCESS GRANT>
transfer.sh --provider storj
Google 云端硬盘使用情况
对于 Google 驱动器的使用,您需要指定以下选项:
- provider
- gdrive-client-json-filepath
- gdrive-local-config-path
- basedir
创建 Gdrive 客户端 Json
您需要从 console.cloud.google.com 创建一个 OAuth 客户端 ID,下载文件并将其放入安全目录。
使用示例
go run main.go --provider gdrive --basedir /tmp/ --gdrive-client-json-filepath /[credential_dir] --gdrive-local-config-path [directory_to_save_config]transfer.sh下载地址
GitHub:
- transfersh-v1.3.1-android-arm64-v8a26.9 MB
- transfersh-v1.3.1-android-arm64-v8a.sha256sum103 Bytes
- transfersh-v1.3.1-android-arm64-v8a.tar.gz7.85 MB
- transfersh-v1.3.1-android-arm64-v8a.tar.gz.sha256sum110 Bytes
- transfersh-v1.3.1-darwin-amd6423.4 MB
- transfersh-v1.3.1-darwin-amd64.sha256sum98 Bytes
- transfersh-v1.3.1-darwin-amd64.tar.gz7.71 MB
- transfersh-v1.3.1-darwin-amd64.tar.gz.sha256sum105 Bytes
- transfersh-v1.3.1-darwin-arm6424.4 MB
- transfersh-v1.3.1-darwin-arm64.sha256sum98 Bytes
- transfersh-v1.3.1-darwin-arm64.tar.gz7.62 MB
- transfersh-v1.3.1-darwin-arm64.tar.gz.sha256sum105 Bytes
- transfersh-v1.3.1-dragonfly-amd6422.7 MB
- transfersh-v1.3.1-dragonfly-amd64.sha256sum101 Bytes
- transfersh-v1.3.1-dragonfly-amd64.tar.gz7.51 MB
- transfersh-v1.3.1-dragonfly-amd64.tar.gz.sha256sum108 Bytes
- transfersh-v1.3.1-freebsd-38618.6 MB
- transfersh-v1.3.1-freebsd-386.sha256sum97 Bytes
- transfersh-v1.3.1-freebsd-386.tar.gz6.86 MB
- transfersh-v1.3.1-freebsd-386.tar.gz.sha256sum104 Bytes
- transfersh-v1.3.1-freebsd-amd6422.7 MB
- transfersh-v1.3.1-freebsd-amd64.sha256sum99 Bytes
- transfersh-v1.3.1-freebsd-amd64.tar.gz7.52 MB
- transfersh-v1.3.1-freebsd-amd64.tar.gz.sha256sum106 Bytes
- transfersh-v1.3.1-freebsd-arm32-v7a18.8 MB
- transfersh-v1.3.1-freebsd-arm32-v7a.sha256sum103 Bytes
- transfersh-v1.3.1-freebsd-arm32-v7a.tar.gz6.87 MB
- transfersh-v1.3.1-freebsd-arm32-v7a.tar.gz.sha256sum110 Bytes
- transfersh-v1.3.1-freebsd-arm64-v8a21.6 MB
- transfersh-v1.3.1-freebsd-arm64-v8a.sha256sum103 Bytes
- transfersh-v1.3.1-freebsd-arm64-v8a.tar.gz6.85 MB
- transfersh-v1.3.1-freebsd-arm64-v8a.tar.gz.sha256sum110 Bytes
- transfersh-v1.3.1-linux-38618.7 MB
- transfersh-v1.3.1-linux-386.sha256sum95 Bytes
- transfersh-v1.3.1-linux-386.tar.gz6.87 MB
- transfersh-v1.3.1-linux-386.tar.gz.sha256sum102 Bytes
- transfersh-v1.3.1-linux-amd6421.4 MB
- transfersh-v1.3.1-linux-amd64.sha256sum97 Bytes
- transfersh-v1.3.1-linux-amd64.tar.gz7.41 MB
- transfersh-v1.3.1-linux-amd64.tar.gz.sha256sum104 Bytes
- transfersh-v1.3.1-linux-arm32-v518.8 MB
- transfersh-v1.3.1-linux-arm32-v5.sha256sum100 Bytes
- transfersh-v1.3.1-linux-arm32-v5.tar.gz6.89 MB
- transfersh-v1.3.1-linux-arm32-v5.tar.gz.sha256sum107 Bytes
- transfersh-v1.3.1-linux-arm32-v618.8 MB
- transfersh-v1.3.1-linux-arm32-v6.sha256sum100 Bytes
- transfersh-v1.3.1-linux-arm32-v6.tar.gz6.88 MB
- transfersh-v1.3.1-linux-arm32-v6.tar.gz.sha256sum107 Bytes
- transfersh-v1.3.1-linux-arm64-v8a21.6 MB
- transfersh-v1.3.1-linux-arm64-v8a.sha256sum101 Bytes
- transfersh-v1.3.1-linux-arm64-v8a.tar.gz6.85 MB
- transfersh-v1.3.1-linux-arm64-v8a.tar.gz.sha256sum108 Bytes
- transfersh-v1.3.1-linux-armv718.8 MB
- transfersh-v1.3.1-linux-armv7.sha256sum97 Bytes
- transfersh-v1.3.1-linux-armv7.tar.gz6.88 MB
- transfersh-v1.3.1-linux-armv7.tar.gz.sha256sum104 Bytes
- transfersh-v1.3.1-linux-mips3221.2 MB
- transfersh-v1.3.1-linux-mips32.sha256sum98 Bytes
- transfersh-v1.3.1-linux-mips32.tar.gz12.9 MB
- transfersh-v1.3.1-linux-mips32.tar.gz.sha256sum105 Bytes
- transfersh-v1.3.1-linux-mips32le21.2 MB
- transfersh-v1.3.1-linux-mips32le.sha256sum100 Bytes
- transfersh-v1.3.1-linux-mips32le.tar.gz12.7 MB
- transfersh-v1.3.1-linux-mips32le.tar.gz.sha256sum107 Bytes
- transfersh-v1.3.1-linux-mips6422.9 MB
- transfersh-v1.3.1-linux-mips64.sha256sum98 Bytes
- transfersh-v1.3.1-linux-mips64.tar.gz6.43 MB
- transfersh-v1.3.1-linux-mips64.tar.gz.sha256sum105 Bytes
- transfersh-v1.3.1-linux-mips64le22.9 MB
- transfersh-v1.3.1-linux-mips64le.sha256sum100 Bytes
- transfersh-v1.3.1-linux-mips64le.tar.gz6.27 MB
- transfersh-v1.3.1-linux-mips64le.tar.gz.sha256sum107 Bytes
- transfersh-v1.3.1-linux-ppc6421.4 MB
- transfersh-v1.3.1-linux-ppc64.sha256sum97 Bytes
- transfersh-v1.3.1-linux-ppc64.tar.gz6.67 MB
- transfersh-v1.3.1-linux-ppc64.tar.gz.sha256sum104 Bytes
- transfersh-v1.3.1-linux-ppc64le21.4 MB
- transfersh-v1.3.1-linux-ppc64le.sha256sum99 Bytes
- transfersh-v1.3.1-linux-ppc64le.tar.gz6.54 MB
- transfersh-v1.3.1-linux-ppc64le.tar.gz.sha256sum106 Bytes
- transfersh-v1.3.1-linux-riscv6421.6 MB
- transfersh-v1.3.1-linux-riscv64.sha256sum99 Bytes
- transfersh-v1.3.1-linux-riscv64.tar.gz7.22 MB
- transfersh-v1.3.1-linux-riscv64.tar.gz.sha256sum106 Bytes
- transfersh-v1.3.1-linux-s390x21.8 MB
- transfersh-v1.3.1-linux-s390x.sha256sum97 Bytes
- transfersh-v1.3.1-linux-s390x.tar.gz7.2 MB
- transfersh-v1.3.1-linux-s390x.tar.gz.sha256sum104 Bytes
- transfersh-v1.3.1-openbsd-38618.6 MB
- transfersh-v1.3.1-openbsd-386.sha256sum97 Bytes
- transfersh-v1.3.1-openbsd-386.tar.gz6.86 MB
- transfersh-v1.3.1-openbsd-386.tar.gz.sha256sum104 Bytes
- transfersh-v1.3.1-openbsd-amd6422.7 MB
- transfersh-v1.3.1-openbsd-amd64.sha256sum99 Bytes
- transfersh-v1.3.1-openbsd-amd64.tar.gz7.52 MB
- transfersh-v1.3.1-openbsd-amd64.tar.gz.sha256sum106 Bytes
- transfersh-v1.3.1-openbsd-arm32-v7a18.8 MB
- transfersh-v1.3.1-openbsd-arm32-v7a.sha256sum103 Bytes
- transfersh-v1.3.1-openbsd-arm32-v7a.tar.gz6.87 MB
- transfersh-v1.3.1-openbsd-arm32-v7a.tar.gz.sha256sum110 Bytes
- transfersh-v1.3.1-openbsd-arm64-v8a21.6 MB
- transfersh-v1.3.1-openbsd-arm64-v8a.sha256sum103 Bytes
- transfersh-v1.3.1-openbsd-arm64-v8a.tar.gz6.85 MB
- transfersh-v1.3.1-openbsd-arm64-v8a.tar.gz.sha256sum110 Bytes
- transfersh-v1.3.1-windows-386.exe19.6 MB
- transfersh-v1.3.1-windows-386.exe.sha256sum101 Bytes
- transfersh-v1.3.1-windows-386.tar.gz7.19 MB
- transfersh-v1.3.1-windows-386.tar.gz.sha256sum104 Bytes
- transfersh-v1.3.1-windows-amd64.exe22 MB
- transfersh-v1.3.1-windows-amd64.exe.sha256sum103 Bytes
- transfersh-v1.3.1-windows-amd64.tar.gz7.52 MB
- transfersh-v1.3.1-windows-amd64.tar.gz.sha256sum106 Bytes
- transfersh-v1.3.1-windows-arm32-v7a.exe19.4 MB
- transfersh-v1.3.1-windows-arm32-v7a.exe.sha256sum107 Bytes
- transfersh-v1.3.1-windows-arm32-v7a.tar.gz7.06 MB
- transfersh-v1.3.1-windows-arm32-v7a.tar.gz.sha256sum110 Bytes
- Source code (zip)
官网地址:
项目地址:
GitHub:
https://github.com/dutchcoders/transfer.sh/
转载请注明出处及链接